I’ve wanted to do a paulownia wood guitar kit for a long time. And being a bass player myself, this Fistrock Precision-style DIY bass guitar kit really caught my eye. The paulownia is beautiful, easy to finish, and very lightweight. And a bass guitar is one of the easiest kits to assemble. Here is a bass guitar kit I can recommend for any level of kit builder, and especially for beginners.
Fistrock is a quality line of affordable DIY electric guitar kits sold through Amazon. This P-bass kit includes a paulownia wood body and a maple neck with a dyed poplar fingerboard. All of the electronic components are pre-assembled on the pickguard, including the wiring for the pickups, so there is no soldering or even a wire connection that has to be made. After getting the finish I wanted on the body, neck, and headstock, final assembly took less than one hour.
This is the second Fistrock DIY electric guitar kit I have completed. You can read about my Fistrock Strat-style build here. These guys put together a nice, complete package. And buying through Amazon means you can count on fast shipping and high customer service standards. Read why you should consider buying your kits at Amazon here.
What’s In The Box

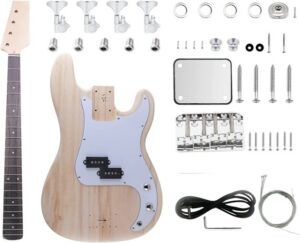
Here is a picture from the Amazon website of the Fistrock P-bass DIY guitar kit I purchased. As is typical, there are three individual boxes inside one larger shipping box. The body is in one box, the neck in a second box, and the remaining parts individually bagged and placed in one larger bag in the third box. Everything was well protected, and nothing was missing or damaged.
The neck and body are matched prior to shipment to guarantee a proper fit. This kit came with the fully assembled 3-ply white pickguard already attached to the body. The Precision-style split-coil humbucker pickups are screwed onto the body, not the pickguard, and they are already wired to the electronic components in the pickguard. You know everything is going to fit, but they do have to be removed prior to applying the finish to the body.
The bridge is a nice, heavy standard top-loading hardtail design. The tuning machines are quality sealed tuners, but they are not Fender style; they are a butterfly-type design. Because I am going for a vintage Fender look in this kit, I may change them out sometime in the future.
There are no printed instructions in the box, however the Amazon seller will email them to you after your purchase. They are pictorial and easy to follow, and they include a parts list which is very helpful. But the best way to understand the assembly of this DIY guitar kit is to watch the 6-minute video on the Amazon listing.
Some Pros and Cons
The most outstanding feature of this Fistrock P-bass DIY guitar kit is the paulownia wood body. It is absolutely beautiful. Paulownia is a very lightweight hardwood grown in southern and eastern Asia. It is the fastest growing tree in the world, making it sustainable. Paulownia is said to be second lightest in weight, next to balsa, yet it has the highest strength to weight ratio of any wood in the world. The grain is full and pronounced, and looks fantastic with a natural finish that lets it shine through.
The total weight of my completed Fistrock P-bass is 6 pounds, 8 ounces. Compare that to a mahogany J-style bass kit I built that weighs in at 8 pounds, 12 ounces. And my Peavey T-20 is a real backbreaker at 10 pounds. This Fistrock P-bass is comfortable to play.
While I can sing the praises of this kit in the rest of this post, there are just a few negative things to say.
First, the pickup sounds great but is not as hot as some other P-bass pickups I’ve used. At this price point, I didn’t expect it to be comparable to Seymour Duncan. It is pretty easy to change later if you want. It isn’t really an issue, just something to be aware of when you plug it into an amp you’ve used for another bass.
Second, there were some sharp fret ends that had to be filed. That is common among almost all guitar kits and should be expected when dressing the fingerboard. I’ve found sharp frets even on brand new guitars I have purchased. If this is your first time, plan to spend a little time with this.
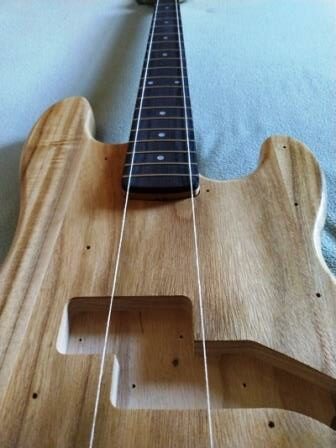
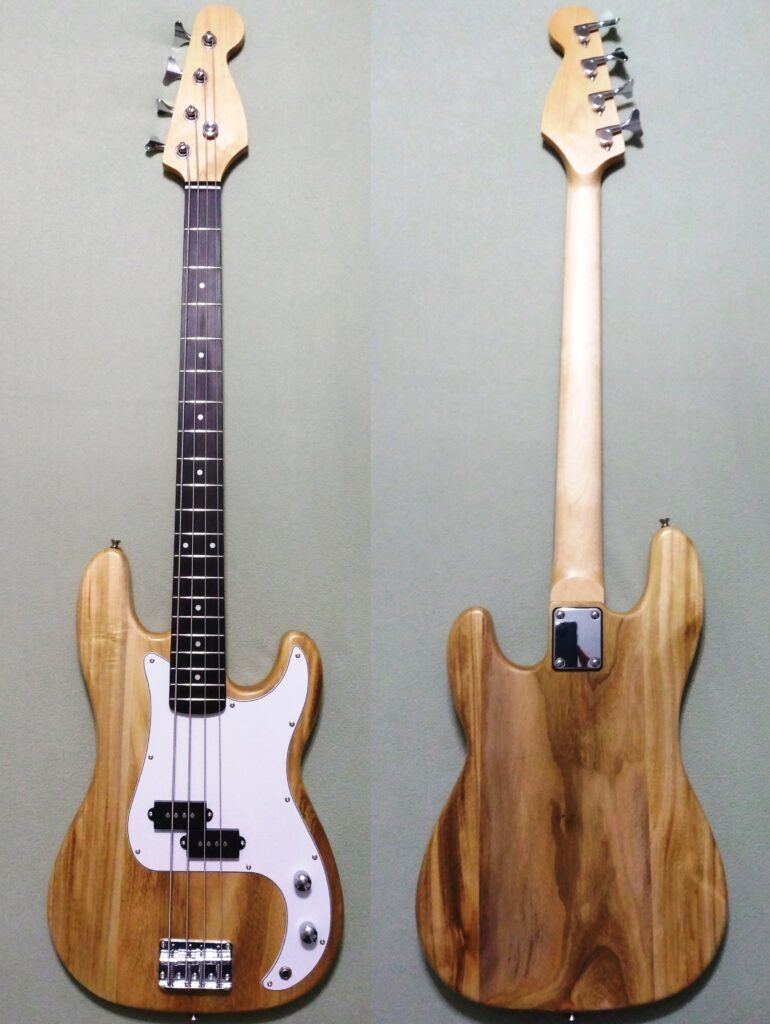
Finally, there was just a little bit of play in the bolt-on neck cavity. But that didn’t turn out to be an issue, as you can see by the picture below. The alignment is near perfect. And in the picture of the assembled guitar, you can see that the strings are perfectly centered over both of the pickups and the fingerboard inlays.
Test Fitting the Neck and Body
A visual inspection of the neck looked straight, and a straight edge over the frets looked good. As mentioned, when I seated the neck heel into the neck cavity it wasn’t as tight as I am used to seeing in other kits. It had play, but there was definitely a sweet spot, and that is where I positioned it.
Here is how I checked alignment. First, I cut two lengths of kite string about four feet long and tied them in the tuning machine holes in the headstock, one in the first hole and one in the fourth. Then I placed the bridge on the body and inserted a couple of wooden skewers in the screw holes to hold it in place. After positioning the neck in the neck cavity, I placed the strings in the outside nut slots and took them down through the outside string holes in the bridge. I pulled them somewhat tight (remember, nothing is permanently attached yet) and examined how they lined up with the edges of the neck.
By putting kit string on the inside nut slots and inside string holes in the bridge, you can also check the alignment with the position inlay dots.
You can look at this picture and see that the alignment is spot on. I had no concerns about the somewhat sloppy fit in the neck.

Finishing the Neck and Body
The maple neck came with a blade type headstock. Since I am going for a Fender Precision Bass look, I found a template and completed the shaping. You can read my post How to Shape a Headstock to see how I did this one. I am pleased with the results.
I finished the headstock and neck by sanding to 400 grit and applying Minwax Tung Oil Finish. Then I wet-sanded the back of the neck with 800 grit paper and applied a final coat. This neck is a nice amber color and very smooth.
For the paulownia wood body, I sanded it lightly, wiped it down, and applied Minwax Tung Oil Finish to it as well. After letting it dry, I again used wet sandpaper between several more coats, always letting it fully dry, until I was satisfied with the finish. It looked great, and I decided not to go over it with poly or lacquer. We’ll see how this holds up.
Assembling the Fistrock P-Bass DIY Guitar Kit
For the most part, I followed the pictorial instructions and the video. It doesn’t take any special tools for this kit, and you don’t even need a soldering iron.
My variation from the instructions and video is an important one. I installed the neck first, and I did that for alignment purposes. Before starting the kit, I had already checked the alignment because of the loose fit, so I was confident it was good. Having the neck installed first means I can fine-tune everything else to this fixed assembly.
Next, I installed the tuning machines. The video shows the guy using a 14mm wrench, but my 14mm wrench was too small for the ferrules provided. I tried a 9/16-inch wrench and it was still too small. A 15mm seemed a little big, but it worked. I have no idea what size these are supposed to be. They are installed, look good, and work as they should.
I reinstalled the pickups and pickguard, routing the ground wire up through the hole leading to the bridge. Then I put the bridge in place and started only the two outside screws along the bottom. Again I put the kite string from the tuning machines, over the nut, and through the bridge, and checked the alignment. All was good, so I finished installing the rest of the bridge screws.
Before installing the strings, I polished the frets with 0000 steel wool (protecting the fingerboard), and wiped the dyed poplar fingerboard with Dunlop Fretboard 65 Ultimate Lemon Oil. I always use that on rosewood fingerboards, and the Amazon seller confirmed with the manufacturer that I should treat the dyed poplar in the same way.
I have never used the strings that come with a DIY electric guitar kit. But when I went to get my strings for this kit, I found I only had one set of D’Addario EXL170BT strings left. So for the first time ever, I decided to use the strings that came with the kit. I have no idea what gauge these are (they appear to be light, comparable to the D’Addario set) but they sound very good and play well. I’ll go with the D’Addario strings next time.
Lastly, I installed the strap buttons and the string retainer. There is no pre-drilled hole for the string retainer, so that takes a little care in properly positioning it.
Final Setup of the Fistrock Precision-style Bass Kit
No adjustment to the truss rod was required and the nut slots were good. I adjusted the saddles to set the string height at the 12th fret, evened up the height of the pickups, and then began setting the intonation. On a bass guitar, that process is really easy, which is another reason this makes a great beginner kit.
This bass plays very nicely. Whatever the strings are that came with it, they stay in tune well and are pretty easy on the fingers.
One concern I had in the back of my mind was that this paulownia bass would be top-heavy. Though the body is light, the neck on this 34-inch long-scale bass is maple. The balance is, in fact, somewhat different than my ten pound Peavey, but it isn’t distracting. Actually, it feels very natural. The strap button is properly positioned over the 12th fret and the bass hangs comfortably.
If you are building this Fistrock P-Bass DIY guitar kit because you want to play it, I don’t think you will be disappointed. You might want to use your preferred brand of strings, and you might want to upgrade the pickups. This is a very playable instrument that feels good in your hands.
If you are just wanting a great kit to build, especially a beginner kit, then right here is where you should start. Building a bass is the easiest thing you can do, and choosing this Fistrock P-bass helps to minimize any problems you might encounter.
And if I didn’t mention it, this beautiful, lightweight paulownia wood is incredible!

Stratocaster and Precision Bass are registered trademarks of Fender Musical Instruments Corporation.

In my school when the teachers used to leave the musical instruments out, in particular the guitar, we always used to give it a strum. Guitars have always been a fascinating instrument to play however until recently haven’t had the chance to fulfill this hobby. Now deciding it’s finally time to grab myself one and take lessons, I feel this post has only helped widen my knowledge a little about this cool instrument!
I built the same kit. I think the strings that came with it are junk. I put some flat wounds on it and it sounds SO much better now. All in all it was a pretty easy kit to put together. Don’t use a power tool to drive the screw all of the way in, drive them in most of the way and them finish tightening by hand. Just take your time.
Great point about the screws. The paulownia is beautiful but screws can strip out pretty easily. I never use power tools for the small screws, and sometimes (like for the strap buttons) I put a drop of CA glue in the hole before inserting the screws and tightening by hand.