
Many DIY electric guitar kits come with blade or spade unfinished headstocks. One of the most intimidating parts of the project can be getting that headstock shaped the way you want it. Here is a straightforward way to successfully shape a headstock on your DIY electric guitar.
First and foremost – take your time. Do not rush this process. It really isn’t too hard, but don’t cut corners. OK, that was a bad pun, but if you just start hacking with your jigsaw without a plan, it will end up looking like you hacked it with a jigsaw without a plan. This is worth the investment of time and patience.
I don’t have an extensive set of woodworking tools, just simple hand tools. No bandsaw table, jigs, or router. The primary tool for this project is a Dremel rotary tool.
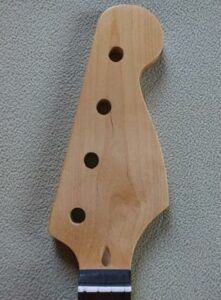
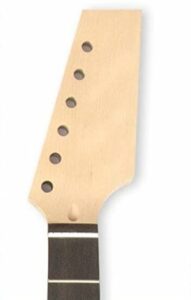
There are two types of unfinished headstocks. Most common is the blade headstock. These often have the holes for the tuning machines pre-drilled along one side, leaving the top and the other side uncut and ready to shape. A variation of this configuration has pre-drilled holes on both sides (such as for 3L-3R tuning machines) leaving only the top to be shaped.
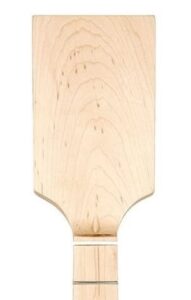
A spade-type headstock has no pre-drilled holes and requires shaping on the top and both sides, in addition to locating the holes for the tuning machines, drilling them straight through and perfectly round. They allow for any tuning machine arrangement, such as 3L-3R or 4L-2R. Spade headstocks are a much greater challenge. This post will be limited to blade headstocks, though the principles can be applied to spade headstock shapes.
Creating The Headstock Template
Having a template for the headstock shape is essential, whether you use a common shape or design your own. Common shapes can be found online and downloaded, but will probably need to be resized before using them.
If you want to design your own shape, first create an accurate outline of the blade headstock. An easy way to do this is just to place a piece of paper over the headstock and run your fingers along the edges making a crease. Be sure you crease the holes as well so you know exactly where they are before drawing your design.
For shapes that are downloaded, a convenient way to get the proper size is to paste the picture into a word processor such as Microsoft Word. Display the horizontal and vertical rulers, then drag the corner of the image while using the rulers to get the size needed for the blade headstock. Holding the <shift> key in Word while resizing maintains the proper aspect ratio.
I have found many of the blade headstocks to be slightly smaller or angled just a little differently than the templates I downloaded. Using the word processor to resize and print them helped in fine-tuning the correct size. Don’t finalize your template until you know it fits exactly like you want. Then print two copies of the template and carefully cut them out.
Tracing The Template
After cutting out the templates, tape them to both sides of the headstock. Use a common reference point and align the fixed edge (the one you won’t cut) so that you are absolutely certain you have the templates in exactly the same place on each side. The reason for doing both sides is to keep a good perpendicular vertical edge
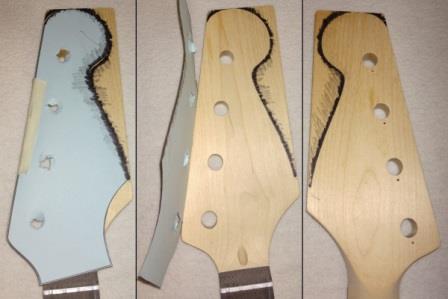
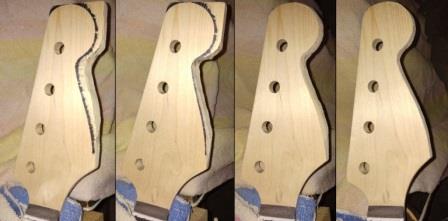
With the templates in place, it is time to mark the headstock. Don’t try tracing the shape. Instead, use a Sharpie or other marker and draw lines from inside on the template to outside on the headstock. You are going to be removing the part with the lines. Always go from the inside out so that you don’t risk marking the part of the headstock you are going to keep. Do this on both sides of the headstock, then remove the paper templates.
When you finish, you should have matching outlines on both sides of the headstock.
Preparing The Work Area
Fair warning, there is going to be a lot of sawdust. Choose a place to work where you have a solid table edge and can handle the dust. You will also need good lighting.
Solidly clamp the neck to the table, remembering to protect both the back of the neck and the fingerboard. For my work, I wrap the neck in a bath towel, then place it in an old wooden miter box. I clamp the whole thing to a table, leaving the headstock extended out so I can work on it.
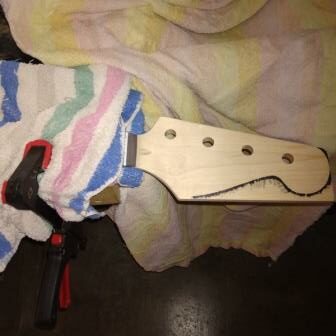
Use a piece of tape to cover or paper towel to stuff the hole for the truss rod adjustment. You don’t want sawdust or anything else getting in there as you are working.
Wear a mask. You are probably tired of hearing that phrase, but here you will need it. Also, wear eye protection. There will be a lot of sawdust (I already said that, but there is a lot) and there is always the risk of a piece of something flying off. Make sure you have enough lighting.
Cutting The Headstock Shape
Now for the real thing. To remove material and shape the headstock, start with a Dremel rotary tool and a sanding drum with a coarse 60-grit band. Holding the Dremel vertically, begin removing the marked parts of the headstock blade. This is a slow process, take your time. As you get nearer to the design, angle the Dremel just slightly so that you are leaning into the shape. This will insure you aren’t cutting too much from the other side.
If you have rounded portions, like the top of a Fender shape, carefully go around the radius with the Dremel. Do it lightly and don’t push too hard. Pressing too hard might cause you to distort the shape, and it can leave burn marks along the sides.
Turn the neck over and work on the other side of the headstock. Again, lean in slightly as you go around the shape. That will leave a “belly” on the edge of the wood. You can use the Dremel to then remove most of the belly.
Turn the neck over as much as needed, use a light touch on the Dremel and a 120-grit band, and get this shape a close as possible to how you traced it. It might be necessary to change to a new sanding band as you near the finishing stages of the shape. Brush the sawdust off, and inspect your work. Make any touch-ups needed, always mindful of taking too much off.
Finishing The Headstock Shape
Use 220 grit sandpaper and a solid sanding block to clean up the edges of the headstock and remove what is left of the belly. To get to the inside of any curves, I often wrap the sandpaper around a rubber eraser, If your shape has any inside corners, use a fine file to make it clean and straight.
Look for any burn marks from the Dremel sanding drum and make sure you sand them away. Burn marks are really accented when you apply oil or poly. Finish it off with 400 grit, then go to finer paper until it is smooth (I usually end up with wet 800 grit paper). Lightly go around the edges to remove any sharp or rough spots. Use your fingers to be sure that everything is smooth.
Wipe everything down to get rid of the sawdust. Check the surface of the fingerboard and brush away any foreign particles before doing anything else with it. Use a rag to clean sawdust out of the tuning machine holes.
Now you can step back and admire your work! It’s time to finish it off with Tru Oil, Minwax Tung Oil Finish or wipe-on poly.
I’ve completed several headstocks using this method. Each time, I think I get a little better at it. Enjoy your work, and enjoy the finished product. Then get another kit and try it again.
I’d love to here about your experience cutting DIY electric guitar headstocks. Please leave a comment below.
Building an electric guitar from a kit can be a challenge, specially if it is your first time and you don not know how to finish the headstock. Using these instructions seems very straightforward and easy to follow. I am confused though about creating a template.
So if I understand correctly, the kit includes a headstock, but the headstock is not shaped the way one wants it. One then needs to create your own template to be used on the headstock that came with the kit?
You mention that you downloaded a template. But is there a link where one can access the templates?
Why do you wrap the neck in a towel? Is it essential or is it to protect the wood? Can something else be used? Thank you.
These are great questions. Yes, the blade or spade headstock is intended to be customized. Of course, you could use it just the way it is supplied, but that would look rather odd.
For this one and a few others I have done, I chose to stick closely to the Fender shape. It should be noted, though, that those are protected by copyright, so I am not supplying a template here. You can use any search engine, browse images, and find several. Or, you could simply draw the one you want on paper and cut it out. The important thing is to know ahead of time what you want the finished product to look like, and make sure you have multiple copies, especially if you draw it yourself.
I wrapped the neck in a towel just to protect the wood while it was clamped. It needs to be held solid while being shaped, but damaging the smooth surface on the back or getting clamp marks on the fingerboard – or worse yet, bending the frets – would be disaster. Use whatever you have, but make sure the neck is protected while doing this kind of work.
Ready to give it a try?