Have you ever thought about putting together your own electric guitar or bass? A DIY kit might be just what you’re looking for. These kits come with all the pieces you need to create a fully functional instrument, including the body, neck, hardware, pickups, and electronics. It’s kind of like a musical puzzle, where each part has its own place and purpose.
Building your own guitar isn’t just about ending up with a cool instrument. It’s a pretty rewarding journey that combines a bit of engineering with creativity. You learn how a guitar works mechanically and electrically, and best of all, when you’re done, you get to play a guitar you built yourself. There’s a real sense of accomplishment in holding and playing something you’ve pieced together, like getting to know your guitar inside out.
This guide is perfect for beginners. If you are new to guitar building or even the idea of working with tools and electronics, you are in the right place. It’s for hobbyists too, especially those with no prior experience. I’ll walk you through the basics at a steady pace, making sure you’re comfortable with each step before moving to the next.
We’ll cover essential skills like using basic tools, understanding guitar components, and the assembly process. You will learn enough about fretboards, pickups, and even a bit of the science behind sound to start crafting your own riffs and melodies in no time. Whether it’s building a guitar or a bass, This guide will help you turn a box of parts into an awesome instrument.
Selecting the Right Guitar Kit for Your Needs
Choosing the right guitar kit sets the tone for your entire DIY project. Knowing what to expect when you first open that box can make the process less daunting. Most kits come with the essentials: a pre-cut body, a neck, hardware like bridges and tuners, pickups, and electrical components like pots and jacks. Just think of it as a starting point for your musical masterpiece.

When deciding between an electric guitar kit and a bass kit, it’s important to remember their fundamental differences. Are you a guitar player? A bass player? Maybe you play one and would like to try the other? Guitars are typically smaller, and can have unique pickup configurations that cater to their sound. On the other hand, bass kits have a longer scale length, and most of them are a little more simple with the wiring. Understanding these nuances can help you choose the kit that best matches the sound you’re aiming for.
One of the first decisions is to determine how much assembly you want to do. Partially assembled kits, such as those pre-painted bodies or with pre-wired pickguards or wiring harnesses, might sound easier but can limit your customization options. They’re very good if you’re just starting and want a straightforward build. Other more unfinished kits might require a little greater effort and skill, and allow for more personalization because you get to configure critical elements that have a noticeable impact on the instrument’s playability and tone.
Quality is another consideration. While entry-level kits are wallet-friendly, they may require a few tweaks to get things just right. Higher end kits, on the other hand, might offer better materials and components, leading to a more satisfying sound and build experience. They’re worth exploring if you want your first project to result in something closer to a fully professional instrument.
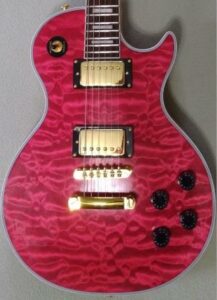
Finally, the style of the kit is crucial – not just visually, but in terms of sound. Whether you’re drawn to the classic rock vibe of a Les Paul, the sleek design of a Stratocaster, or you’re a fan of the deep grooves of a Jazz Bass, there’s something for every stylistic taste. Matching your kit style with your musical preference will make your finished instrument more enjoyable both visually and acoustically.
Gathering Essential Tools and Materials
Building a guitar from a kit isn’t only about piecing together the things that come in the box. You also need the right tools to help things go smoothly. Start with some basic tools every DIY guitarist needs: screwdrivers, pliers, wire cutters, and a soldering iron are your go-to items for most tasks. For wood finishing, you will need several grades of quality sandpaper.
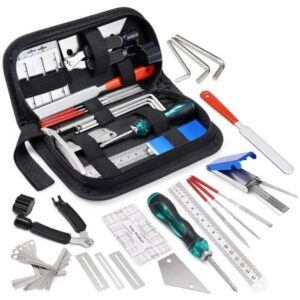
For those looking to delve a little deeper into the crafting process, you’ll want to grab some specialized tools. Fret files and nut files help with the finer details, especially when getting that neck just right. Clamps become handy during assembly when you need precision and stability and are required for kits with a set neck – along with a good wood glue. And you may occasionally need a drill or even a drill press for some more advanced kits.
Here are some quality products for fine-tuning your fretboard. You can also find generic unbranded versions, just be sure to read the reviews before you buy. (Links open at Amazon)
- MusicNomad Fret Leveling Beam
- FretGuru Fret Leveling Beam
- MusicNomad Diamond Coated Fret Crowning File
- FretGuru Guitar Fret Crowning File
- MusicNomad Diamond Coated Fret End Dressing File
- FretGuru Ultimate Fret End File
- MusicNomad Diamond Coated Nut Slotting File Set
- StewMac Gauged Nut Slotting File Set
Some tools aren’t essential but can make life easier. A string winder will save you time when you’re restringing, and a clearly marked string action gauge makes final setup easier. Microfiber cloths and polishing compounds are perfect for adding that finishing touch to your project.
Safety is a priority, especially when handling tools and materials. Work on a flat, stable surface. Get yourself a pair of gloves and safety goggles if you are doing much woodworking, and make sure you’re working in a well-ventilated area when using chemical finishes or a soldering iron. Keeping safety in mind ensures that your building experience is both fun and accident-free.
Creating a Stunning Finish: Paint and More
Once you’ve got the basics set up, adding a killer finish to your guitar can really make it pop. Choosing the right paint and finish not only affects the visual appeal but also has a subtle impact on the sound of your guitar. Make sure the finish you choose is compatible with the wood used. Some may not readily accept dyes or stains. Lacquer, polyurethane, and oil-based finishes each bring their own pros and cons, so it’s worth taking the time to find what fits your vision and sound preference.
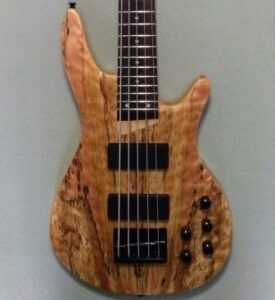
Check out my 5-string bass with a spalted maple veneer finished in Tru-Oil Gunstock Finish.
Sanding the body smooth and sealing it properly beforehand is key to a professional finish. Skipping this step might lead to uneven surfaces that can affect both the look and feel of your guitar. It’s all in the preparation, so spend a good amount of time here if you want that perfect base for your paint or stain.
When it comes to applying the finish, think of it as an art form. Whether you’re painting or staining, applying thin layers and allowing each to dry is crucial. This helps in building up a rich, deep color over time. You might have to practice a bit to get that even coat, but the effort pays off when you see the end result.
Finally, polishing brings the whole look together. It’s the step where you can make your instrument shine, quite literally. Using a polishing compound along with some elbow grease can give your guitar a slick, smooth surface, making it stand out. A good polish gives a professional, store-bought look that’s bound to turn heads.
Assembling Your Electric Masterpiece
Now comes the big moment: putting it all together. Start with the body and neck – these are the backbone of your guitar. Before you jump in, check for any defects or rough spots and give them another quick sanding if necessary. The neck requires precision in alignment so the strings properly go over the pickups and frets. A bolt-on neck allows for minor adjustment later, while a set neck needs to be carefully aligned and glued from the start.
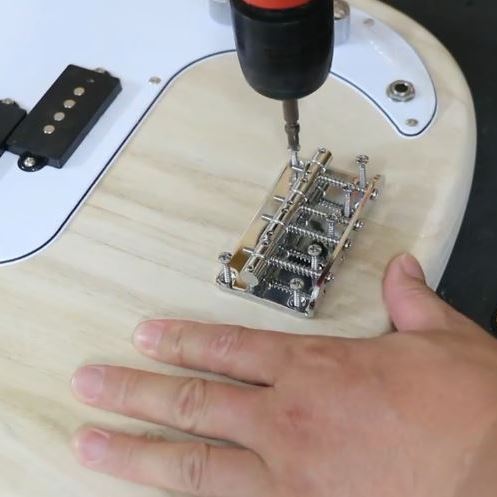
Most builders start with the tuning machines. Carefully align them before tightening them down. And use extra caution when installing those tiny retainer screws to prevent breaking them off. The holes should always be pre-drilled, and a little soap on the threads helps.
Installing the pickups and electronics might seem daunting, but with a step-by-step approach, it’s manageable. Understanding where each pickup goes and how they work with the volume and tone pots and capacitors is fundamental. If your kit requires soldering, it is essential to keep your joints neat and solid for a reliable signal flow.
Next up is fitting the bridge and tailpiece. Different bridge types, like fixed (hard tail), tremolo, or tune-o-matic each have their own installation method. Here, precision matters to ensure the strings sit perfectly and your guitar stays in tune while playing.
Hardware installation involves affixing switch covers, control knobs, input jacks, and strap buttons. It’s attention to detail in these areas that completes the look and functionality of your guitar, ensuring everything works smoothly.
Stringing up your guitar feels like magic. Proper string installation sets the stage for tuning and action optimization. Adjusting the truss rod for neck relief and setting the proper string height at the bridge helps in achieving the desired playability and ensuring your guitar responds well to every note played.
Perfecting Your Instrument: Final Touches and Setup
The assembly’s done, but getting your guitar to play at its best involves some fine-tuning. Start with neck adjustments. The truss rod controls the neck’s bend (relief). Although it influences how high the strings sit, the truss rod is never used to set the action. A small twist can change the playability drastically, so adjust it in tiny increments.
Setting the action, or string height, is your next task. A lower action makes playing easier but may need more precise alignment to prevent buzzing. Action is always set at the bridge. Play around with different settings till you find what feels comfortable without sacrificing sound quality.
Intonation is all about ensuring the guitar plays in tune across the whole fretboard. Adjusting the saddles on the bridge allows each string to stay true to pitch when pressed at different positions.
Pickups also need attention. Their height affects sound balance and output. Too close, and they can interfere with string vibration; too far, and you might lose volume. Aim for even spacing and try different levels to find your preferred tone.
Lastly, check that all electronic components are securely connected and operating without hitches. Testing them with an amp ensures everything is working smoothly. A bit of patience here pays off with a well-tuned, dependable guitar ready for action.
Troubleshooting: Resolving Common DIY Issues
Even the best-made plans can run into snags, but troubleshooting can fix most issues. Common assembly problems like neck alignment or bridge height discrepancies can affect sound and playability. Re-checking alignments and fine-tuning with patience usually does the trick.
If you’re getting no sound or a less-than-optimal output from the pickups, it might be an electrical issue. Grounding problems or loose connections are often the culprits. A quick inspection and some careful soldering can restore it.
Playing issues like string buzzing can be traced to action or neck adjustments. Check the string height and the neck curvature again if you experience this, and adjust accordingly.
When diagnosing issues, go step by step. Consider the problem logically, and test each section separately. This way, you can isolate the source of the problem and address it directly. Troubleshooting might require a bit more time, but it builds your skills and understanding of guitar mechanics, turning these challenges into learning experiences.
Making It Your Own: Customization and Upgrades
Once your guitar is assembled and finely tuned, the real fun begins with customization. Personalizing your instrument lets it stand out and can even enhance how it plays and sounds. Swapping out pickups can dramatically change your guitar’s tone, turning it from a standard model to something truly unique. Consider experimenting with different brands and styles to find the sound that reflects your musical personality.
Hardware upgrades like switching tuners or bridges can improve tuning stability and sustain. Opt for high-quality components if you’re unsatisfied with the stock options. This could be the difference between an average player experience and something way more rewarding.
Don’t hold back with visual touches either. Custom pickguards, decals, or even engraving can add flair and make the guitar feel more like a personal tool of expression rather than just another instrument. These simple modifications can make a big impact on how your guitar looks and feels.
Creative finishes and designs take your project to a whole new level. Unleash your artistic side, whether through unique paint jobs or intricate detailing. Incorporating your ideas into the finish elevates your guitar from just another kit build to a custom piece that’s truly yours.
In the end, it’s about finding your own style. The process of personalizing your guitar teaches you more about your taste in sound and aesthetics. It might even inspire your musical creativity, making every strum and pick a reflection of your craftsmanship and vision.
Good evening. I purchased the Leo Jaymz Explorer bass kit to build with my daughter, but it came with no instructions. I’ve reached out to the companions had no response.
You wouldn’t still have the instructions would you? I would purchase them.
Hi Tony, unfortunately I do not have any instructions for a Leo Jaymz Explorer Bass. However, I did find an assembly video from Leo Jaymz. I added it to my post on the Leo Jaymz Explorer Bass. Best of luck and I hope you enjoy the build.