The T.R.A.I.N. method of guitar setup is a system developed by Dan Erlewine, a renowned guitar technician and expert in guitar repair and setup. The T.R.A.I.N. method is designed to help guitarists and technicians systematically set up a guitar for optimal playability. It provides a step-by-step process that ensures each critical aspect of a guitar’s setup is properly addressed.
The origin of the T.R.A.I.N. method comes from Erlewine’s extensive work in the field of guitar repair. He developed it as a way to standardize and simplify the setup process, making it easier for guitar technicians (and players) to understand and follow the correct order of adjustments to achieve a well-set-up instrument. Dan Erlewine’s approach became popular through his workshops, books (such as Guitar Player Repair Guide), and instructional videos, in which he shares his expert knowledge on guitar setup and repair.
Acronyms are used as a memory tool. In guitar setup, the acronym T.R.A.I.N. stands for the order in which the setup process is performed.
- T – Tune your guitar to the way it will be played
- R – Relief (neck relief, or the amount of bow in the neck)
- A – Action (string height from the fretboard)
- I – Intonation (ensuring the guitar is in tune along the fretboard)
- N – Nut height (adjustment of the string height at the nut)
The T.R.A.I.N. method has become widely used due to its clear, systematic approach, which helps both beginners and professionals alike ensure that their guitars are properly set up for the best possible playability and tone. Here we will go over each of these critical points. (Note: clicking links will show you the tools described available at Amazon.)
T – Tune Your Guitar
While the most common tuning for a 6-string guitar is E-A-D-G-B-E, there are also many alternative tunings. Especially in the sub genres of modern rock music, various tunings are often used to reinforce the low end. The most common alternate tuning is the “Drop D,” where the lowest string is simply lowered by one step. Here are a few common alternate tunings:
| Drop D | D-A-D-G-B-E |
| Double Drop D | D-A-D-G-B-D |
| Drop C | C-G-C-F-A-D |
| Celtic | D-A-D-G-A-D |
| Nashville | E’-A’-D’-G’-B-E (lower strings are an octave higher) |
| Open E | E-B-E-G#-B-E |
| Open G | D-G-D-G-B-D |
Of course, not all guitars have 6-strings. Setup for 7- or 8-string guitars, or for 4-, 5-, or 6-string bass guitars, will follow these same steps. Various alternate tunings might also apply to these instruments.
These alternative tunings sometimes require using different string gauges in order to get the proper tension. It is also common practice to use standard tuning with heavier or lighter string gauges to get the sound and feel that the player desires. In order to properly set up your guitar, the first thing to do is make sure the correct strings are installed and they are tuned they way you will be playing. Changing tunings and/or string gauges will require a new setup.
R – Relief (Truss Rod Adjustment)
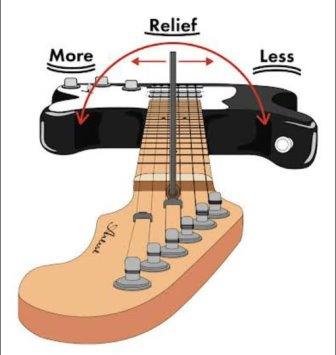
The tension of the strings will draw the neck into a concave bow. The truss rod is used to counteract the string tension so that the neck and fingerboard are almost flat (some players want it completely flat). This is why it is important to tune your guitar first, so that the truss rod can counteract the proper amount of string tension. Tightening the truss rod increases the resistance to bow flattens the neck. Loosening the truss rod allows the strings to pull the neck forward, creating “relief.”

To properly check the relief, put a capo before the first fret and press down on the fret nearest to where the neck meets the body (usually about the 17th fret). This takes both the nut and the portion of the neck attached to the body out of play. Measure the distance from the fret in the middle of the span (usually the 8th fret) to the bottom of the string. Different manufacturers recommend different relief heights. This setting is ultimately your personal preference.
To flatten the neck and reduce relief, tighten the truss rod by turning it clockwise. To increase relief and add more bow, loosen the truss rod by turning it counter-clockwise. Remember, righty-tighty lefty-loosey. If you are tightening the truss rod, you may wish to loosen the strings by a turn or two of the tuning machines. Bring your guitar back up to pitch and check the relief measurement again. You can also measure using a slotted straight edge designed to go over the frets on your guitar or bass.
Please not that the truss rod is for relief adjustment only, NOT for string height.
A – Action (String Height Adjustment)
Action generally refers to how far the string must go down to meet the fret, usually just called “string height.” This is not consistent over the neck, otherwise you would have lots of buzz. The target height is usually referenced at the middle of the string, at the 12th fret. Action that is too high can make your instrument difficult to play and harder to keep in tune. Action that is too low can create a lot of buzz and dead notes. Again, this should ultimately be set to your personal preference.
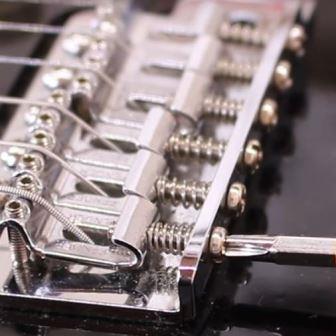
Use a string action gauge to measure string height at the 12th fret. Raise the bridge saddles up or down to achieve the desired action. DO NOT use the truss rod for adjusting string height. Individual bridge saddles usually have a couple of set screws on either side of the string to raise or lower the height for that one string. Tune-o-matic bridges such as found on many Gibson-style guitars will have adjusting screws on both sides of the bridge to raise or lower that side of the bridge. Individual string height is not needed with a Tune-o-matic bridge.
If you are adjusting each saddle independently, it is not only important to get the correct string height but also to maintain the proper radius across all of the strings. The radius at the saddles should match the radius of the fretboard. String radius gauges are available in various sizes to assist in getting this correct.
For independent saddles, set the string height at the 12 fret for the two outside strings, and check to make sure there is no buzzing. Then use a string radius gauge to properly adjust the middle strings. Try to slip a thin piece of paper underneath the string radius gauge very near the saddle. When you are unable to slip the paper between the gauge and any string, the radius is properly set.
I – Intonation (Setting the String Length)
It may sound strange, but not all of the strings on your guitar are the same length. More specifically, the portion of the string that vibrates – from the nut to the bridge – is not the same from string to string, and that affects the pitch as you go up the fretboard. Additionally, the string will stretch as you push down behind the frets, and different thicknesses strings stretch by different amounts. That is why it is important to set up your guitar with the string gauge you will be using when you play.
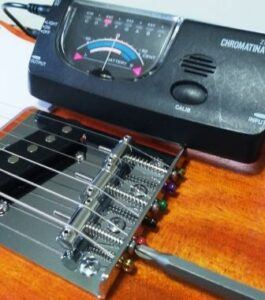
Lightly touching a string at the half-way point, just above the 12th fret, causes the string to vibrate in two sections at twice the original frequency (the octave). This is called a harmonic. To properly intonate your guitar, the goal is to make the pitch when the string is pushed down behind the 12th fret the same as the 12th fret harmonic. To do this, you will need an accurate guitar tuner, preferably one with a meter and needle (or digital simulation of one) or, better yet, a strobe.

Compare the 12th fretted note to the harmonic. If the fretted note is sharp, then you need to lengthen the string. If the fretted note is flat, the string needs to be shortened. Lengthening and shortening the string is accomplished by moving the bridge saddles back and forth. How you do that will be dependent on the type of bridge and bridge saddle you have, but is usually done by turning a screw that passes through the saddle.
I usually like to detune slightly before moving the saddle, at least until I am down to the last fine-tuning adjustments. This reduces the chance of scratching the bridge plate with the height adjustment screws. Since turning a screw that is parallel to the guitar body can be a little tricky, it is usually a good idea to put some type of protection, like a piece of card stock, between the tool and the body just in case it slips.
N – Nut Slot Adjustment
The slots in the nut properly align the strings, and they also set the correct string height above the first fret. If the notes on the first one or two frets sounds a little sharp, your nut slots may need to be adjusted. Using a feeler gauge, the measured distance from the top of the first fret to the string is typically around 0.020 inches.
To properly make any adjustment, you will need a set of nut files designed for your guitar or bass. There is typically an individual file for each string gauge, and a quality set can be quite expensive. Less costly sets for guitar or bass can get the job done if you are careful, and some people even use inexpensive needle files. You can often smooth out any rough areas using a discarded piece of string of the correct gauge.
The key to filing nut slots is to be slow and deliberate. File in the direction of the headstock with a slight downward slope, leaving the fretboard side of the slot clean and higher. Be careful not to take off too much – if you do, you will likely have to replace the nut. Always make the measurements with the string at full tension. After you have filed the slots, use a little graphite from a pencil lead to lubricate it.
Bringing the T.R.A.I.N. Method All Together
Setting up your guitar is a rewarding skill to learn. There are many good videos available to show you how to do each individual step. The key to the T.R.A.I.N. method is to follow these steps in order. The guitar must be in tune before checking neck relief, neck relief must be correct before setting the action through string height, and all of these adjustments must be made before attempting to intonate.
After completing all these steps and determining that the nut slots are correct, go back and check everything from the beginning. You shouldn’t have to make many additional adjustments. Just remember to do everything in order so that you don’t throw off something you have already done.
The setup should be checked and any adjustments made whenever you change your strings, and especially if you change the gauges of the strings you are using. Temperature and humidity can also affect the wood, which may require adjusting the relief with the truss rod. And since that step affects everything else, just follow the correct order to get your instrument in the best playable condition.
What tips do you have for setting up and maintaining your guitar? Share them with us in the comments below!
What about pickup height?
Good question! Perhaps pickup height was not included because it is largely player preference and does not directly affect setup. You would set the height of the pickup(s) after this is complete.
The pickup(s) should be close enough to the strings for the desired output, but not so close as to affect playing. Some manufacturers publish recommended pickup heights; this clip is from the Fender Factory Specs sheet. Multiple pickups might need lowered so that a proper balance is achieved.