
One of the styles I really wanted to try in a DIY electric guitar kit was a semi-hollow body. But that was intimidating to me. When I finally got up the courage to do it, I went shopping and found a a really nice selection of kits at Pango a.k.a. GuitarKit.shop. But I was unsure whether a Pango DIY electric guitar kit would be a good choice. Was this a quality kit? How long would it take to arrive? What if I encountered issues with it?
The price was pretty reasonable, and their website said it would arrive in 25 days. And, did I mention there was a very nice selection of semi-hollow body kits to choose from? I found an ES-335 style with a flamed maple top, a maple fretboard with trapezoid-type inlays, all gold hardware and the Gibson open-book headstock shape already cut (I’m still not sure that part is legal). So I took the plunge.

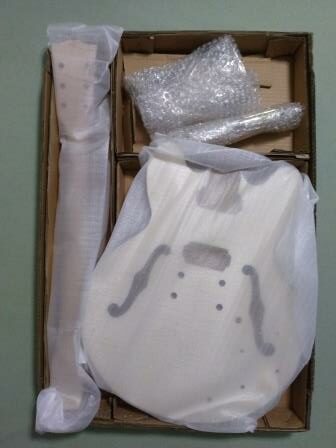
Unboxing The Kit
To my surprise, the Pango DIY electric guitar kit arrived from China in just 23 days, and that included the Christmas and New Years holidays! UPS delivered it in a well-taped undamaged box. Inside that box was another box, the kind you expect with a guitar kit. And inside that box were the typical 3-tray compartment boxes.
The internal tray boxes did not have lids like some other kits I’ve purchased. And I immediately noticed that the huge ES-335 sized body was way bigger than the tray space for it. This guitar kit was really crammed into the packaging, and the box was actually a little small for the kit I had received. Everything was wrapped in protective slipcases and arrived undamaged.
So I unwrapped the packages and did a quick inspection. I found no parts list anywhere, but I had the picture from the website listing and I’ve put together a few kits before. It didn’t appear that anything was missing. I did notice that the nut, which was supposed to be white, was black. That didn’t really matter. The black looks better, and it is plastic so it will be replaced later anyway. The speed knobs were supposed to be gold but they were also black, which I like better.
The Initial Inspection
The set neck fit nicely, not too tight and very little if any play. The neck angle also looked good. I’ve not done many set necks, and I’ve not yet done one that required any kind of shimming, so that was a relief. I used a penlight and looked inside the f-holes, where I saw a rough and very soft piece of fractured wood going down the middle.
This kit included gold tuning machines stamped “Grover.” Have to laugh at that one. I took several photographs and sent them to Grover/Trophy Musical Products who told me these absolutely “are not authentic Grover tuners.” Since the difference in price for buying the kit with or without all of the hardware was $13, I wasn’t expecting $100 tuners. Tuning machines are usually one of the first things upgraded on a kit guitar.
No specific instructions were provided with this kit. After my order was placed, they did send me a book in pdf format about building electric guitars. This isn’t a beginner kit, and I really wanted some kind of guidance. Fortunately, a Google search found a few downloadable ES-style kit instructions out there, and they are all pretty similar.
Finishing the Flamed Maple Top
I decided to finish the body first before setting the neck. You could do otherwise. After sanding, I applied the first round of Keda wood dye to the maple veneer top, using a mixture of blue and black on the first pass. That’s when I noticed glue spots along the middle seam. But let’s be realistic: this isn’t a high-end kit, and something like this might be expected. Pango customer service wouldn’t even acknowledge this was an issue.
I went to work with some sandpaper, being careful not to sand through the veneer, and very carefully removed a good bit of the glue, then worked in the dye to minimize the imperfections. The seam is still visible in the final product, but it is a whole lot better than it was initially. I finished the top with Minwax clear lacquer.
The back and sides of this guitar, on the other hand, are absolutely beautiful. I decided to leave them natural and applied several coats of Tru Oil Gun Stock Finish. If you want a beautiful oiled finish over wood grain, this stuff is fantastic. The blonde color of the maple created a nice contrast to the dark blue top and looks great along with the gold hardware. This entire guitar including the fingerboard is trimmed out in a black binding.
The Tuning Machines
As noted before, tuning machines are generally the first thing upgraded on a kit guitar. Since this is a semi-hollow guitar with some resonance, and since I will likely play a lot more open chords on this than on, say, a Stratocaster type guitar, I decided to go with a wound third “G” string similar to an acoustic guitar.
Once the fake Grovers were installed in the headstock, they looked great individually. But the pre-drilled holes were way out of alignment and on the back side looked very uneven. After I put the the strings on it became obvious even from the front that the holes were off. The strings on the bass side barely miss touching the prior tuning peg.

They didn’t have a good feel, and two of them immediately started slipping. So I splurged and bought a set of Graph Tech Ratio machine heads. Each individual machine head it specifically designed and marked for a particular string. I installed the set for acoustic guitar so it would have a wound third; more on that later. Quality tuners made a big difference on this guitar.
For more on on the ridiculous way Pango customer service addressed this problem, read my post My Pango Experience.
Installing The Bridge
Everything for the bridge and tailpiece was pre-drilled – almost. Of course, for a Tune-o-matic bridge it is necessary to place a ground wire before pushing in the bushings, but there was no hole for the wire. So I carefully covered the top of the guitar and used a long bit to go through the side of the right tailpiece bushing hole into the cavity.
I pushed in the bushings without much difficulty using a wood block and small mallet. Then I threaded in the inserts and placed the bridge across the first set. No problem, near perfect. The tailpiece was a little tight, possibly because of the addition of that ground wire, but it did slide on. At least it isn’t going to fall out.
So, with the snug-fitting neck glued in place, the pickups laying in the routed cutouts (not yet installed) and the Tune-o-matic bridge in place, I put the strings on but didn’t pull them all the way up to pitch. The distance across the outside poles of the neck pickup is 50mm, and on the bridge pickup it is 52mm, so that’s good although 49mm at the neck would probably be better on this guitar. The strings are in an acceptable range over the pickup poles, and they look good on the fingerboard.


The Electronics
Even though the picture in their listing shows a bunch of loose components, the electronics (except for the pickups) came fully wired as a harness. I sketched the actual positions on a piece of cardboard and laid them out just to make sure everything would fit. The only things I needed to solder were the pickups and the bridge ground.
It was a little tight, but I was able to install the harness and hide the wiring from being visible in the f-hole. Unlike some pre-wired kits, this one was color coded correctly. Ground is black; one set of controls used a yellow wire matching the neck pickup, and one set used a red wire matching the bridge pickup.
It wasn’t hard to tell the pickups apart, as they are stamped “N” and “B” on the back besides having different thicknesses of pickup rings and slightly different pole spacing. The resistance measured the same on both. I don’t know what brand they are, but they seem to sound decent. One of the volume pots was noisy but eventually worked itself out. They are all miniature dime-sized components.
I installed a set of D’Addario EXL-110W strings with a wound third, similar to my acoustic guitars. The Graph Tech Ratio tuners are designed for the wound third “G” string. Now I could set very near perfect intonation, and they sounded fantastic on this semi-hollow guitar even playing open chords.
The neck looked to be in great shape right out of the box. So far, I have not made any adjustment in the truss rod. I had to work on a couple of high frets that were relatively easy to level. I didn’t find any sharp fret ends. The nut slots were a little high on the treble end, but fine on the bass side and I will eventually replace it anyway. If I can tout one quality piece on this instrument, it is the neck – along with a gorgeous all maple back and sides.
Setting the string height and pickup height was again relatively easy. The intonation wasn’t difficult after moving to the wound third string. I don’t care for this Tune-o-matic bridge style, with the long retaining wire across the front. On another kit I went with a replacement Bogart bridge that had longer saddle adjustment, and I may do something similar here as well.
Final Recommendations
Building any guitar kit requires patience and the ability to control your frustrations. I expected to encounter a few problems, but I was determined to find a way to deal with them and make this into a quality instrument. So, here is a quick summary of the Pango DIY electric guitar kit:
Pros
- Huge selection of kits
- Great quality neck
- Back and sides are beautiful wood
- Fast delivery from China
Cons
- Standard tuning machines will probably be replaced
- Some of the parts do not match the picture
- Glue on the veneer top
- No parts list or instructions
- Very poor customer service
| Consideration | Rating |
|---|---|
| Price (Including Shipping) | 3 |
| Speed of Shipping and Delivery | 4 |
| Packaging | 3 |
| Quality of Materials | 3 |
| Assembly Instructions | 1 |
| Customer Service | 1 |
| Overall Rating Based on a scale of 1 (Bad) to 5 (Good) | 2.5 |
This Pango DIY electric guitar kit turned out very nice, though it did take a lot of work. An ES-335 style kit is not the easiest kit to build. It was a great learning experience. And don’t expect ANY help at all from Pango.
In my opinion, this Pango kit gets a C+ grade. Be prepared to put forth a little extra effort. The result will be a very nice playing instrument you will be proud to display.

Do you have something you want to share about your experience with a Pango DIY electric guitar kit? Leave us a comment below!
Does it play good, action .binding, nut width,??
It does play well. I am a firm believer that most anything can be set up to play well. The neck and frets were the best part of this kit. Action is great, and with the wound G string the intonation is spot on. It has a 42mm nut, and the string alignment is very good even though the tuning machine holes in the headstock are a little off. Nut slots did require a little filing.