Leo Jaymz DIY electric guitar kits are affordable kits sold through Amazon and other online retailers. Have you wondered if a lower-priced kit like this was really worth building? I ordered a Tele-style kit and put it together. Here is an overview of how that went.
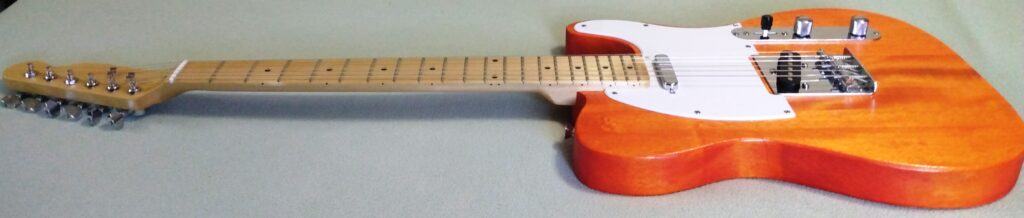
First, the bottom line. The finished product looks pretty good, sounds great and plays very well. You could slap this together in less than an hour, but if you take your time and do it right you can end up with a very nice instrument.
What’s In The Leo Jaymz Box
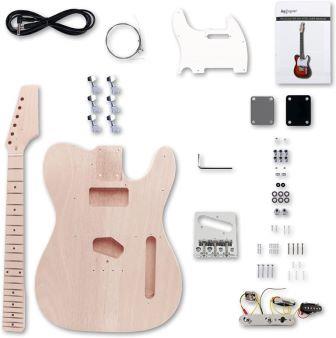
Here is a picture from the Amazon website of the Leo Jaymz TL style DIY electric guitar kit I purchased. It comes in one big box with three smaller boxes inside – one for the body, one for the neck, and one for everything else. This is one of the better packaged kits that I have purchased. All the items you need to assemble the guitar, including the fasteners.
Typical for a Tele-style guitar, there are two single-coil pickups. One gets mounted to the pick guard, and one gets mounted to the bridge assembly. The electronic components are already mounted to the control plate, and everything connects with plugs and doesn’t require fasteners.
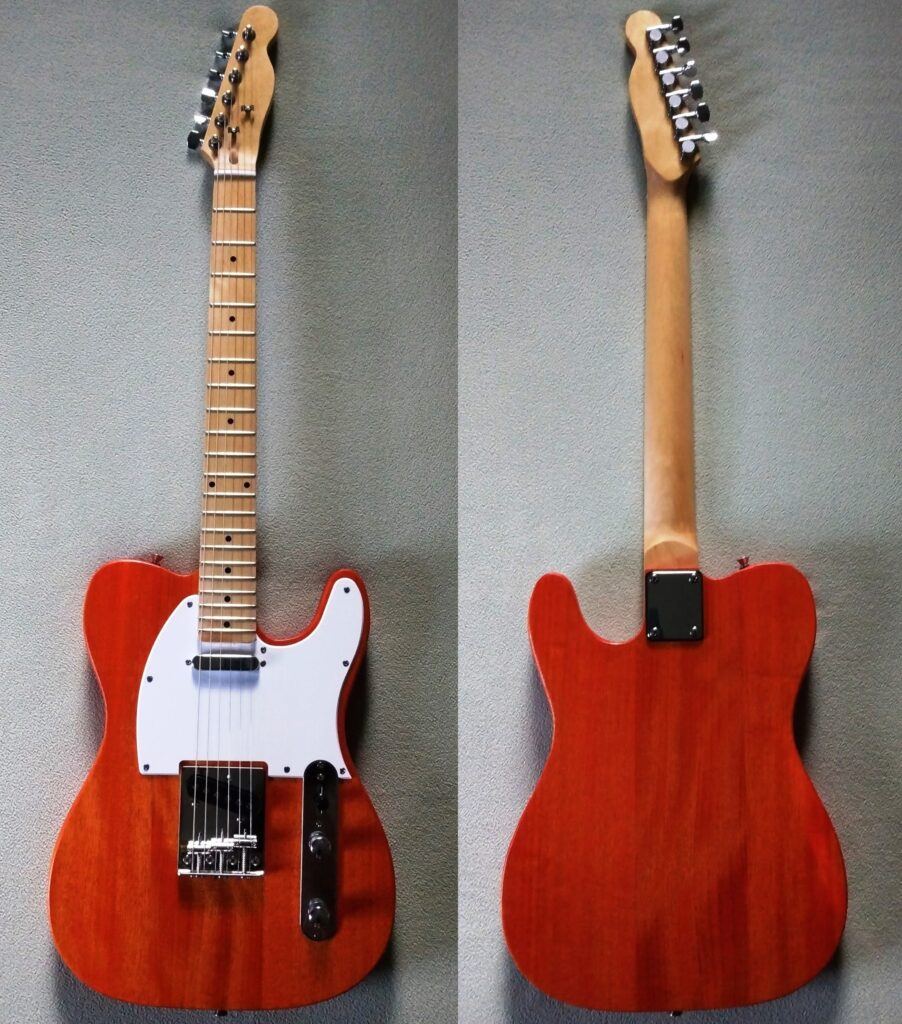
It says the body is mahogany. I’m not an expert in wood species, but I’m pretty sure this is mahogany and accept that the description is accurate. Some people have commented that they thought the wood in some Leo Jaymz kits that was listed as mahogany was actually basswood.
Whatever it is, it looks good. I’m sure they selected one of the nicer looking bodies for the pictures. Mine was made of three pieces of wood that were very nicely matched. There was one issue, which I will discuss later. Everything on the body is pre-drilled, as is the neck.
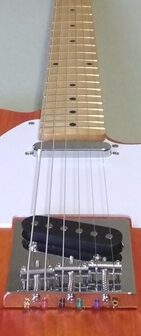
The bridge is a vintage Telecaster style. It has three adjusting screws for the saddles, and each saddle supports two strings. Strings are top-loading. The pick guard is single ply. Mine was white; they could change from time-to-time.
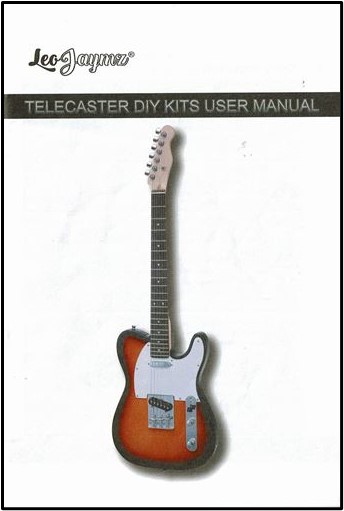
The instructions are a 24-page comprehensive booklet specific to the model. They even include a Tele-style template for shaping the headstock, but you will need to enlarge it a bit. The last several pages of the instructions walk you through the setup. They also include a parts list of everything in the kit, right down to the quantity of the fasteners with a description of where they are used.
Test Fitting the Neck and Body
First I looked down the neck and it appeared to be straight. When I ran my hand down the sides I did not find any sharp fret ends. The nut was pre-installed and glued in place.
The neck and body are numbered in each kit and are supposed to be matched before they ship. Mine had no problems at all. The neck seated properly and was tight. I put a straight edge across the frets and didn’t notice any problems. Then I laid the bridge on the body, holding it with just a couple of turns of the outer screws in the mounting holes. I tied string in the first and sixth tuning machine holes, stretched them across the nut and saddles and pulled them through the string holes. Alignment looked good all the way around.
The pick guard seemed OK around the neck, using toothpicks in the screw holes to hold things in place. The control plate was a little tight and the toothpick scheme didn’t work. The jack was also a little tight in the hole and I had to bend the lugs in just a little to make it fit.
I did not put the pickups in the pick guard or bridge. Later I discovered that the bridge pickup could not be properly adjusted and had to enlarge the cutout. Next time I will mount the pickups and test their fit so that any adjustments can be made before the body is finished.
Finishing the Neck and Body
Since I wanted my Tele-style kit to have an authentic looking Telecaster headstock, I found a template online and made a pattern. It turned out as intended. I sanded the headstock and back of the neck to 220 grit, then applied a couple of coats of Minwax Tung Oil Finish. For the maple fingerboard, I lightly went over it with 0000 steel wool, then put a couple of coats of Minwax Tung Oil Finish on it as well. I didn’t do anything else to the fingerboard, but sanded the back with 800 grit wet paper and applied another coat of the Tung Oil Finish. When it was dry, this produced a very smooth neck.
I sanded the body to 220 grit and wiped it down. Then I mixed red and yellow Keda Wood Dye to make a nice orange color. After testing it on some scrap wood, I rubbed it on the front, sides, and back of the body. It took about three applications to get the color I wanted. That was when I noticed a problem.
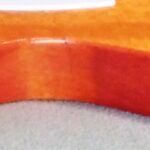
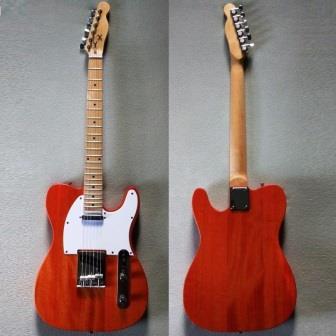
On the left side when facing the front of the body right at the narrow “waist” – the dip in the top of the guitar in playing position – the dye had soaked into a crack. It was completely across one of the three pieces of wood that made up the body, about 2-inches long, and was clearly visible on the front, edge, and back of the guitar. Nothing was loose. I was only cosmetic, and wasn’t going to present any kind of structural problem.
You can see the crack in this closeup from the picture at the top of this page.
I contacted the Amazon third-party seller, and then went ahead and applied several coats of Minwax Wipe-On Poly. With each application I waited for it to dry and then very lightly spot sanded. Before the final coat I lightly sanded all over with 800 grit wet paper, wiped it down, and waited until it was completely dry. I am very satisfied with the finish.
My Interaction with Leo Jaymz
Before contacting the seller, I took pictures of the finished body that clearly showed the crack. Through Amazon, I sent a message to the seller along with the pictures asking only for a replacement body. Yes, that is risky because the body and neck in the kit are matched, but I was pretty sure I could get them to fit. The seller responded that individual parts were not available. He suggested I return the kit through Amazon and order another.
No way was I going to do that, even though Amazon has a great free return program. I had way too much work in the headstock, neck and fingerboard. Yes, I could forfeit the work I had done finishing the body that was defective, but I wasn’t interested in sending the whole thing back and starting over.
So I asked the seller for contact information for the manufacturer, and he said he was the manufacturer. He said the kits are pre-packaged and only shipped as a unit. Sorry, I didn’t find that acceptable, but what could I do short of sending the kit back for replacement? I decided to just leave things as is, knowing it was only a cosmetic defect. With the pick guard in place it is barely noticeable, unless you are looking for it (but I know it is there!).
Installing the Neck
Installing the neck for this Tele style DIY electric guitar kit was relatively straightforward. The body and the neck itself were pre-drilled. First, I installed the six tuning machines, and since the holes were already drilled for the string trees, I installed them as well.
This kit included a rectangular metal plate that fits inside a black plastic base. Before installing, I always write my name and the date on a piece of paper and tape it inside the plastic base. I made sure the neck was properly seated in the cavity, then installed the four screws through the plate and body and into the neck. I drove these in by hand rather than using a drill.
Installing the Pickups, Bridge, and Electronics
Next I mounted the neck pickup in the pick guard and the bridge pickup in the bridge. Initially they were mounted about as low as they could go. I positioned the pick guard and temporarily secured it with the toothpicks, routing the pickup wires through the body.
There is a ground wire on the controls that needed to be fed up under the bridge. Then I set the bridge in position and attached it with the four screws under the saddles, clamping down on the ground wire. At this point I tried to raise the bridge pickup a little, and found that it was too close against the side of the cutout.
It was necessary to remove the bridge assembly and, using a rasp, take out some of the wood where the pickup was rubbing. At one point, the file slipped and I gouged the body. Fortunately this would be hidden by the bridge when it was reinstalled, but it reminded me of how careful I must be when working with the finished body. I removed about 1/16-inch of the wood in the corner of the routing. The pickup was then able to be raised and lowered without interference.
Before putting in the pick guard screws, I positioned the control plate but did not drive the screws in all the way. I aligned the pickguard with the control plate, neck, and bridge, then installed the pickguard screws. After installing the jack plate, I used the solderless plugs to connect the pickups, jack, and controls. Finally, I screwed the control plate into place.
Finishing the Leo Jaymz Tele Project
This guitar was really looking nice. Before stringing it, I used a fret rocker and did not find any problem with high or low frets. Using 0000 steel wool with painter’s tape on the fingerboard for protection, I polished each individual fret to a mirror shine. As usual, I tossed the strings that came with the kit into a box of parts I have been accumulating. Instead, I put a set of D’Addario EXL-110 strings on it (that’s what I always use).
Following the detailed instructions provided, I checked and made one slight adjustment to the neck truss rod. After sanding and filing the nut to set the first fret string height, I adjusted the saddles to set the string height at the 12th fret. Then I set the intonation. All of these are detailed in the instruction book. Finally, I set the height of the pickups, again using the recommended distances in the instructions. I will fine tune the pickup heights to get the tone I want and proper balance between the pickups later.
I am very happy with the way this guitar turned out. It looks great, plays well, and has the twangy sound I was looking for from a Telecaster. Though I was a little disappointed that I couldn’t get a replacement body, I know this one will be fine.
Would I buy another Leo Jaymz kit? Sure…
Telecaster is a registered trademark of Fender Musical Instruments Corporation.
Love what you did here. Question – did you use a clear coat on the neck? Or just the tung oil finish?
Good question. I have never put a clear coat on any neck, just the tung oil finish or Tru-Oil Gunstock finish. It’s all a matter of preference, though, on how you want it to feel. To me, that is more important than how it looks. Thanks for the comment!
I got the same kit you did although I received a piece of copper tape in the hardware bag that is 6ft by 2 inches. I feel this is something that got in the bag by accident. Your comments will be appreciated.
Thanks for the comment, Bret, and I hope you enjoy this kit. Actually, the current packaging includes the copper shielding tape. Use it to line the control cavity, and make sure you attach a ground wire to it. My kit did not include the shielding tape, but I bought a roll separately. I use it on all my kits now. Here is what I bought.