
I’ve played acoustic guitars for more than 50 years. And I’ve also played a bass guitar for about as long. Over the years I’ve had quite a few different instruments, including a handful of electric guitars (though I never learned to play them well). But it wasn’t until I retired from my day job that I decided to try building a DIY electric guitar kit myself.
One day while browsing a social media marketplace I saw a listing for a DIY electric guitar kit. This particular kit was a jazz-style bass. I had one of those back in the late 1970s, so now my interest was piqued. Could I really build one of those? Would it look good? Would it play well?
Now, I’m not one for buying something sight unseen, and I was really unsure if this was anything more than a novelty. But I did notice that the seller, Budreau Guitars, was only about half an hour from my location. So I contacted the owner, Chuck Budreau, and made arrangements to drive over and look at the kits, which at the time he was selling out of his garage. A few days later I went to see him.
He showed me several of his kits, including the jazz-style bass I had first asked about. Then he showed me a couple of DIY guitars he had built himself. We talked about how to finish them and how to assemble them. Then I picked out the one I wanted and we examined it, and did a test fit of the neck right there in his garage. I paid him, and then headed home.
Getting Ready to Build My First DIY Guitar Kit
Over the next several days I watched a lot of YouTube videos, pausing them to look at the kit I had bought and to think about what I wanted to do with it. Chuck Budreau had used Minwax Wipe-On Poly on one of his builds that he showed me, along with Minwax Tung Oil Finish on the neck. I snapped a picture of them with my phone while I was there so I would be certain to get the correct thing, since I had no experience doing any fine woodworking and this was all new to me.
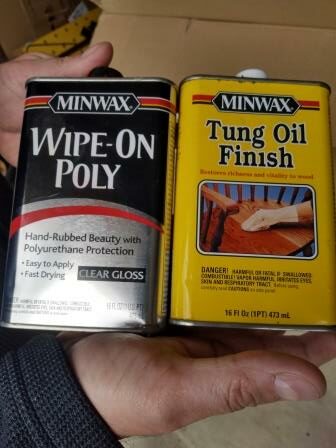
When I finally decided how I wanted to finish my bass, I made a list of supplies and went to the local Menard’s. In addition to the Wipe On Poly and Tung Oil Finish, I picked up some sanding supplies and a small can of Minwax mahogany stain. Then it was time to get to work.
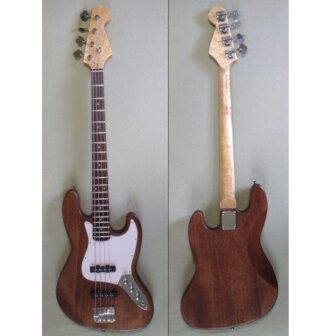
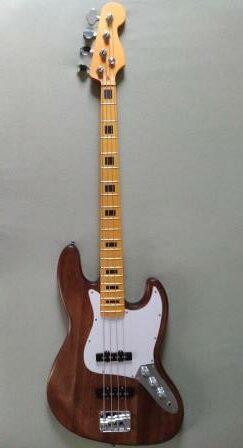
My first task was probably the most difficult. I wanted this to look like a Fender Jazz bass, so I searched online for a headstock template. Using a Dremel rotary tool, I carefully shaped the headstock to look like the Fender. It didn’t turn out perfect, but it was pretty good, especially considering this was my first time. You can read about how I learned to do this in my post How to Shape a Headstock.
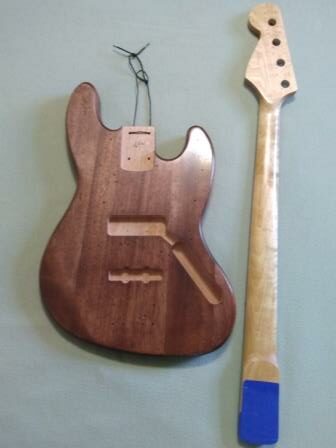
With the headstock shaped, I sanded it until all the edges were smooth, then lightly sanded the neck and taped over the fingerboard. Over the next few days I applied several coats of Minwax Tung Oil Finish. Then I sanded the body, wiped on the mahogany stain, and let it dry for a couple of days. When it was ready, I put on several layers of the Minwax Wipe On Poly. After all of this had fully dried, it was time to assemble the rest of the guitar.
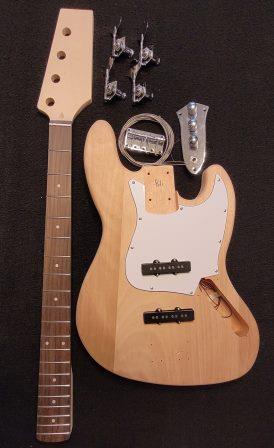
Everything on this kit was pre-drilled. That made it easier, since I didn’t have to worry about squaring up the tuning machines or properly locating the bridge. I’m glad I started with a good quality kit. The neck didn’t need shimming, and everything lined up the way it should. It all went together without any surprises or problems.
The neck and frets were in great shape right out of the box, so they didn’t require much preparation. I polished the frets with steel wool, the removed the tape and rubbed some Dunlop Fretboard 65 Ultimate Lemon Oil into the fingerboard. I had a new set of D’Addario EXL-220 strings and decided to put those on instead of the strings that came in the kit. Setting the string height and intonation were pretty easy for me because I had done this previously on my Peavey T-20 bass.
Then came the moment of truth. I plugged it into my amp and played a few runs and scales. The pickups that came with the kit sounded very good, better than I expected. Overall, it was great and I loved it! This was no “novelty;” it wasn’t some toy or wall decoration. This bass was a fine, quality instrument and I was quite happy. Maybe I got lucky, or maybe the time and patience I forced myself to take with it had paid off. One thing was certain, though. I was hooked.
Almost before I put it down, I was thinking about my next project. This bass was pretty easy. What would a Strat or a Les Paul be like? Maybe a Tele? I had seen those kits while I was in the Budreau garage.
What I Learned, What I Missed
Again, this was my first attempt at a serious woodworking project. I like the mahogany and the dark stain, but I did not do any grain filling first. The fine pores of the grain are more pronounced than I would have liked. It is smooth, though. The wipe-on poly took care of that.
I don’t know that there is just one order for doing things, but I could have done them differently. I ended up taking the pickguard, control plate, and bridge off a few times.
And I’m somewhat ashamed to say that I had one bad solder joint. That shouldn’t happen, given that I’ve been an amateur radio operator since even before I started playing guitar, and currently hold an Extra Class license. A pickup wire eventually pulled loose from one of the pots. It was an easy repair, but one I shouldn’t have had to make.
Months later I looked into something I should have caught at the start. This felt a lot like my Peavey bass, though not nearly as heavy. I laid them side-by-side, and noticed that the necks looked about the same. When I put a scale across the nut, it measured just over 1-5/8 inches, or 42mm, the same as the Peavey. That wasn’t right. The Jazz bass is supposed to have a 1-1/2 inch, or 38mm, nut.
I had wanted to mimic a Fender Jazz Bass as closely as possible, but this neck just was not correct. So, I did some searching and found a nice maple neck with a maple fingerboard and the correct nut width that didn’t cost more than the original kit I started with. I ordered it, along with a set of genuine Fender tuning machines. It made me a little nervous, but the neck changed out perfectly with the proper alignment.
Now I was a happy camper. I finished it off by buying a genuine Fender padded gig bag and swapping the strings for Fender 9050L Flatwounds. But now I had a new problem – an extra neck complete with tuning machines but nothing to put it on. So I did the only thing I could think of – I ordered an unfinished P-style body (to match the 1-5/8 inch neck) and started building another bass.
I learned a lot from this first DIY electric guitar kit. Choosing the J-style bass was a good choice for the first project, both because I wanted one and because the bass kit is probably the easiest of all to complete. The components are larger than a standard 6-string electric, and there are fewer of them.
My Next Project
I contacted Chuck Budreau again and sent him pictures of the completed project (before I knew about the neck and made the swap). I remembered him mentioning a kit that had recently been returned because there was a chip along the edge. He sent me a picture of the damage, we talked about it, and agreed on a discounted price. I was ready to try another DIY electric guitar kit.
Just like before, I drove over to his garage and picked up the kit. I knew I would need to do some repair work on the back edge of the body – you can read what I did in my post Fixing or Hiding Blemishes. But in more ways than that, this kit was going to be a real challenge. Was I up to it? My second project would be this PRS style kit with a flamed maple top and a set neck.
So I finished the PRS style kit, then tried a Tele style kit from Amazon. Then another. And another. At the time of this writing, it has been nine months since I made my first trip to Budreau Guitars. Chuck is still selling great guitar kits, but he has moved to Florida so I can’t just drive over and pick one out. I am currently working on my 11th project.
How was your first DIY Electric Guitar Kit? Or, are you thinking about trying one for the first time? Leave a comment below and let us know.