Building your own guitar is a rewarding project that lets you create a personal instrument with a finish that truly stands out. Dyeing or staining your guitar body properly not only protects the wood but also gives a boost to its natural beauty. In this guide, we break down the essential steps to prep, treat, and finish your guitar body, ensuring a consistent and attractive look. Whether you are a beginner or a seasoned woodworker, following these streamlined steps can help you achieve a professional appearance without overcomplicating the process.
Getting Started: Preparation
Before you start, gather all the necessary materials to avoid interruptions along the way. Here are some things you will need:
- Sandpaper of various grits (120, 220, 320, 400, and 600)
- Sanding block and large eraser or soft sponge
- Tack cloth
- Wood grain filler (preferably darker for contrast)
- Water-based or alcohol-based dye such as Keda Wood Dye
- Clean rags
- Gloves
- Fine-bristle brush or foam brush
- Clear coat (lacquer, polyurethane, or oil finish)
- Masking tape (for protecting areas like the neck pocket)
Working in a well-ventilated area and clearing your workspace sets the foundation for a smooth and successful project.
Step 1: Sanding the Guitar Body
Sanding is the first critical step toward achieving a refined finish. Begin by removing any rough marks left during shaping. Start with 120 grit sandpaper to eliminate machining marks, then move to 220 grit for further smoothing. Continue with 320 grit and finish with 400 grit to create an even surface that’s perfect for dye absorption.
Always sand with the grain to reduce the risk of scratches. Using a sanding block ensures even pressure, especially on curved sections. Don’t use your hands as the uneven pressure from your fingers can leave grooves, even if you can’t see them. Once you are satisfied with the smoothness, wipe the surface thoroughly with a tack cloth to remove all dust, ensuring that the dye will absorb uniformly in the wood.
Tip: For beveled surfaces or tight curved surfaces such as the inside of the horns, wrap the sandpaper around an artist’s gum eraser or soft sponge.
Step 2: Grain Filling (Optional but Recommended)
Certain woods, like mahogany, have an open grain that may appear rough after dyeing. A wood grain filler like ColorTone Powderd Grain Filler or Minwax Stainable Wood Filler can even out the surface by filling the pores while still allowing the natural texture to show. Choose a filler that is slightly darker than the wood to create an attractive contrast.
Mix the filler following the manufacturer’s guidelines and apply it with a plastic scraper or an old credit card. Work the filler into the grain using gentle circular motions. After letting the filler sit for the recommended time, remove any excess by wiping with a cloth and, if necessary, lightly sand with 400 grit sandpaper for an even, smooth finish ready for dye application.
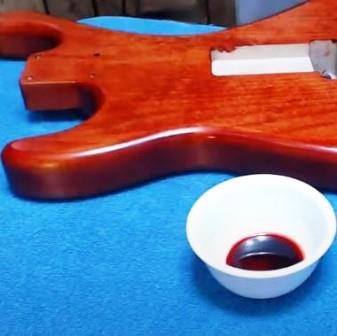
Step 3: Dyeing or Staining the Guitar Body
Now comes the creative part—applying the dye or stain. Begin by mixing the dye accurately according to the instructions provided. For a custom shade, you may blend different dyes, but always test your mixture on a scrap piece of wood or an inconspicuous area of the guitar body to ensure it shows the right tone. If you are using an oil (such as Tru-Oil Gunstock Finish) as the final finish, be sure to test this as well. Oiled finishes can alter the color of the dye, typically with a yellow hue.
Once you are satisfied with the test result, use a clean rag or foam brush to apply the dye along the wood grain. Apply the dye liberally, then promptly remove excess with a clean cloth so that the application remains even and free of blotches. Allow the dye to dry completely in line with the product’s instructions. The dye gives a boost to the wood grain, bringing out its natural texture while smoothing out any color differences.
Optionally, you can sand back the surface for an enhanced grain look. Lightly sand with 400 grit to remove some of the dye from the surface, leaving it mainly in the grain. This gives a “grain pop” effect. Then reapply the dye for a deeper, richer color if needed.
Taking a moment to evaluate the test application can make a difference. Sometimes, minor alterations in the mixture can bring out a unique look that complements the natural pattern of the wood. Experimenting with multiple combinations enables you to track down a shade that perfectly fits your vision. Remember that patience at this stage can help avoid mistakes that might be hard to fix later. Each additional coat should be applied with the same care as the initial layer to build a rich, even finish.
Step 4: Finishing the Guitar Body
Finishing seals in the color and provides lasting protection while adding a brilliant shine. Start by applying a clear sanding sealer over the dyed surface. This step creates a smooth base for the final clear coat. Use a brush or spray to evenly cover the entire surface, and once the sealer dries, lightly sand it with 400 grit sandpaper to remove slight imperfections and knock down any raised grain.
Next, apply several thin coats of your selected clear finish—whether it’s lacquer, polyurethane, or an oil finish. Working in thin layers rather than one heavy coat minimizes brush marks and drying issues. Allow each coat to cure fully according to the product directions, and lightly sand with 600 grit sandpaper between coats to maintain a uniform, smooth surface. The final clear coat not only protects the dye but also delivers an eye-catching shine that makes the guitar look professionally finished.
Tip: I like to use oil (Tru-Oil Gunstock Finish or Minwax Tung Oil Finish) or wipe-on polyurethane that can be applied in thin coats with a clean, lint-free cloth. If desired, you can thin these a little with mineral spirits, making them a little easier to apply.
After the final clear coat has cured, consider giving the surface a final buff and polish. Using a soft cloth along with a fine polishing compound can further step up the look of your guitar. This additional touch produces a mirror-like finish, accentuating every contour and curve while also sealing the finish against minor abrasions. The extra effort in buffing and polishing ensures your instrument remains as striking as it is durable.
Step 5: Troubleshooting Common Issues
Throughout this process, you may face a few challenges.
- Apply the dye or stain with a clean rag or foam brush.
- Work quickly and evenly to avoid streaks.
- Wipe off excess promptly to prevent blotching.
- Let it dry thoroughly, then assess the color.
- You may need to do multiple light coats rather than one heavy coat.
If the dye appears uneven or patchy, it may be due to incomplete sanding or residual dust that was not fully removed. In such cases, lightly re-sand the affected area with 400 grit sandpaper and ensure all dust is removed before reapplying the dye. For adjustments in color intensity, if the initial coat appears too light, opt for a second application after the first has completely dried. Conversely, if the color is overly dark, gently sand with a fine grit to remove extra dye without losing the detail of the wood grain. Regularly checking your work under different lighting conditions can help you spot these issues early, enabling you to make the necessary corrections for a smooth, even finish.
Basswood, another popular wood in DIY electric guitar kits, is quite different from mahogany! It has a tight, almost featureless grain and tends to absorb stain unevenly. Basswood is prone to blotching, so using a wood conditioner is crucial. Brush or wipe on the conditioner following the manufacturer’s instructions. Let it sit for the recommended time (usually about 15 minutes), then wipe off the excess. Allow it to soak in and dry completely. Since basswood lacks strong grain, the focus is more on achieving even color rather than enhancing grain patterns.
Check out my basswood mini P-bass here.
Step 6: Final Thoughts and Next Steps
Achieving a professional finish on your DIY guitar body is a rewarding adventure that combines careful preparation with creative expression. Every step from sanding to finishing plays a vital role in crafting an instrument that not only looks fantastic but will also stand the test of time. Take your time with each phase and always inspect your work from various angles and lighting conditions. This process not only protects the wood but also allows for customization that reflects your personal style. As you complete this project, consider setting up a dedicated workspace and gathering extra supplies for future builds. Each project is an opportunity to hone your skills and learn new techniques.
Thank you for exploring this guide on dyeing or staining your DIY guitar body. We invite you to share which step excites you the most and any questions as you move forward with your next DIY project. Your passion for creating a unique instrument will shine through in every detail, and every project adds to your experience in the craft.
Which step are you most interested in trying first? Share your plan and any questions as you progress on your next DIY adventure.