
Muslady DIY electric guitar kits are inexpensive kits sold online through Amazon, Walmart, and other mass market online retailers under a variety of brand names.1 Have you ever looked at the ads and wondered just what you might be getting? Well, I ordered one from Walmart and put it together. Here is a rundown of how that went.
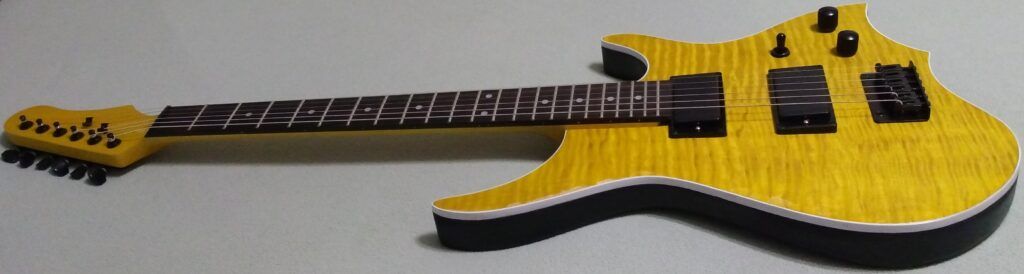
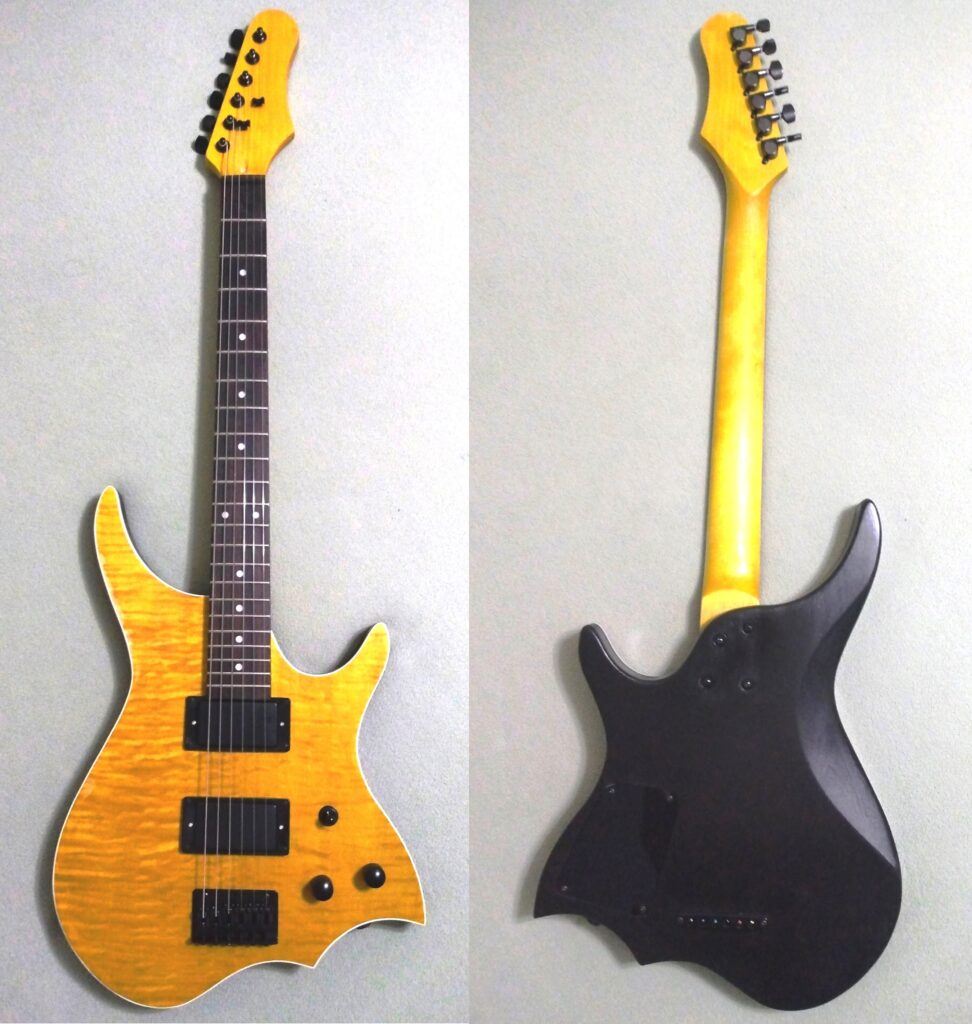
First, the bottom line. Surprisingly, the finished product looks really good. There were some issues with the flamed maple top that I will get to later, but the black back (my choice) and all-black hardware really set it off. After a fair amount of set-up, it plays amazingly well and sounds great. The electrical components seem to be good quality. It did take quite a bit of work to get to a good end result. This kit would be pretty challenging for a beginner.
What’s In the Box
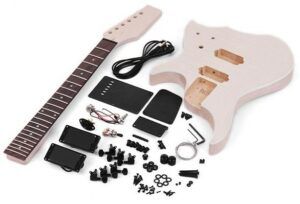
Here is a picture of the Muslady DIY electric guitar kit I purchased. There is no picture of an assembled or partially assembled product anywhere in the listing, so you kind of have to use your imagination. It has a flamed maple veneer top on a basswood body with a white plastic binding. The bolt-on neck is maple, and the fingerboard is rosewood. There are two humbucker pickups and two pre-wired pots with a separate three-way switch and 1/4-inch jack.
All the hardware is black. It comes with a set of strings and an instrument cord, which typically get tossed in a box and I don’t use them.
If you examine the picture, you might notice the back cover plate for a Strat-style tremolo bridge with springs. There is no such bridge, and that cover plate was not in my kit. I’ll discuss the bridge that is included a little later but notice that there are no holes drilled in the body for installing it. That turned out to be a good thing as far as placement.
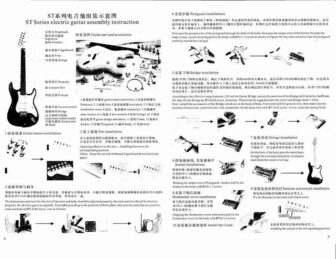
There is a booklet included with 16 pages of instructions covering several guitars. The LP-style guitar takes up 3 pages (it is the only one that includes a wiring diagram), and there are 2 pages each for the Strat, Tele, Beatle Bass, Explorer, headless and MM styles. There is a 1-page assembly instruction for a Jazz-style bass. Each page is full of small pictures with words in both English and Chinese.
So, you can see that the “instructions” are minimal. And to top it off, nothing like the kit I purchased was even in the booklet. But really, the assembly is pretty intuitive especially if you’ve ever done a bolt-on neck guitar kit.
I asked the distributor about it, and even asked him what style of guitar they called this. He/she just said, “It is a new kit we call Electric Guitar” (yes, they capitalized that) and then told me to follow the instructions.
Test Fitting the Muslady DIY Kit Parts
First, I checked the neck to see how straight it was and made a slight adjustment to the truss rod. A straight edge across the frets showed they were pretty good. I ran my finger and thumb along the edge and only found a few sharp frets that I needed to file back. Overall, the neck and fingerboard were in pretty good shape.
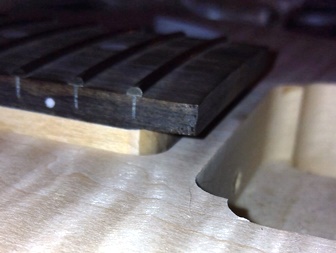
The neck was tight in the cavity but did not go in all the way. The cavity had a generous radius in the corners, and the corners of the neck were only slightly rounded. Most kit builders recommend that you leave the neck alone and make any necessary adjustments to the body cavity, but it was easier for me to round off the corners of the neck than to carve out the body. I didn’t have to worry about how that might affect the scale and bridge, since the bridge holes were not predrilled. After that it seated properly, though the cavity was pretty shallow, A straight edge extended over the fingerboard looked like it was pretty high in the bridge area.
I also put a straight edge down both sides of the neck and found that the pickup routing was properly centered, so I marked the centerline of where the bridge should go. I confirmed the distance to the 12th fret as 12.75″ and marked the proper bridge location for a 25.5″ scale length. The pickups sat very nicely in the routed holes, and I test fitted the pots and switch.
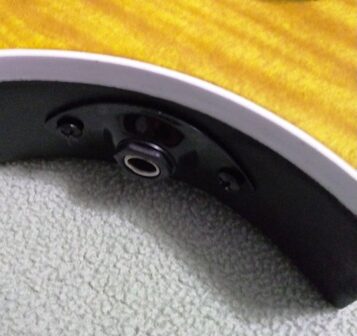
Then I looked at the jack and jack plate. The kit included a nice black curved plate with a recess for the jack. But it was curved for the convex surface you would find on the edge of a standard shaped guitar body. This odd-shaped body has a concave area where the jack hole is drilled. There was no way this would work as it was, and the metal was too heavy for me to try to bend back the other way. So, I took the jack out and turned it around. The curve of the plate was a fairly close match to the concave body edge. I decided to go with that, installing it backwards. It looks a little different to have an extended dimple instead of a recessed jack, but it is actually easier now to insert or remove the cord.
Finishing the Neck and Body
I cut and shaped the headstock just like I would with any other kit, and it came out as I intended. After sanding to 220 grit, I put a coat of Tru-Oil on the headstock and back. Then I sanded it with 800 grit wet paper and applied another coat of Tru-Oil. I rubbed Dunlop Fretboard 65 Ultimate Lemon Oil into the rosewood fingerboard a couple of times.
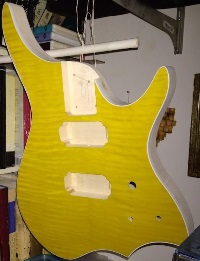
After lightly sanding the flamed maple top, I mixed and applied yellow Keda Wood Dye, wiping from the center out. If you look at the finished pictures at the beginning and end of this post, you will notice that there are quite a few places of glue bleed-through in the veneer along the binding. I sanded lightly, but didn’t want to use much pressure because this veneer is very thin.
I brought this to the attention of the third-party seller on Walmart, and they agreed to send me a replacement body. It wasn’t any better, in fact it was a little worse. So, I continued with the original body and did the best I could.
After it was completely dry, I put a coat of Tru-Oil over it, turning the bright yellow into an amber-gold. That turned out great, and the amber-gold color does a great job of blending in the glue spots along the edge.
For the back and sides I used Minwax True Black 274 semi-transparent stain. It was easy to apply with a rag and the translucent black looks nice. I finished that off with Minwax Wipe-On Poly, because I didn’t want to take the chance that the Tru-Oil would put an amber tint over the black. Then I scraped the white binding to remove any finish materials. Considering the glue issues with the veneer top, I am quite satisfied with how this turned out.
Installing the Neck
I installed the six tuning machines in the headstock, carefully lining them up and drilling the holes for the small screws. The body was pre-drilled for the neck screws and had countersinking for the washers. I don’t own a drill press. Using the body itself as a template, I carefully drilled pilot holes in the neck itself, then installed the four screws and finish washers. After checking and double-checking the location of the bridge for the correct saddle position, I marked and drilled the mounting holes. Using a long 3/16″ bit, I drilled a hole for the bridge ground wire into the bridge pickup cavity.
Next I installed the pots and switch and ran the ground wire through the pickup cavity and hole I had drilled to where the bridge would be mounted. I installed the bridge and pickups but didn’t wire them yet.
Normally I don’t use the cheap strings that come with the kit. But I was pretty certain the neck was sitting too high, and I didn’t want to waste a set of good strings if this was not going to be playable. So, I put the cheap strings on. Sure enough, they were touching the last few frets. It was probably the correct height for a Tune-o-matic style bridge, and since no holes were predrilled I could have obtained one and installed it. But that isn’t what was supplied, and I decided to stay with what I had.
I took the strings off and removed the neck. Then I cut a sheet of heavy stock paper in the shape of the top of the neck cavity. With a shim under the outer two neck screws only, it changed slightly the angle of the neck in the cavity and resolved the issue. After sanding and filing the nut to set the first fret string height, I adjusted the saddles to get the string height at the 12th fret at about 0.060″. It felt great.
Problems With the Bridge
Next I set out to intonate the strings, and that’s when I noticed a problem. On the A-string and low E-string the adjusting screw for the saddles was hitting the string enough to make a considerable bend in it. This top-loading fixed bridge wasn’t going to work for me. Fortunately, the bridge also had holes for a string-through mounting. But there were no string-through holes in the body, no ferrules included, and I doubt this is the way this kit was intended to be assembled.
Recall that I don’t have a drill press. I do have a metal guide block that can get me started drilling a straight hole. So, I marked the location of the 6 string-through holes, removed the bridge, and did the best I could to get a straight hole coming out the back side. It looked pretty sloppy. I didn’t have any black ferrules handy, so I put a washer on the back of the guitar and pulled the strings through temporarily just to see if it was going to work. It did.
I re-strung the guitar with the sleeves against the bottom of the bridge and proceeded to set the intonation. That seemed to be going well. I completed wiring the pickups, switch, pots and jack by copying the way I wired my PRS-style kit (remember, there was NO wiring diagram provided for this kit!), then plugged it into my chromatic tuner. Once I got the intonation set, I tried playing a few chords and scales.
I was amazed at the results! When I played open chords, they were in tune. I could bar all up and down the neck. Scales anywhere on the fingerboard sounded great.
Finishing The Muslady DIY Project
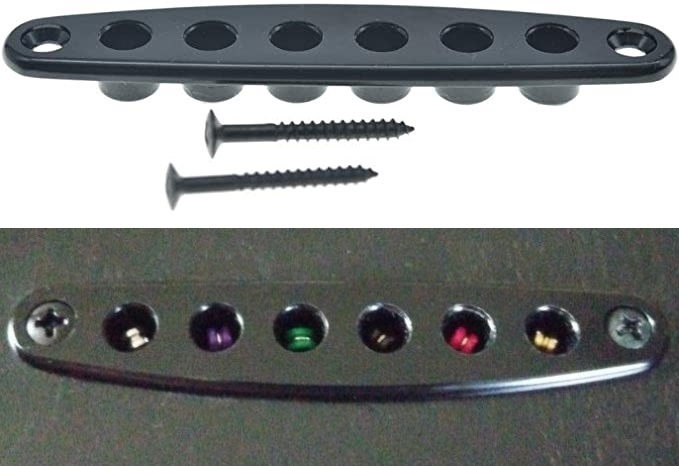
Now I was satisfied that this project was going to turn out OK. The back of the guitar looked pretty bad where I had drilled the string-through holes. Even if I purchased some regular string-through ferrules and installed them, the alignment was going to look way off. But I found this one-piece “String-Thru Body Ferrule Bushing Plate” at Amazon and ordered it. When it arrived a few days later, I meticulously removed a little of the wood around the back holes with an X-Acto knife until it could be pushed all the way down, then installed it. You would never know that the original holes aren’t in perfect alignment.
I removed the cheap strings, tossed them in the trash, and put on a set of D’Addario EXL-110 strings (that’s what I always use). Then I fine-tuned the saddle heights and intonation.
Like I said at the beginning, it took a lot of work to get here. But other than the finishing materials, the only thing I added to what was in the kit was a set of strings and that ferrule bushing plate. I am quite happy with how this sounds and plays. It was worth the frustration and extra work, and actually a lot of fun in the end. Frankly, I’m kind of proud that I was able to make this kit into a nice instrument.
Would I buy another Muslady kit? Maybe… well,YES! They are great low-cost basic kits that are pretty easy to mod. Even with all of the frustrations, this turned out to be one of the best sounding and easiest playing kits I have built.
1In my experience, you are ALWAYS better off with Amazon rather than Walmart when it comes to third party sellers.
This is a very detailed and extremely helpful review of the Muslady DIY electric guitar kit. It is amazing to read how you fixed the problem with the bridge, which to a large extent explained to me why the kit is not good for beginners. Does the kit come with detailed instructions, or are they just basic ones?
Well done on completing the guitar and getting good sound from it. Can one save a lot of money by buying a guitar kit? Or is it not really worth the frustration? Thank you.
Thanks! I’d say the instructions were pretty much non-existent. Nothing in them matched what I had. But, it wasn’t my first kit, and some things are pretty standard.
The challenge of the build and ultimate completion made it worthwhile for me. I don’t think I’d recommend it as a way to save money, though. There are a lot of inexpensive electric guitars out there that, when properly set up, make fine instruments.
It is a lot of fun and very rewarding.