Sometimes when you are working on your DIY electric guitar kit you encounter problems. Most of them can be overcome, and they don’t have to derail your project. One common issue you might have to deal with is a physical blemish – perhaps one you discover in the kit, or perhaps one you inadvertently cause. Here are some ideas on fixing them.
Fixing Glue Spots
In my post Muslady DIY Electric Guitar Kit Review I described the presence of several places of glue bleed-through in the veneer along the binding. After I brought this to the attention of the third-party seller, they offered to send me a replacement body. When I received the replacement, I found it to be in worse condition than the original and did not use it for that project.
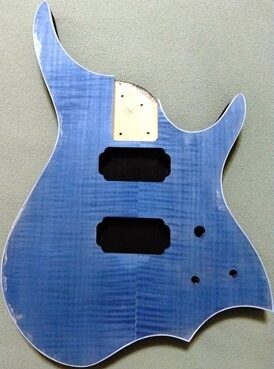
But now I had an extra guitar body in a very unique shape, so I decided to experiment with it. After lightly sanding the flamed maple veneered top, I applied a couple of coats of blue Keda Wood Dye. You can see in the picture how the glue spots did not absorb the dye. The seam in the veneer shows through as well (and it isn’t centered on the pickups or neck!). This veneer is very thin and additional sanding or preparation was risky.
First I considered just painting the whole thing a solid color, or at least painting the top a solid color. That would eliminate the problems with the glue, but it would cover the flamed maple veneer that was really starting to look nice even with just a few coats. So I decided to try some kind of a burst. If that failed, I could still paint it all solid. Before doing the burst, I finished dying the veneer to a medium purple.
The burst needed to be a solid paint to hide the glue spots, so I tried a procedure I remembered seeing in a video a while back. First, I traced the shape of the guitar body onto a piece of cardboard. Then I came inside that tracing a couple of inches and made another outline. I cut out the smaller outlined shape with a pair of scissors.
Before starting I masked off the sides and back, since I had already stained them black. And I used painter’s tape in the neck cavity to prevent paint buildup. The binding was white, so I chose to use just regular white enamel spray paint in a can. I’m not going to a lot of expense with this project.
This setup was reconstructed and the pictures taken after I had already finished, just because I forgot to take them while I was doing it.

I put a couple of blocks made from 1×3 pine in the routed pickup holes and laid the cardboard cutout on the blocks. This cardboard shape, slightly smaller than the guitar body, now rested about 1-1/2” above the body. Then I carefully and methodically sprayed white enamel paint from a can down onto this setup. Without moving the cardboard, I waited for it to dry and then did it a second time.
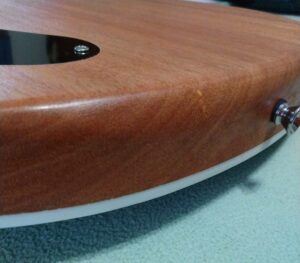
The result was a little surprising. The elevated cardboard cutout allowed the paint to gradually transition to the purple without any harsh lines, and the solid white along the outer edge completely covered the glue bleed-through and a good bit of the seam line. What remained of the seam will be covered by the bridge.
There was some residual spray that came under the cardboard, but it dusted right off. After letting the enamel dry for nearly a week, I sprayed the top with nitrocellulose lacquer. I am quite satisfied with the end result.
Fixing Dents in the Wood
Sometimes when working on a guitar kit a tool will slip, or the body gets bumped by something and it leaves an indentation in the wood. On a few occasions, I’ve found these dents in the wood and had no idea how they got there. Maybe they were there when I bought the kit and I didn’t immediately notice them.
This little trick is pretty well known. I’ve done this several times on both mahogany and basswood and assume it will work on other woods as well, though the harder woods may be more difficult. I had a very small indentation mark in a maple neck and this method corrected it.
Make sure you have a good, solid, and steady surface where you can work. Use a regular household iron that you would use on clothing, or for small dents you can use a soldering iron. The household iron is easier. Turn the heat setting to high.
I usually use a large terrycloth hand towel or washcloth so I can cover the surface and protect from accidentally touching another area with the iron. Thoroughly dampen the area of the cloth where you will be using the iron. Saturate it with water, then wring it out so that it does not drip.
Lay the dampened cloth over the damaged area and apply heat. Just go for about ten seconds to start, then check the damaged area and repeat if necessary. Go until you can no longer see or feel the indentation. Do not let the cloth dry out – dampen it again if it does.
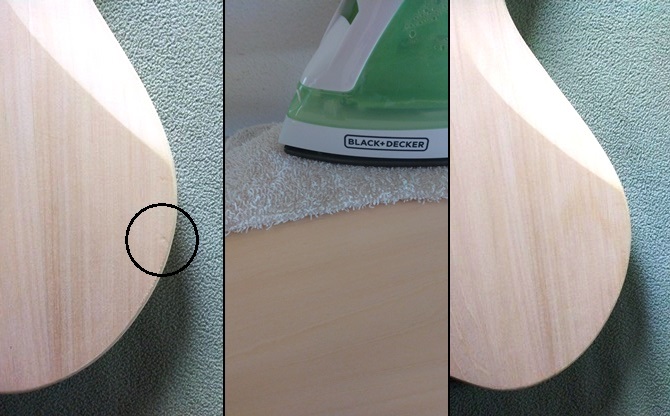
When you have finished, wipe the area down and run your hand over it. You should not feel the indentation, but you will likely feel raised grain where the moisture was applied. Wait until it is completely dry, then sand it smooth. Don’t attempt to sand or finish the spot until you are sure it is fully dry.
You can also use this method on a damaged area that is already finished. Just be a little more careful when applying the heat so that you don’t discolor or otherwise mar the finish.
Fixing Chips in the Wood
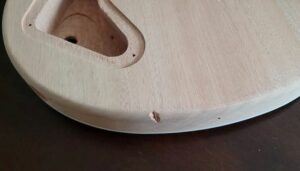
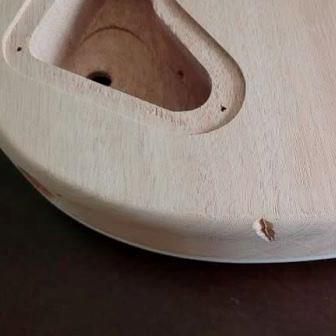
I once got a great deal on a DIY electric guitar kit because it was blemished. There was a chip in the edge of the mahogany body, about 1/2” long and 1/4” wide. It looked like it was about 1/8” deep but there was a crack that actually went much deeper.
My intention when I got this was to fill the damaged area with a good wood filler and then apply an oiled finish to the back and sides of the guitar body. But after testing a couple of different fillers on some scrap wood, I could not get them to take the Minwax Tung Oil Finish satisfactorily. So I went with plan B.
I decided to sand down the damaged area to remove the blemish as much as possible. Yes, that meant actually changing the radius profile on the edge of the guitar. It was a long and tedious process, and as I mentioned the crack went pretty deep into the guitar. But after a lot of work, I eliminated nearly all of the chip itself. Then I put a small amount of filler into what remained of the crack.
Of course, it was necessary to continue around the edge of the back so that it blended into the new radius profile in the damaged area. I know that the profile has been changed and is inconsistent, and there is evidence of the filler in the crack. But to the casual observer, it goes undetected. The Minwax Tung Oil Finish enhances the grain creating a more than acceptable look.
Conclusion
The key to any of these repairs is patience. Think everything through before acting. Have a plan, and before executing it have a backup plan in case you don’t like the initial results. Try not to do anything that cannot be undone or further modified. And most importantly, if you feel frustration setting in – stop. Come back to it later.
Our kits are not perfect, but they are our own handiwork.
Painting can be very hard especially if you desire professional type results; however, some of the best painting results are obtained by being very creative and by trying different techniques. By following the creative process, all the way you can end up designing a personalized creative delight. A fully customized guitar which is highly noticeably as truly unique and special, is considered a work of Art and people may pay you much money to complete. I accidentally, had to paint my guitar and was worried about what it would look like but I was offered many times what it was worth simply because someone was impressed with its uniqueness.
Thanks for the input! Painting is certainly a challenge, I find it tries my patience a lot more than dyeing or staining. But that’s the key to all of these fixes – patience!