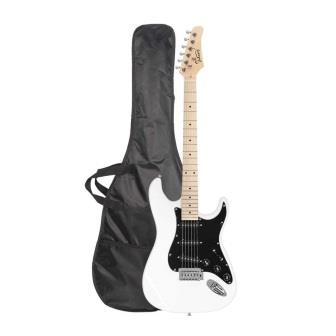

This Glarry GST electric guitar is a sharp looking Strat-style instrument. Mine is a gloss white body with a maple fingerboard, black pickguard, black pickups, and chrome hardware. But wait, isn’t AxeKit.com all about DIY electric guitar kit building? Why are we reviewing a fully assembled guitar?
Actually, I bought this guitar to take apart. I wanted the already finished white body for one project, and I wanted the neck with the hardware for another project. It seemed like a good, economical choice, so I purchased it. When it arrived, I was really impressed – as I said, this guitar looked great! So I went ahead and tuned it, then plugged it into my amp.
It sounded as good as it looked. Well, almost. The quality of the sound was good, but as with any new guitar, there was some tweaking to do on the setup. So I made some quick adjustments, got it playable, and then found myself in a quandary. Do I really want to disassemble this nice instrument?
What’s In the Box
This Glarry GST electric guitar was part of a package deal. You can purchase it alone, but I found a good price on the whole package, so I went for it.
The Glarry GST is a Strat-style guitar. Here are the quick details:
- Strat-style double cutaway basswood body
- Maple C-shaped neck
- 22-fret maple fingerboard
- 1.656 inch (42mm) plastic nut
- Standard 25.5 inch scale
- Three single-coil pickups
- 5-position standard Strat-style blade switch
- 1 volume, 2 tone controls
- Tremolo bridge, 6-point
- Sealed tuning machines
Mine is white. It also comes in black, red, blue, yellow, green, sunset, and skyblue. The pickguards are always black.
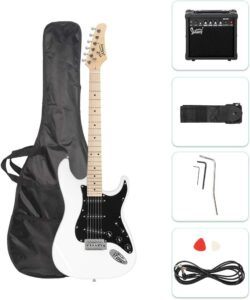
Along with the guitar, the package I bought included:
- Glarry GA-20 20-watt amplifier
- Vinyl bag
- Strap
- Cord
- Tremolo bar, hex keys, and a pick
The Glarry GST Electric Guitar
Then neck is a comfortable “C” profile, so it is not as thick as some electric guitars. It fit my hand well. Sometimes I hook with my thumb, and that didn’t present any problems. I ran my hand down both sides of the fingerboard and didn’t find any sharp frets, which is unusual even on moderately priced guitars. The frets are smooth but need to be polished, which could just be dependent on how long it has been sitting in the box.
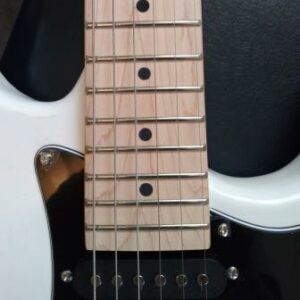
On my Glarry GST, the neck/bridge alignment is just a little off. At the bottom of the neck, the high E string measured 0.125″ from the right edge, and the low E string measured about 0.180″ from the left edge. Looking at the position marker, you can see that it isn’t perfectly centered between the third and fourth strings, and that the high strings aren’t perfectly centered over the pickup poles. Honestly, that shouldn’t be a problem for anybody.
The Glarry GST feels very comfortable to play. The basswood body is not too heavy and is balanced well with the neck. According to the Glarry specifications, the guitar weighs 6 pounds. I weighed mine and it was 5 pounds 10 ounces. It has strap pins in the normal locations in the center of the bottom and at the top of the left horn.
After raising them up a little, the pickups sounded pretty decent. They are balanced and bright, and I did not notice them being microphonic. I’m sure they are generic single-coil pickups, but they seem to be of good quality. The poles heights are fixed and all at the same level, with regular adjusting screws on either end.
The 5-way switch is smooth and isn’t noisy, though it is a PC-board type. The controls are mini-pots with green 100v caps. All of that is typical for a guitar at this price point, and they work as they should. The black pickguard is 3-ply with the white stripe around the edge.
Overall, I really don’t have any complaints about this guitar. For an inexpensive Strat-style instrument, you would have a hard time finding something better.
The Rest of the Package
The Glarry GA-20 guitar amplifier is rated at 20 watts according to the manufacturer. It has a 6-1/2 inch speaker. There is one 1/4-inch instrument input, with bass and treble controls and a master volume control. A pushbutton switch selects overdrive, and there is a single “gain” control for this feature. A 1/8″ jack on the front panel is marked “MP3” and provides an auxiliary input for a phone or other audio device. There is a 1/4-inch jack for headphones, which is a nice feature. You will need an adapter for smaller plugs, and there is no provision for a footswitch to operate the overdrive.
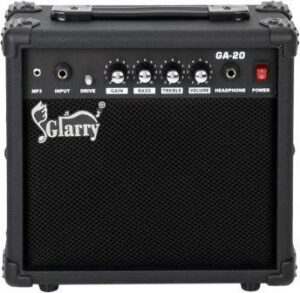
I wasn’t expecting a lot, but it really isn’t a bad little practice amp. I struggled with the overdrive and gain control, and it seemed like I needed to have “overdrive” on to get enough volume. There wasn’t a huge amount of distortion, which is fine for me. Physically this is a small amplifier, about 11-1/2 inches wide and 10-1/2 inches high, but it is very thin – a little less than 5-inches. There is a handle on top so it is portable and convenient to carry, and it’s lightweight at just about 6 pounds. This isn’t big enough for a club or a church sanctuary , but it is fine for practicing in a small room.
The vinyl “gig” bag also isn’t suitable for gigging. It’s just a single layer with no padding, and it is a good dust cover for home use. It zips closed, there are soft woven carry handles and a full-width zippered pocket on the front. The package includes an 8-foot lightweight instrument cord, a woven strap, the tremolo bar, and two hex keys (one for the bridge and one for the truss rod). And a pick.
So, at this point I will highly recommend the Glarry GST electric guitar. If you don’t have a practice amp, this one will serve you well. But if you already have one or don’t need one, then pass on all of the other stuff and just get the guitar. Note: at the time of this writing, the guitar alone is sold out and unavailable.
A Little About the Setup
I mentioned that this guitar is very playable with a few quick adjustments. Here are the steps I go through for a minimal setup on an electric guitar. This setup is for a hard-tail bridge as found on most Fender guitars. The process is similar but not exactly the same for Gibson-style tune-o-matic bridges.
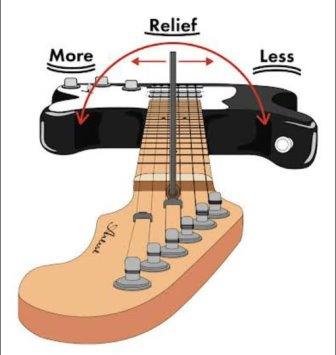
The first thing I checked is the neck, looking first for any twist (I fond none). Next, you will need a good straightedge that you can lay on top of the frets. If the neck looks pretty straight with a very slight concave bend up (like this Glarry), then just leave it alone. If there is a too much bend up or any back bend, then adjustment of the truss rod is needed. Never turn the truss rod more than 1/8-turn at a time, and let it set for several minutes after each adjustment.
I checked the string height at the nut, pushing down on the string between the second and third frets and measuring the gap at the first fret with a feeler gauge. I like the gap to be around 0.010-inches. This Glarry guitar measured 0.014-inches on the low E string and 0.012-inches on the high E string, so I didn’t make any adjustments. On other guitars, I have used inexpensive needle files to lower the slots to the level I wanted.
To set the proper string height, measure the gap at the 12th fret without pressing the string down. The “action” here is a matter of personal preference and is made by raising or lowering the bridge saddles. I adjusted the Glarry to 0.050-inches to start, then raised the strings until there was no (or very minimal) fret buzz at the higher frets. Then I fine-tuned the saddles so that they closely matched the radius of the neck – again just eyeballing it. You could purchase tools made to measure the radius if you wanted.
Now play every note on the guitar. We are looking for any fret that sounds dead, buzzes, or is otherwise different than the others. If you find one, you may need to do some fret leveling, which is a little more than just simple setup. It is possible to address this problem with the other adjustments, but that may not really solve the problem. If you need to adjust a single fret, you will want to remove the strings to do it properly.
Setting the Intonation
After everything else is as you want it, then set the intonation. To do this, I use an old chromatic tuner with a meter that has an actual needle (hard to find now!). I have found it much more difficult to do this with one of those clip-on tuners, but if that is all you have it will work. A phone app is also a good reference.
First, tune the guitar. Then, I start with the low E string, and confirm it is in tune by lightly playing the harmonic at the 12th fret. Touch the string, do not push it against the fret, and play it. It will vibrate at the exact center of the string, an octave above the open note. Then push down at the 12th fret and play. Almost always at the beginning of the process, the note is sharp. De-tune the string a little, then use a tool (usually a screwdriver turning clockwise) to move the saddle for that string backwards, making the string length longer. Re-tune the string, and repeat the process. When the string played at the 12th fret is exactly the same as the harmonic, the intonation is properly set.
Follow this process on the other five strings. Turn the saddle screw clockwise to make the string length longer and lower the note at the 12th fret; turn it counter-clockwise to make the string length shorter and raise the note at the 12th fret. Keep going back over the strings until all six strings have the same note pressing at the 12th fret as they have using the harmonic at the 12th fret.
Glarry GST Conclusion and Verdict
After making this limited setup, the Glarry GST Strat-style electric guitar sounded great and played very well. And at this point, I have not decided whether or not to disassemble it, which was the reason for the initial purchase. It is actually a very nice guitar. I can confidently recommend it to anyone searching for an economical way to get started. It is constructed well enough that you could invest in a professional setup if you didn’t want to attempt it yourself.
Since I haven’t yet decided what to do with it, I haven’t changed the strings. To fully appreciate your instrument and give it the chance to sound the best it can, you will always want to replace the strings that came on it from the factory. AxeKit.com recommends D’Addario strings. Personally, I use D’Addario EXL110’s.
Now for the complete package, I honestly think you could do better with a different amplifier. But if you are just getting started and are only going to be playing at home or with your friends, this one is fine. If you intend to take your guitar anywhere, get a different, padded gig bag.
Do you have a Glarry guitar? Leave a comment below and tell us about it.
Stratocaster is a registered trademark of Fender Musical Instruments Corporation.
Hey Larry,
Looks like the Glarry GST is a great guitar for beginners or something that can be taken apart and tweaked lol
How does it compare to the Fender strat as the body looks very similar.
I’ve been looking for a spare gig guitar but don’t want to shell out the money for a second Fender strat.
Thanks, Jay. This is a copy of the Fender Strat, which is where this Glarry model gets its name, GST.
The Glarry guitar is lighter – 6 pounds compared to 7-1/2 to 8 pounds for a Fender. This one has a basswood body, a lighter and less costly wood than the Fender’s alder body. Alder is usually said to be a better tonewood, but that’s subjective and a lot of people probably wouldn’t notice any difference.
Your Fender probably has a 2-point bridge mounting, while this Glarry is a 6-point. So if you use the tremolo, this may feel a little different.
I mentioned the Glarry likely has generic pickups, and I didn’t find any identifying markings on them. Your Fender has pickups designed by Fender and manufactured to meet Fender specifications. The nice thing about these copies is that the pickups, or even the entire loaded pickguard, is easily replaced.
If you want to try this lower-priced Glarry as a backup or maybe to take somewhere that you don’t really want to take your prized Fender, I would recommend getting a professional setup. Then, if you like the way it feels and plays, you might consider upgrading the pickups and maybe replace the plastic nut with bone. And if it isn’t for you, you won’t have a lot invested and can keep on looking for something else.
I will be interested in hearing what you decide!