So you have completed your electric guitar kit and it looks great! But now, when you try to play it, the guitar feels terrible in your hands. It is hard to make chords or play scales, and even though you’ve tuned it, everything sounds way off. It’s time for setting up your DIY electric guitar so that it plays and sounds as good as it looks.
What Makes Your Guitar Work Correctly
The musical notes from your guitar are the result of the string vibrating at a certain frequency. For example, the A string on a standard guitar vibrates at 110 vibrations, or cycles, per second, producing the desired note. On a musical staff or a piano keyboard, this is the second A below middle C, commonly designated as A2.
Every time the frequency doubles, the pitch of the note increases by one octave. For example, the A at the second fret on the G string is 220 cycles per second (cps), designated as A3. The A at the fifth fret on the high E string is 440 cps, designated as A4. This is known as the standard orchestral pitch for tuning.
The 12th fret on your guitar is in the middle of the total string length. If you pluck your properly tuned open A string, it vibrates at 110 cps. Now touch your finger to the string just above the 12th fret, in the middle of the A string, and pluck it. Don’t push down against the fret, just lightly touch the string. Now each half of the string is vibrating at 220 cps, or the second octave of the open A string. This is known as a natural harmonic frequency.
The Goal of Setting Up Your Guitar
When you press the strings down behind a fret on the fingerboard, you are actually shortening the remaining length of vibrating guitar string. The effect of shortening the string is a higher frequency. For example, when you press with your finger behind the third fret on a properly set up A string, you shorten the string so that it vibrates at 130.8128 cps and you hear a C pitch – actually, C3, an octave below middle C. This same idea applies to every fret on your guitar. That is why the distance between the frets gets shorter as you go toward the bridge. They are placed so that the correct string length is achieved.
There are two goals in setting up your guitar. First, we want it to be comfortable to play. You should be able to move your hand comfortably up and down the neck and place your fingers where they need to be without fighting against the strings. Second, we want every string to be in tune at every fret along the fingerboard.
To do this, we will check key places and, if necessary, make several adjustments along the way. Pushing the string against the fret to shorten it actually causes it to stretch slightly, and the different diameter (gauge) strings stretch at a different rate. In setting up, we are seeking to achieve the proper balance between the height of the string above the frets, which determines not only how easy they are to play but also how much they will stretch, and the overall length of each string.
Step One – The Truss Rod
The truss rod is a metal shaft that runs the full length inside the neck and counteracts the tension of the strings in order to keep the neck straight. It is NOT the end-all in setting the string action, and using it that way could damage your guitar and indicate that you have other issues to deal with, such as the neck angle. Only adjust the truss rod to get the neck straight or with a slight forward bow.
Begin without the strings in place. Adjustment is usually made to the truss rod using a hex wrench in the hole at the top of the neck, just beyond the nut. Some guitars may use a different tool. Put a straightedge on the fingerboard, and adjust the truss rod so that the neck is flat or has just a very, very sight forward bow to it.
If there is a too much forward bow or any backward bow, then adjustment of the truss rod is needed. The truss rod counteracts the string tension; loosening it will create more forward bow and tightening it will make the neck flatter. Tightening too much will cause back bow. Never turn the truss rod more than 1/4-inch at a time, and let it set for several minutes after each adjustment.
Click here for a straightedge that is notched on one side so that it will go over the frets of most electric guitars and lay directly on the fingerboard. The other side is usually straight. so you can lay it on top of the frets if they are are level.
Once the neck is flat, install the strings, and then check the neck again to see if the truss rod needs further adjustment.
Step Two – Fret Leveling
Use a fret rocker tool to check for high frets. This multi-sided tool is designed so that you will be able to find a perfectly straight edge that will span three frets and no more. By spanning three frets, you will be able to find one that is high. Go successively from frets 1-2-3 to frets 2-3-4, then 3-4-5, and so on until you have covered them all, rotating the tool each time so that it only covers three frets.
If at any point the tool “rocks” it is an indication that the fret in the middle is higher than the other two. Most kit builders will mark the top of that fret with a colored marker that is easy to see (be careful not to slip and mark the fingerboard). Be sure to check all areas of the frets – left, center, and right as you are looking at them. When you find a high spot, mark it. Then you can use a file or sanding block on only the marked portion to relieve the high spot.
Use a fret leveling beam to go up and down the fretboard (never across the frets) to remove high spots on the frets. This is usually a perfectly straight aluminum channel with different grit sandpaper on each side. Be careful to always keep it level with even pressure.
Gently remove any sharp fret edges you feel when you run your hand up and down the sides of the neck. Some DIY kit builders will also use a fret crowning file to shape the fret. After you have finished and are satisfied, polish the frets with 0000 steel wool. Use tape or some type of guard to protect the fingerboard when you are crowning or polishing the frets.
Step Three – The Nut
The most stretching of the string will take place at the first fret, because the distance to the nut behind your finger is the shortest. That makes the angle the string drops over the nut the greatest it will ever be. So, we want to make sure the slot in the nut is the right depth. For this, you will need a feeler gauge or similar tool.
Measure the distance between the first fret and the bottom of the string. Typically, it should be 0.020″ for the E and A strings, 0.018″ for the D and G strings, and 0.016″ for the B and E strings. Now press your finger between the second and third frets, so that the back of the string is against the second fret and the nut, and measure the height of the string over the first fret. It should be about 0.010″.
You can lower the strings by filing the nut slots, but be careful. If you remove too much, you may end up replacing the nut. Nut files range from small, inexpensive needle wires to professional tools.
If you have the nut height set correctly, then when you play the first fret on your B string you should get a C (1/2-step higher), and so on across the first fret. If the note comes out a little sharp, you may want to lower the nut slot.
Step Four – Setting Up the String Height
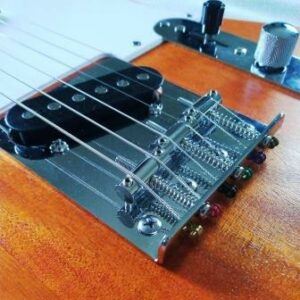
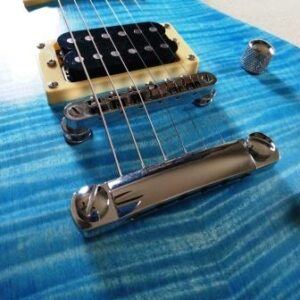
Next we will set the string height using the saddles at the bridge. There are primarily three types of bridges used – a tremolo bridge common in Strat-style guitars, a fixed hardtail bridge, and the Tune-o-matic bridge used in Gibson-style guitars.
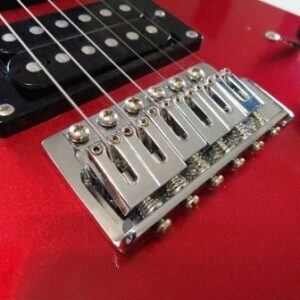
For the tremolo and hardtail bridges, the height of each string is adjusted individually (or, in the case of a vintage Tele style, in pairs). Adjust the height by inserting a small hex wrench into the adjusting screws on each side of the saddle. If there is only one string per saddle, adjust both screws evenly. In the case of the Tele-style pairs, adjust the height of each string using the screw closest to it. Turning clockwise raises the string; counter-clockwise lowers the string. It is important to keep the radius over the top of the strings as closely as possible to the radius of the top of the fingerboard.
For a Tune-o-matic style style bridge, the entire bridge is raised or lowered using the two large screws going into the posts in the body of the guitar. Turn them using a screwdriver, being careful that it does not slip and damage the finish on your guitar. Turn counter-clockwise to raise the string; turn clockwise to lower the string.
String height is usually measured at the 12th fret, halfway down the neck, and is subjective. For a good starting point, capo the first fret (taking the nut out of play) and set the strings for low action at about 0.050″ from the top of the fret to the bottom of the string. You can raise them in small increments if you need to reduce fret buzz or for personal preference.
These are common types of bridges. There are variations of these, but the principles of adjustment are pretty similar.
Step Five – Setting Up the Intonation
To set the intonation, we need to adjust the length of each string. Remember, the string heights as well as the gauge of each string are factors that affect the way the string stretches when when played. Generally, to match the fret spacing (which, buy the way, is NOT perfect), thicker strings will need to be slightly longer than the thinner, smaller gauge strings. Wound strings will also not be exactly the same as plain steel strings.
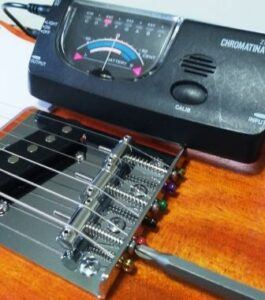
I like to use a chromatic analog tuner with an actual, physical meter needle. But digital tuners work fine, too, and even a clip-on tuner will suffice. There are a number of very good apps like Guitar Tuna that will give accurate readings.
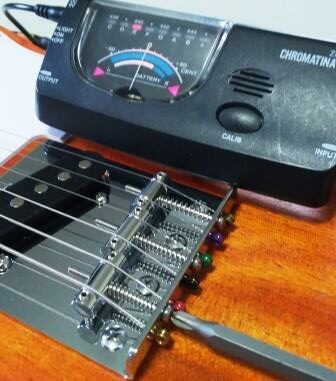
Start by tuning your guitar. Then play the natural harmonic at the 12th fret (as mentioned above) to confirm that you have the guitar in tune. A good chromatic tuner should have no problems, but if you encounter difficulty with a tuner specifically for 6-string guitars, especially the clip-on variety, you might have difficulty with the harmonic. If that is the case, try using a phone app and setting it for a 12-string guitar. 12-string guitars have the lower four strings on octaves and the tuner will recognize the higher frequencies.
Now press down at the 12th fret and play the string. I usually start with the low E string, but it doesn’t really matter as you will be doing the same procedure for each string. If your tuner indicates the note is either flat or sharp, you will need to make an adjustment.
If the note played at the 12th fret is sharp (higher in pitch than the natural harmonic), the string is too short and you will need to lengthen it. To lengthen the string, move the bridge saddle away from the neck. If the note played at the 12th fret is flat (lower in pitch than the natural harmonic), then the string is too long and you will need to shorten it. To shorten the string, move the bridge saddle toward the neck. Make small adjustments, and check the tuning each time.
On tremolo and hardtail bridges you will see long adjustment screws with springs around them that go horizontally into the saddles. To move the saddle away from the neck (lengthening the string), turn the screw clockwise. It helps to de-tune the string first, move the saddle back, and then bring the string back up to pitch. To move the saddle toward the neck (shortening the string), turn the screw counter-clockwise. The spring around the screw will help push the saddle away, but again it may help to de-tune first so that there is not so much downward pressure on the saddle.
For the vintage Tele-style bridge, there are two strings on each saddle. You may need to split the difference between the two, meaning neither string is at the correct length. This is part of what gives the Tele style guitar its unique sound. If you find yourself unable to get an acceptable intonation with the vintage saddles, you may want to consider compensated saddles.
For a Tune-o-matic bridge, access to the adjusting screws can be difficult. The exact location of the screw may not be the same on all models, but you should be able to find where to make the adjustment. Look at the threads and think about which way the saddle will be moved. If you are adjusting from the front of the bridge, turning clockwise shortens the string. If you are adjusting from the back of the bridge, the opposite is true. The procedure is the same – lengthen or shorten the string until the note played at the 12th fret matches the harmonic.
On a Tune-o-matic bridge, there generally is not as much adjustment available as you will find on a hardtail bridge. Some of them will also have an adjusting screw on either side of the bridge that pushes against the post. Turning that screw clockwise can pull the bridge back a little more, making the strings longer. Use this adjustment only if needed.
Do this procedure for all six strings (or seven, or four, or five depending on what kind of guitar you have). Repeat as necessary until you are satisfied with all strings.
Step Six – Setting the Pickup Height
The final step in the setup is to adjust the height of the pickups. This adjustment is very subjective, so, just do what you like best. Turn the screws on the sides of the pickups (and at the top middle of a Tele-style bridge pickup) to raise or lower that edge of the pickup. Adjust them so that you get a consistent volume across the entire range of the strings – unless, of course, you prefer that the bottom end or higher end be louder. It is all up to you.
Having your pickup too low will mean you have less output. Setting it too high it may hit the strings, or you may hit it with your pick or fingers while you are playing. And if you have more than one pickup, you will probably want to adjust them so that they have relatively consistent volumes between them.
Set Up Complete!
Now your DIY Electric Guitar should sound much better! After you have done this a few times, you will develop your own personalized way of doing things. There isn’t one correct way, and what I have described may not be the best in every situation. It works for me.
Do you have any techniques or tricks you would like to share? We’d love to hear them. Please leave a comment below.