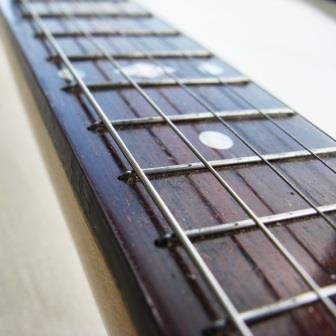
A straight neck and level frets are important for the playability of your completed DIY electric guitar kit. Not having proper neck relief and level frets can lead to actions problems, string buzzing and intonation issues. There are a few “specialty” tools that can be used to get the best results. Fortunately these are not expensive items, and you can even make them yourself. The end goal is to know that you have a straight neck and that there are no high frets on the fingerboard.
Notched Straight Edge
Before beginning any fret leveling it is important that the neck is straight. The easiest way to know if the neck is straight is simply to look down the side of the fretboard But if it is necessary to do any fret adjustment, the most accurate way to check for a straight neck is with a straight edge.
Since one of the steps in improving playability is to level the frets, we start by assuming they are not level. Putting a straight edge perpendicular to unlevel frets will not give an accurate indication that the neck is straight, so it is necessary to use a straight edge that is notched so that it goes over the frets and rests on the fingerboard.
Notched straight edges are commercially available to fit standard guitar scale lengths. Most Fender and Fender-style guitars have a 25.50″ scale, and most Gibson and Gibson-style guitars have a 24.75″ scale. That means that the notches in the notched straight edge would need to be different for each guitar scale. Many commercially available notched straight edges have the 25.50″ scale on one side and the 24.75″ scale on the opposite side.

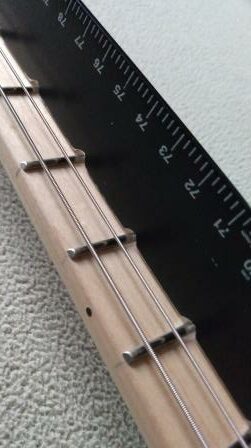
This iLuiz guitar neck notched straight edge has been designed so that one notched side covers both the 25.50″ and 24.75″ scale lengths. This leaves the other side without notches for easier handling and so it can be used as a regular straight edge.

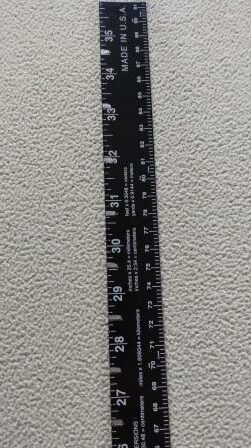
It is a little more difficult to find a notched straight edge for a bass guitar. A standard long-scale bass has a 34″ scale, and many 5-string bass guitars have a 35″ scale. Like the 6-string guitar tools, a notched straight edge for a bass guitar often has the 34″ scale on one side and the 35″ scale on the opposite side.
But there are other scale lengths, and finding a notched straight edge for these might be almost impossible. For example, (click links to see these products) many Mustang and Jaguar guitars have 24″ scale lengths. Many PRS style guitars have a 25″ scale. A short-scale bass is generally a 30″ scale, and a medium scale bass has a 32″ scale. The Solo Guitars short-scale bass kit uses a 28.5″ scale. And a project I am working on as I write this, a short-scale Les Paul style kit, has a 20.75″ scale – the same as the legendary Rickenbacker 325.
Make Your Own Notched Straight Edge
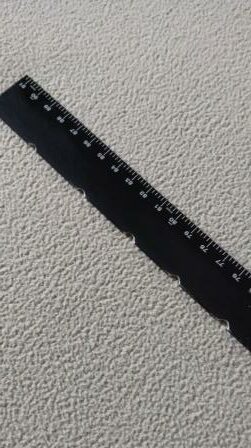
It is not too difficult to make your own notched straight edge. Granted, it may not be as precise as a machined-edge tool, but this will get the job done. I found it necessary to make my own notched straight edge for the shortened 20.75″ Les Paul style kit I am working on. If there is one commercially made for this scale, I haven’t found it yet.
And you may find that it is much less expensive to make your own notched straight edge. I’ve done two of the now, both of them made from one of these aluminum yardstick rulers from Walmart that I picked up for about $3. This is extruded aluminum, and it is very important to check the aluminum yardstick before you start to make sure it is, in fact, straight and level. The easiest way to do this is to put the edge against a glass countertop or tabletop.
Be forewarned: the aluminum yardstick will not offer the same stability and durability as the stainless steel straightedges listed above. But then, they don’t cost nearly as much. And they are customizable to the scale you need.
The procedure is pretty simple. First, cut the ruler so that it is approximately the length of the fingerboard. Make sure you clean up the cut with a file and steel wool so that you don’t scratch your guitar. Then, with one end against the nut, use a Sharpie to mark the location of each of the frets. Clamp the marked aluminum in a vise (protected, of course) and use a round file to make the notch at each mark. Make sure to remove any rough edges. Steel wool also does a great job of removing the ruler markings.
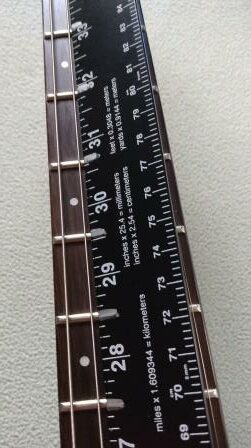
To use the notched straight edge, just place it on the fingerboard so that the notches are over the frets. Have a good light behind the straight edge so that you can see if it is flat against the fingerboard. You can also place the un-notched portion on top of the frets. If you made your own notched straight edge, it might be helpful to mark it with the scale length.
Fret Rocker
A fret rocker is a simple four-sided flat metal tool that is used to find high frets on your fingerboard. The four sides are all different lengths, and provides that anywhere along the fingerboard you will be able to find one of the sides that will cover only three frets. The most critical thing about the fret rocker is that the sides must be perfectly straight. If one is concave or convex, it will give a false indication of a high fret.
These are readily available at Amazon and most guitar stores, but you may be surprised at the variation in price. Do you need to spend fifty bucks and get a StewMac tool? Probably not, but you should read the reviews for whatever tool you choose to get and see what others are saying about it. Sometimes these are also marked and can be used as a string height gauge. Again, read the comments from those who have purchased the product you are considering. Concave sides or inaccurate gauge markings are worse than just a waste of money. It means you probably have made your instrument worse, not better.

Unless you have access to a pretty elaborate workshop, it isn’t likely to be worthwhile to make your own four-sided fret rocker tool. You can, however, use other items to perform the task of a fret rocker tool. The items you choose must have a good flat edge, and they must be long enough to cover three frets – no more, no less. So if you use individual pieces, that means you are going to need several (like, at least four).
If you made a notched straight edge from the 36-inch piece of aluminum yardstick, you could carefully cut smaller lengths from the remaining piece to simulate the four sides of a fret rocker. For reference, the sides of a standard fret rocker are 4″, 3″, 2″, and 1-5/16″ (source: StewMac). If you choose to find other flat pieces to use or to make your own, if you think you have discovered a high fret be sure to check it with two or three other pieces before attempting to address it.
To use your fret rocker tool, lay it across three frets. If you are able to “rock” the tool, it means that the center fret is a little too high. When you are working with the first few frets, closer to the nut, use the longest side of the tool. As you progress down toward the bridge and the longer side hits four frets, turn the tool to the next shorter side. Continue this way until you get to the last frets that are much closer together and you are using the shortest side of the tool. Make sure to check both sides of the fingerboard as well as the middle, since a fret could be high on one side but not the other.
Fret Leveling Beam
To lower the high frets, use a fret leveling beam. This tool is a perfectly flat sanding block, and there are many varieties available. Usually they will have varying grits of sanding paper attached to each of the four sides of the block. The sandpaper often ranges from 320 to 1500 grit, though both coarser and finer grits might be used where needed. The block should be approximately 8-inches (200mm) long.

Even though the commercially available fret leveling beams are numerous and fairly inexpensive, be sure to read the reviews and comments for the one you end up purchasing. Alternatively, you can make one yourself. The most critical factor is that it be perfectly flat, and one way to do that is to place a piece of glass between the sandpaper and the block.
To use the fret leveling beam, first use a Sharpie and color the tops of the frets. Then use the leveling beam and work parallel to the neck – never perpendicular and never over just one fret. The high fret will be the first to contact the beam. Continue working until the Sharpie marking is gone. Then recheck the frets with the fret rocker.
Some Final Thoughts
One additional tool you may want to get is a fret crowning file. This will help to restore the proper shape of the fret after it has been somewhat flattened by the fret leveling beam. And while it isn’t practical to make your own fret crowning file, a small triangular file could be used to shape the fret. For best results, first round off the pointed edges of the file so as to minimize the possibility of damaging your fingerboard.
It is always recommended to protect the fingerboard when working ono the frets. Painters tape or masking tape works well, but be careful when removing it (especially on rosewood or other unfinished fingerboards) so that you don’t pull up small splinters from the wood. Another method is to use guards or shields around the fret, and these can be purchased commercially. They can also be made by cutting a slot in a thin plastic card using an Xacto knife or razor blade.
Do you have experience working with electric guitar frets? Do you have any additional insight or tips you would like to offer? Please leave a comment below and tell us what you think.