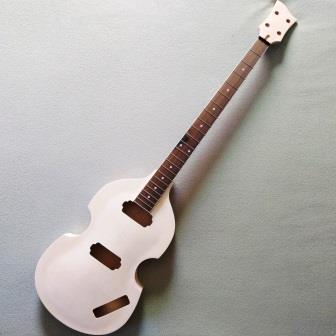
A DIY violin bass might be a little more advanced than other DIY bass guitar kits. But the challenge is pretty exciting, and the experience is well worth the effort required. And besides that, it’s a fun little bass to play!
The Hofner violin style bass has been around since the mid 1950s, and is most widely recognized as the “Beatle Bass” used by Paul McCartney of the Beatles in the 1960s. McCartney is said to have been drawn to it because it was very inexpensive and the symmetrical design didn’t look as awkward when played left-handed. This is a hollow-body bass guitar in the traditional shape of the double bass in the violin family, though clearly much smaller.
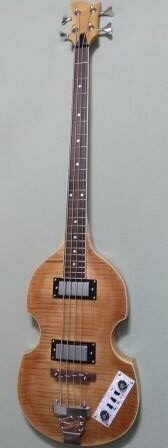
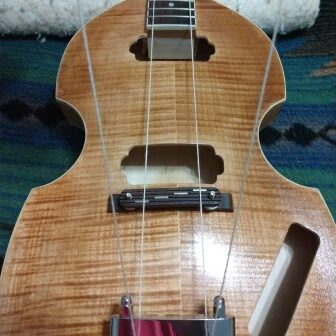
The violin bass is a short-scaled bass, just 30 inches instead of the usual 34-inch scale. It distinctively does not have the f-shaped sound holes, and although the hollow body provides some resonance the tone is primarily electronic. It uses two humbucking pickups and magnetic strings. Overall, it measures about 43-inches long and weighs about 5 pounds.
A very important consideration with the violin bass is the strings. If you aren’t going to use the generic strings that come in the kit (which I do not recommend), you will need to get strings for a medium-scale bass. The short-scale strings will not fit because the length is extended due to the trapeze tailpiece. The end of the thickest strings at the tuning machines need to go across the nut before they begin to taper. I used D’Addario EXL-170M medium-scale strings for my DIY violin bass kit and they were a perfect fit.
If you are looking for a good DIY violin bass kit, you may only find a few options. Solo Music Gear and BexGears make a nice DIY violin bass kit, and these companies both stand behind their products. Both are available at Amazon, which offers another layer of buyer protection, though it is less expensive to buy the Solo kit direct. You may also find other suppliers. The DIY violin bass kit I built is from Bargain Musician, but unfortunately I cannot recommend it. I describe a few of the problems with that kit at the end of this post, or you can jump to that now. And it goes without saying, PANGO kits should always be avoided.
The Hofner-Style Control Plate
Of course if you want to build an authentic Hofner-style DIY violin bass, you will use the standard Hofner-style controls. The nice thing about building your own kit is that you have the freedom to customize your build however you want. It might be worth considering changing the controls to something more conventional. The Hofner-style controls are anything but intuitive.
The control plate that comes with your kit consists of two volume pots, one for each pickup, and three slide switches all attached to a circuit board behind the a rectangular plastic panel. The jack is already attached; all that is required is to connect the pickups and a ground wire. In the case of the BexGears kit, this is plug-and-play and no soldering at all is required. The plastic panel then just screws to the top of the body.
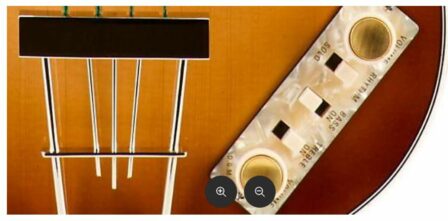
The plate seems to be upside down; the printing is viewed from the perspective of the player looking down on it. Though the volume controls seem natural – the one toward the front controls the neck pickup and the on toward the back controls the bridge pickup – the switches certainly are not. There is a “solo/rhythm” switch that simply boosts the volume in the solo position. It isn’t really a boost, because the pickups are passive. In the solo position, consider the level to be 100%, and in the rhythm position it is about 70%. And of course the volume controls also affect the level.
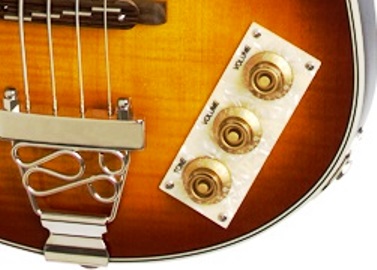
Then there is a switch marked “Bass” and a switch marked “Treble.” Turning on the bass actually just turns off the bridge pickup, and turning on the treble just turns off the neck pickup. Oh, and turning “on” means moving the switch away from the word “on.” Like I said, not at all intuitive. Once you figure it out, you can use it. But for me, the first switch will always be in the “solo” position and the other two will always be down so both pickups are on. The volume pots are sufficient for adjusting the pickup levels if needed. Everything else can be controlled from the amp anyway.
If you wanted your DIY violin bass to be more “normal,” it would be pretty easy to cut a piece of pickguard material in the rectangular shape, install regular volume and tone pots, maybe a switch, and wire it like a regular bass. It wouldn’t be like the authentic Hofner, but might resemble the more traditional controls on the Epiphone viola bass.
Assembling a DIY Violin Bass Kit
These are set-neck kits, meaning the neck is glued to the body rather than bolted on. I’ve read differing opinions on whether to do the finish before or after installing the neck, but I have always applied the finish first. My kit had a lot of quality issues with the wood for the body, one of the primary reasons for not recommending the Bargain Musician kit. Working those out before assembly made it a little easier. Make sure to temporarily put the neck pickup into position before setting the neck.
My next step was to install the tuning machines, then use kite string to check alignment and locate where to put the tailpiece. The DIY violin bass has a bridge that just sits on the body without being permanently attached, so the tailpiece position is critical in bringing the strings across the bridge in the proper location. At this point for my kit, it revealed just how horrible the quality control was for this body. The seam in the flamed maple was so far off-center that, if I could, I would have returned the whole thing. Check out the pictures toward the end of this post.
After getting the tailpiece in the right place to properly align the strings over the fingerboard, I installed the strings and located the bridge for a 30-inch scale. Now I could correctly position the neck pickup under the strings, and using the pickguard (which I did not install) as a guide, also get the correct location for the bridge pickup. Then I removed the strings, bridge, and part of the tailpiece in order to finish the wiring.
The tailpiece is held in place by two screws on the end, and there was a third center hole in the bracket. I located another small screw, drilled a hole all the way through the end of the body at that center location, and pushed a ground wire through it, leaving a small amount of exposed wire right at the end. With the braided wire in that small hole, I installed another screw to create a ground connection, then attached that wire and the pickup wires to the control plate. After installing the jack, I used an ohm meter to make sure the tailpiece was, in fact, grounded, which would ground the strings. Then I installed the control plate.
Finally I re-installed the strings for a final setup, which is where I discovered that the nut slots were way to high. I think this is the first time I have ever had to file the slots in the nut on a DIY bass kit.
The truss rod had a lot of back bow, and I began the process of loosening it to increase relief. Then, before I got to the number I wanted, the truss rod stopped turning. I don’t know if it reached the end or if something caught, but I am assuming by the way it behaved that it is not a double-action truss rod. In any case, it wasn’t loosening any further. The gap at the 8th fret was only 0.007″, not what I wanted but I think it will be OK. For more on how to adjust neck relief, read my post How to Set Up Your DIY Bass. I finished the setup, raised the pickups, and gave it a test play.
Problems With This DIY Violin Bass Kit
As mentioned, this kit is from Bargain Musician. To be fair, I purchased this kit as a brand new but blemished B-stock from a third party. Blems at the set neck mounting were clearly described, and I had no problem with them as they were expected. However, there were numerous additional issues with the body materials that weren’t part of those described blems. Had I purchased this DIY violin bass kit directly from Bargain Musician, perhaps the issues I encountered with the wood might have been resolved with a replacement part.
First, this is a shaped, hollow instrument made from laminated materials (plywood) and, presumably, the exterior sides are maple. However, the back of my DIY violin bass was riddled with spots that would not take stain. I assume this is glue that had come through either during the lamination process or during the shaping of the back. Light sanding did not resolve the issue, and heavier sanding could have easily gone through the outer layer. It took a lot of work to get this to look acceptable, though the defects are still visible and the color is a lot lighter than I wanted.
The veneered top also had lots of glue bleed-through. I checked for glue spots with a UV light and tried to eliminate most of it, but was still afraid of sanding through the veneer if I went further. This isn’t the first time I have had issues with veneer on a Bargain Musician kit, though again I must point out that it was a B-stock purchased from a third party. Still, it seems to be a pattern.
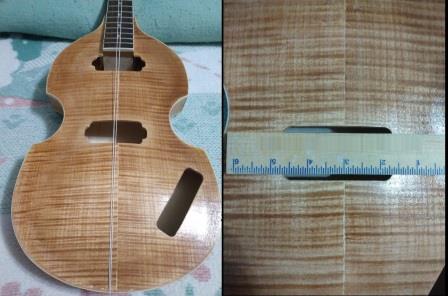
This picture shows a completely unacceptable misalignent and a primary reason I will not try the Bargain Musician brand again. The seam in the veneer is way off-center, very visible because it is a poor and wide join. The only remotely forgiving aspect of this is that the widest part of the seam from the bridge pickup to the bottom of the guitar is behind the D string. The cutouts for the pickups are made correctly and aligned with the neck. You can see that the veneer is simply improperly positioned. This should never have passed quality control.
There was also a very noticeable dark spot on the fingerboard at the 11th and 12th frets. It is part of the rosewood, but in my opinion should not have been used. Perhaps this should have been listed with the blemishes; as mentioned, I’ve purchased two other kits this way and have never encountered any issues with the necks or fingerboards.
So my biggest concerns with this kit are with the quality of the wood, and that is a trend I’ve seen in the three kits I’ve purchased from this source. The first was good, the second not so much, and this third one is terrible. The subpar wood is similar to what I found in my Pango kit, and I wonder if they may come from the same factory in China. This kit, even with the flamed maple top, would have been much better suited to a solid color paint job, but that isn’t what I wanted. Eventually I may take the hardware off and paint it anyway.
Beyond the wood, the truss rod is a concern for me. I don’t think I can make any further adjustments, and hope that is not necessary. I would recommend always looking for a double-action truss rod. Having broken a truss rod in an acoustic guitar a few years back, I am hesitant to try to force this one.
Conclusion
I’d been wanting to build a Hofner-style DIY violin bass kit for a while, so when this one came along I snagged it. Perhaps a little more research would have led to the selection of a better quality kit, but I’m up for a challenge. If you want things to go smoothly, get the BexGears kit through Amazon. When it arrives, check it carefully and, if you find problems, contact the seller or send it back. Or, get your kit from Solo. Either supplier will stand behind their product and offer guidance if you encounter a problem, need advice, or just get stuck.
Have you built a Hofner-style DIY violin bass kit? How was your experience? What would you recommend to those who may not yet have attempted a kit that requires a little more skill? Please leave a comment for us below.