Headless guitars have gained popularity for several reasons. Besides having a modern, futuristic look that stands out visually, without the headstock these guitars are more compact, making them easier to transport and store. Most headless guitars are lighter in weight, making them ore comfortable for long playing sessions. And the absence of the headstock eliminates any neck dive usually found in lighter guitars.
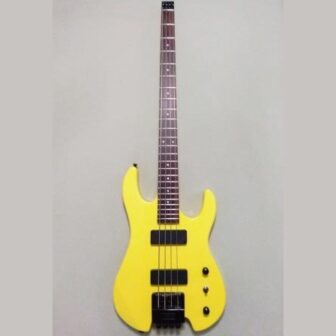
Being a bass player, I chose to build a headless bass DIY kit. All of those features I listed come into play, and even more with the bass kit. It is very comfortable to hold, and though it is a full 34-inch scale, it fits nicely in a regular electric guitar gig bag. Absolutely no neck dive on a bass is a big deal, and playing this one was so easy.
Headless DIY electric guitar kits are unique and might not be for everybody. The strings are fixed at the top, and because of the method of locking them down there is a “zero fret,” making setup and intonation accuracy so easy. The tuning mechanism is located at the base of the guitar past the bridge. On many guitars, as with my bass, the bridge and tuning machines are one assembly. The end of the guitar body is shaped so that the tuners are easily acceptable.
So how easy it is to build a headless DIY electric guitar kit? Assembly is similar to most other DIY kits. String installation and setup are a little different, but overall still relatively straightforward. Here is my experience with a DIY headless bass guitar kit.
Assembling the Headless DIY Bass
As I said before, assembly of a headless DIY electric guitar is pretty similar to other DIY electric guitar kits. This was a Fretwire kit I bought on clearance that is no longer in production, but there are others out there. I began by painting the body, which was made of basswood (NOT my favorite!). Then I finished the back of the neck with Tru-Oil Gunstock Finish and treated the rosewood fretboard with Dunlop 65 Lemon Oil. Of course, you don’t need to shape a headstock!
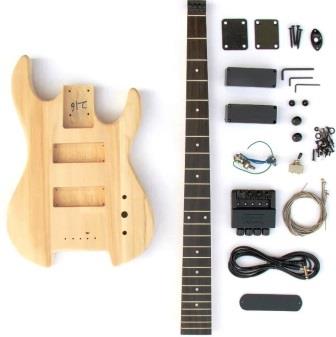
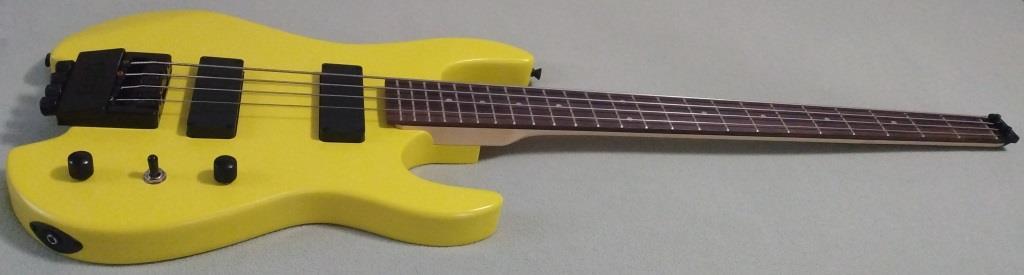
Next, I installed the pickups, pots, and switch. This model has two humbucker pickups wired similar to my PRS style kit with a pickup selector switch, one master volume control and one tone control. The output jack is in the side of the guitar, and all controls are accessible from the back behind a plastic cover.
After attaching the neck, I installed the head piece. A couple of screws affix it to the end, allowing for the strings to go over a 90-degree bend into retainer holes with set screws. When ready for setup, two clamps will each hold two strings down against the headpiece so they are against the zero fret.
Finally, I loosely installed the bridge and tuner assembly. Using kite string as I always do, I checked the scale length, approximately 34-inches from the zero fret to the bridge saddles, and aligned everything so that the string was properly centered on the fretboard position markers and pickup poles. Then I tightened the bridge screws. After installing the strap buttons, assembly was now complete.
Installing Strings on a Headless Electric Guitar
Installing the strings on my headless DIY bass guitar was a bit different from a traditional bass, but still relatively straightforward. First, I pushed the strings through the holes in head piece, which was where I encountered my first – and really only – design problem. The strings I had chosen to use, D’Addario EXL170 45-100 regular light gauge, of course had a tapered end on the “E” string. This is necessary so that on a regular bass the full thickness of the string goes over the nut but a smaller diameter wraps around the tuning machine. In my case, the .100-inch thickness would not push through the head piece. I had to carefully drill it out a little.

With the strings in the head piece, I put the ball end of the strings in the tuners, with the tuning machine string retainers almost fully extended. Then I gripped the strings at the head piece with pliers and pulled them tight, holding them in place with the set screw. Now I could begin to turn the tuners clockwise, pulling the string retainers back into the assembly. With a little trial and error, pulling more string through the head piece and resetting the tuning machine retainers, I got them to the point I could begin to pull them up to pitch. At least, I thought so.
The second problem I encountered wasn’t a design issue, it was user error. Using the provided hex key in the tuning machine because it was easier, I brought the strings up to pitch. One of them didn’t seem to go, and slipped down in pitch every time I tightened it more. I thought the string was slipping at the head piece, but that wasn’t the case. I actually had the retainer back too far, and the adjusting screw was pushing on the ball at the end of the string. Eventually, I broke the retainer by pushing the string through it, and had to wait until I purchased a replacement to finish the installation.
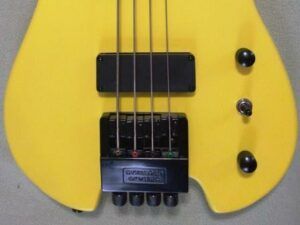
It is important on this type of bridge assembly to keep about half of the ball end of the string exposed, so that you do not push it through the retainer as I did. After getting close to pitch, I tightened the clamp at the head piece and finished tuning the bass. When you are finished installing the strings, you can trim the ends at the head piece.
Setup on a Headless Electric Guitar
Setup on my headless DIY bass was also pretty much the same as on other guitars. For my normal procedure, check out my post How to Set Up Your DIY Bass. There are a few unique things to consider.
First tune the guitar, then set the neck relief. The truss rod on a headless guitar is probably the easiest there is to access. Just go through the hole at the end of the neck in the top of the head piece.
Bridge saddles on headless guitars can vary in style. My headless DIY bass has individual pieces that are moved manually. There is a set screw on the side of the bridge assembly that holds the four saddles in place once adjustment is finished. Back this set screw out slightly until the saddles move, though they will be tight under the tension of the strings. In my case, I used the hex key provided to set the action, or string height.
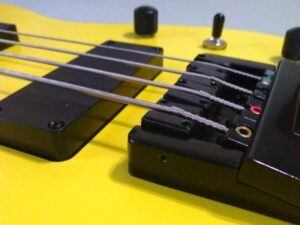
Setting intonation requires manually moving the saddles back and forth, and because of this design it is much easier to do that if you loosen the strings slightly. So, it is a bit more tedious that with other bridge saddles, but the concept is the same. Adjust intonation so that the 12th fret harmonic matches the 12th fretted.
And that actually completes setup! There is no concern with nut height, because with this configuration you have a zero fret with a clamp and no nut.
Final Consideration For Your Headless DIY Guitar Kit
As with all DIY electric guitar kits, consider the skill level required. Your headless DIY electric guitar doesn’t really require more or different skills than with other kits, but there are variations. Select a wood you will enjoy finishing the way you want it to look. Consider whether or not the electronic components will require any soldering, or if it is a pre-assembled harness.
Look for kits made from quality woods and components from a reputable supplier that will provide good customer service. Amazon is a great source for a variety of suppliers, and you can always count on dependable customer service. Unless you are willing to take risks, avoid companies like Temu, Alibaba, or Pango.
Have you built a headless DIY electric guitar or bass? Leave a comment below and tell us about your experiences.