Ernie Ball Music Man basses are well know for their quality and style. The Stingray bass with its easily identifiable humbucker pickup is offered in a variety of configurations with 3-band and 2-band active electronics. But if you have purchased a Stingray-style DIY electric bass kit, chances are it does not include an active preamp. How do you go about wiring a Music Man pickup?
I’ve assembled a few DIY electric bass kits with this style pickup. One was a bass kit from Solo Music Gear, and it had both a regular P-style pickup and a Music Man style pickup. I highly recommend this kit for style, quality, and ease of build. But it had no wiring diagram. Another kit was a more traditional Stingray style with just the single Music Man style pickup in the egg-shaped pickguard. But it, too, did not come with a wiring diagram.
The control plates in each kit came pre-wired, so clearly there was an intended way to connect the pickups. Since I’ve wired dozens of guitars, it wasn’t hard to figure out what to do – but is the intended way the best way? Perhaps not.
Passive vs. Active Electronics
Nearly all Music Man basses have active electronics. I’ve heard there was once a Stingray model (SB-14) that had just the passive pickup and controls, but haven’t been able to find much about it. And there are a few models that use P- and J- type pickups without active electronics. But not the famed Music Man humbucker, those are always active.
Actually, the pickup itself is not active. Very few bass pickups are, themselves, active. Rather, the active circuitry is an equalizer and preamp that comes between the pickup and the output jack. An active EQ and preamp in a bass guitar setup serve to shape and amplify the signal coming from the passive pickups, allowing you to adjust the tone and overall output. Here’s a breakdown of what each component does:
Active EQ (Equalizer):
An active EQ refers to an onboard tone-shaping circuit that allows you to boost or cut specific frequencies in the signal, typically bass, midrange, and treble. Active EQ circuits require a power source (usually a 9V battery or external power supply), and they typically offer more control and precision than passive tone controls. Here’s how it helps:
- Boost and cut frequencies: With an active EQ, you can adjust the low, mid, and high frequencies to suit your playing style or to help the bass sit better in a mix. For example, you could boost the low end for a fatter sound or cut the mids to reduce any honkiness or unwanted frequencies.
- Greater control over tone: The active EQ allows for more dramatic tone adjustments compared to passive controls (which can only cut frequencies).
- Preserve clarity at higher levels: Active EQs tend to maintain signal clarity even when boosting frequencies, making them ideal for high-output settings like modern bass rigs or recordings.
Preamp:
A preamp in a bass guitar is a circuit that amplifies the weak signal coming from the pickups before it is sent to the rest of the signal chain (like an amplifier). It can be part of the onboard electronics or separate in an external device. The preamp has several effects on the signal:
- Signal amplification: The preamp boosts the signal level from the pickups to a stronger, more usable level, preventing signal loss over longer cable runs and ensuring a stronger output into an amplifier or other gear.
- Tone shaping: Many preamps have built-in tone-shaping controls, including bass, midrange, and treble adjustments. In some cases, the preamp may also offer features like a “high-pass filter” to cut unwanted low-end rumble or a “mid-shift” to adjust the frequency range for different sounds.
- Impedance matching: The preamp also ensures that the pickups and the rest of the signal chain are properly impedance-matched, which can help optimize tonal response, especially for active pickups.
How They Work Together:
- Active EQ gives you precise control over the tonal character of the sound, allowing you to adjust the bass, mids, and treble in real-time.
- Preamp boosts the signal to a more useful level while helping maintain the clarity and tone you want from your bass.
The same effects can be accomplished using a pedal. A bass guitar with passive electronics, running through an EQ and preamp pedal and then into a bass amplifier, is essentially the same as a bass with active electronics going directly into the same amplifier. Most pickups, including the Music Man pickups, are passive.
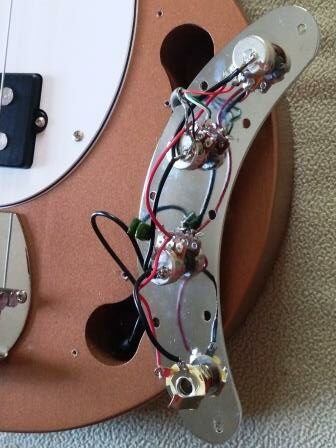
Wiring the Passive Control Plate
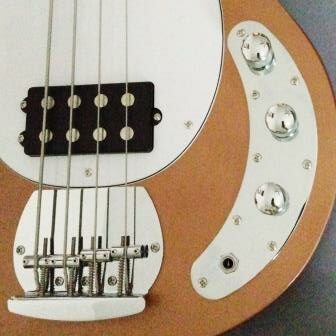
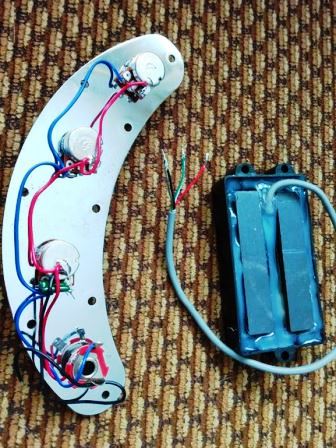
In my kit builds with Music Man-style pickups, the control plates were pre-wired. The kit having both a P- and MM- style pickup was pre-wired with two volume controls and two tone controls. Another kit with a single MM-style pickup had two volume controls and one tone control. The Music Man style pickups in these kits had one hot lead, a twisted pair, and a ground lead with a shield, so the humbucker coils are wired in series.
Unlike almost every other standard configuration, the Music Man humbucker on a Stingray bass is wired in parallel. This means that each coil of the humbucker sends its signal to the bass’s electronics independently. To use the pickup in that configuration, the twisted pair must be separated. For a Stingray-type kit with only one MM pickup and two volume controls, the “north” coil start is supposed to be connected to the center of the first volume control. After separating the twisted pair, the “south” coil start is supposed to be connected to the center of the second volume control. The remaining leads are grounded. Now your volume controls will behave like a standard Stingray bass, but it will be passive.
For the kit that had both P-type and MM-type pickups, the MM pickup is treated as a standard humbucker. The P-type pickup is connected to the first volume control and the hot lead of the MM-type pickup is connected to the second volume control. The twisted pair is wrapped and set aside so the humbucker coils are in series, and the ground lead and shield are soldered to the case of the pot. There is a tone control associated with each of the pickups. Unfortunately, the pre-wired control plate had the tone controls on the output of the volume pots, meaning they were in parallel with each other and did not work independently. A better configuration would be to move them to the input of the volume controls, the same lug where the pickup is connected.
Although this is the way the kits are intended to be assembled, I believe there is a better way.
Wiring the Music Man Humbucker as “Spin-a-Split”
“Spin-a-split” is a configuration that allow you to switch between a humbucker and a single coil sound, not just one or the other but continuously variable in between. I first encountered this method on a Washburn 6-string that I was restoring. The wiring looked unusual to me, but after further investigation it is really quite ingenious.
The first volume control for the MM-type pickup is already wired so that the hot lead – the start of the “north” coil – is connected to the center lug. On the other ungrounded lug, connect the output jack and the tone control circuit. Solder the ground lead and shield to the case of the pot. Completely disconnect the second volume pot. At this point, you have configured the humbucker in a series configuration common to most bass guitars (except, of course, the Stingray).
Now connect the twisted pair to the center lug of what was the second volume control. There is no other connection required, since one of the lugs is already grounded. Now you have created a variable coil split. When this pot is fully clockwise, there is a large resistance path to ground at this connection. Since the coil has a relatively low resistance, the path to ground is now through the south coil, so both coils are acting in series. You will hear the sound of a humbucker pickup.
However, if this pot is turned fully counter-clockwise, the twisted pair is now grounded and the south coil is completely removed from the circuit. You will hear the sound of a single coil pickup (somewhat similar to a J-type pickup). As you turn the control clockwise, you will gradually bring the south coil back in, moving toward the humbucker sound. It is continuously variable, though you may notice that the change is rather abrupt. This is because the 500K pot that was used for the volume control is really too big. This works better with a smaller A25K audio-taper pot, making the transition from single coil to humbucker more gradual. After installing the A25K pot, the transition is much smoother.
Satisfying Results with the Spin-a-Split
This worked so well with the one pickup on my Stingray-style kit that I decided to try it on the kit with both P-type and MM-type pickups. I moved one of the tone control circuits back to the output of the volume pot for the P-type pickup (since I had previously made the change mentioned above). Then I removed the other tone control circuit altogether and replaced it with an A25K pot and connected the twisted pair in the “spin-a-split” configuration. I have to say, I love it.
Of course, since I love to play around with this stuff, I had also at one time used three volume controls and one tone control on this bass, with one volume for the P-type pickup and two volume controls for the MM-type pickup in parallel format. Really, three volume controls is cumbersome. I like this “spin-a-split” much better and I think it gives me more tonal versatility.
To be clear, though, by moving from parallel to series wiring, you will not get the more traditional Music Man sound. So – here’s an idea – why not build two kits? One with parallel wiring, and another with this series “spin-a-split” wiring. Twice the fun!
What different wiring configurations have you used with Music Man style pickups? Please leave a comment below and tell us about it.