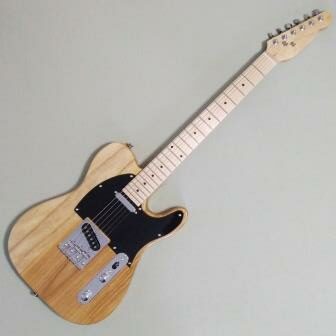
I’ve always been fascinated by the Telecaster’s firm standing in the music world. This guitar has made its mark, from blues to country to rock, and its design has barely changed since its introduction in the early 1950s. The Telecaster’s historical significance is grounded in its role as a pioneer of electric guitars. It was one of the first to be mass-produced, making electric guitar music accessible to a wider audience.
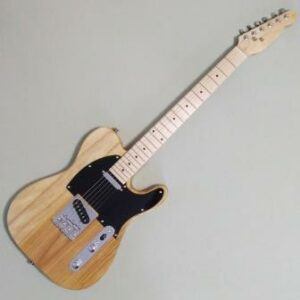
The cultural impact of the Telecaster cannot be overstated. It’s been the instrument of choice for countless legendary musicians. Its distinctive ‘twang’ and clear, cutting tones are instantly recognizable and have become a staple in American music genres. Furthermore, the guitar’s simple, straightforward construction gives it a robustness that touring musicians value. Its reliability and iconic sound continue to endear it to new generations.
What sets the Telecaster apart sonically is its two single coil pickups—a sharp bridge and a warm neck pickup. The bridge pickup, positioned within the bridge assembly itself, imparts that classic brightness while the neck pickup balances it with a richer depth. This configuration provides a versatile canvas for artists seeking a wide range of tones.
For DIY electric guitar kit builders, the Telecaster’s relative simplicity in design offers the perfect entry point to understanding and crafting electric guitars. It’s a model that doesn’t overwhelm with complexity, which explains its popularity among DIY kit builders. As we consider the kit-building process, remember that building a Tele-style kit is not just about assembling parts; it’s about connecting with a piece of music history.
Getting Started With Your Tele-style Kit
If you are ready to build your first DIY guitar, a Telecaster style kit is a great choice. The beauty of this kit lies in its simplicity and the clear path it lays out for assembly, even for those who may not consider themselves particularly handy.
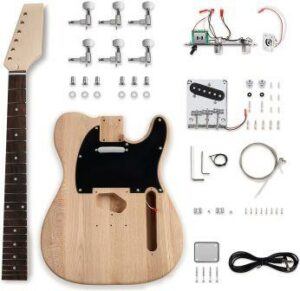
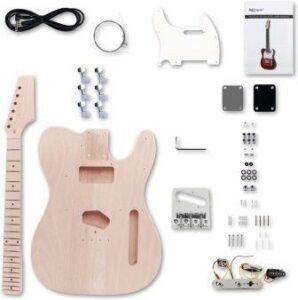
Start by taking inventory of your kit components. They are all pretty standard. For this basic kit you will have the body and neck; six inline tuners with bushings, nuts, and small screws; the large neck screws and neck plate; the bridge and bridge pickup; the pickguard and neck pickup; the loaded control plate; the output jack; and the strap buttons. Make sure you have all of the necessary mounting screws. Your kit will come with a set of strings, but I don’t recommend using them – more on that later.
Most Tele-style kits come with a top loading bridge, meaning the strings go in from the end of the bridge. Some kits may use a string-through bridge, meaning the strings go in from the back of the guitar, retained by six small ferrules, and pass through holes in the bottom of the bridge. Your bridge may have three saddles, each holding two strings, or it may have six individual saddles, one for each string.
Test fit the components before you start. You will be able to identify any problems, understand how the parts fit together, and you will get a preview of how it will look when finally assembled.
Assembling Your Tele-style Kit
Begin by finishing the body. If you have nice looking wood, a stained, dyed, or oiled finish is the easiest to do and will look great. Or you may choose to paint. You can finish the neck at the same time, while waiting for the body to dry, or you could wait until the body is done and then finish the neck. I like to do them simultaneously.
After you are satisfied with the finish, which usually takes the most time, you are finally ready to assemble your kit. Most kits have pre-drilled holes, which makes assembling your Tele-style kit go quickly. First attach the neck. Make sure it is seated solidly in the neck cavity, pushed all the way down and all the way forward. I usually clamp the neck in place before installing the neck plate and screws. This insures a tight fit.
Remember that alignment is critical. The bolt-on design is forgiving, yet ensure the neck sits snugly against the body and the screw holes align perfectly before tightening the bolts. A poorly aligned neck can lead to a myriad of playability issues.
Install the tuning machines next, then lay the pickguard in place but don’t screw it down. Use toothpicks in the screw holes to align it. Now you can position the control plate and the bridge (don’t forget the ground wire. I like to run kit string where the strings would normally be from the bridge to the tuners just so I can check the alignment. Screw the bridge and controls in place, routing the wires as needed, then put the screws in the pickguard.
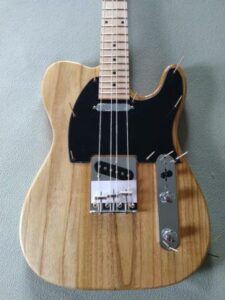
Install the output jack, then remove the screws for the control plate and make all of your electrical connections. Re-install the control plate, install the strap buttons, and you are ready to put the strings on. Again, don’t use the ones that come in the kit. They are usually very low quality throwaways and will ruin the sound of even a well built guitar. I recommend D’Addario EXL110 electric guitar strings, but any quality string will do the job.
Anatomy of a Telecaster
When you pick up a Telecaster style kit, you’re not just assembling pieces of wood and metal; you’re piecing together an icon. The distinctive features of the Telecaster design have cemented its place in music history.
Look at the body of a Telecaster, and you’ll notice two single-coil pickups, one near the bridge and the other closer to the neck. This setup is a big part of what gives the Telecaster its signature twang and clarity. Unlike other guitars, the bridge pickup is melded into the metal of the bridge itself, contributing to its piercing bright tone.
The control plate of the Telecaster, pre-assembled in most kits, houses the electronics and the knobs that control volume and tone. It’s typically straightforward to install, which adds to the guitar’s reputation for user-friendly assembly.
A standout feature is the Telecaster’s neck, which is designed to bolt onto the body. This design not only simplifies the assembly process but also makes maintenance like neck adjustments and fretwork easier.
As you look up the neck, you’ll find inline tuning machines. Their linear configuration aligns with the straight headstock, ensuring stable and straightforward tuning.
Telecaster bridges come in two types: some are ‘top-loading’, meaning the strings feed directly through the bridge, while others are ‘string-through’, where the strings pass through the body of the guitar. The choice affects both the guitar’s sound and string tension.
Regarding saddles—those little pieces that the strings rest on—you have a choice between the classic ‘three-saddle’ design and the more modern ‘six-saddle’ arrangement. Each offers distinct advantages, with six individual saddles allowing for finer intonation adjustments.
And for those desiring even more precise intonation, compensated saddles offer an excellent solution. They’re crafted with subtle adjustments to each saddle’s angle, enhancing the guitar’s ability to maintain perfect pitch across all strings.
Such technical details might seem complex at first, but they offer a deep level of customization that can make your Telecaster a true reflection of your personal style and technique—the perfect bridge to the final section about Telecaster kit variations and upgrades.
Customizing Your Tele-style Kit
The beauty of a Telecaster style kit lies not only in its fundamental design but also in the vast customization options it offers. Throughout the years, modifications have led to a host of variations, each bearing unique features that cater to different play styles and aesthetics.
Semi-hollow Telecasters, for example, stand out with their added resonance and warmth, perfect for those seeking a blend of classic looks with a rich, acoustic-like tone.
If you’re considering more power in your output, replacing single coil pickups with Humbuckers is a common upgrade. It’s a remarkable way to elevate your guitar’s sound, particularly if you’re veering into genres that demand a fuller, more robust tone.
For the purists, the Esquire variant represents the Telecaster’s early history—a simpler setup with a singular pickup yet delivering a punchy and clear sound. Modifying your kit to emulate an Esquire could provide a distinctive playing experience, coupled with a nod to vintage charm.
Ultimately, the Telecaster remains a flexible canvas for your creativity. So, whether you decide to stick to the traditional setup or venture into these variations and upgrades, the Telecaster style kit is your starting point for a personalized instrument that feels and sounds just the way you want it.
Tele-style Kit Recommendations
You can choose from a very good selection of Tele-style DIY electric guitar kits at Amazon, where you get excellent customer service support and the ability to return a kit you don’t like after you see it. I can highly recommend two easy to build Tele-style kits.
Leo Jaymz products are outstanding and very economically priced. This kit features a maple fingerboard, white pickguard, and mahogany body, which is easy to finish resulting in a very beautiful instrument. Check out my review of the Leo Jaymz TL kit for an overview of this fantastic kit.
Fistrock products also offer great quality at a great price. This Fistrock Tele-style kit has a rosewood fingerboard, black pickguard, and an ash body, also easy to finish with a completely different look than the Leo Jaymz kit. Why not get them both for to very distinct guitars?
Have you built a Telecaster-style DIY electric guitar kit? Leave a comment below and tell us about your experience.
