Completing your DIY electric guitar kit build brings a huge feeling of satisfaction. Whether you are a beginner or experienced builder, you take pride in the end result. But it could also be discouraging. In this article we will explore how to choose the right DIY electric guitar kit for your skill level.
As you shop for your DIY electric guitar kit, you will likely encounter a wide variety of kits from which to choose. In many ways, building the kits will be very similar. However, there are also many ways in which they differ. Even the same guitar style can have different methods of construction. One may go together easily in a matter of hours, and another may take weeks or months to finish.
To make your experience more enjoyable and produce a quality end product, you need to consider these important questions:
- What is your skill level and with what complexity of kit are you comfortable?
- What skills and tools do you need for getting a good finish?
- How important is disassembly if you don’t get it right the first time?
- What skills and tools do you have for wiring the electrical components?
- What other skills and tools do you need to successfully finish the project?
Assessing Your Skill Level and Kit Complexity
Let’s consider your current skill level in building a DIY electric guitar kit, always with the goal of increasing your skill for the next kit (yes, this can be addictive!). Some manufacturers will rate the skill required to complete a kit so that it is easier for you to choose. Here is the rating system from Solo Music Gear for their kits:

The majority of assembly done with screwdriver/basic tools, minimal soldering/wiring involved, easy setup, great for beginners.

The majority of assembly done with screwdriver/basic tools, slightly more involved/complex soldering/wiring, easy setup, great for all skill levels.

The majority of assembly done with basic tools & neck requires gluing (set neck), slightly more involved/complex soldering/wiring, more complex setup required such as locking tremolo bridges or headless configuration, great for all skill levels but some experience is an asset.

The majority of assembly done with basic tools & neck requires gluing (set neck), electronics are more advanced & require more solder points, more complex setup required such as locking tremolo bridges or headless configuration, great for all skill levels but some wiring experience is an asset.

The specialized skills or tools required for assembly, body and neck may require gluing/clamping during assembly, wiring is more challenging and complex such as installing wiring harness in a hollowbody/semi hollow instrument with no rear access to electronics, final setup requires more time and effort such as setting up a double neck instrument, suitable for more experienced/advanced builders.
Other companies may use a similar rating system, but most do not, leaving you to figure it out yourself. There is somewhat of a correlation between skill level and kit complexity, and we will look at a few key points next. But first, we need to consider one that isn’t even listed in the Solo skill levels above, and that is the type of wood used for the body, neck, and fingerboard.
Choosing the Right Finish for Your Project
“Tonewoods” are often a hot topic among guitar players. But in reality choosing a DIY electric guitar kit based on the tonal qualities of the wood is probably pretty low on the list. Some musicians will even debate whether or not the wood itself contributes that much to the tone. For us, we are more likely to be concerned about how it looks and how easy or complex it will be to get a nice looking finish.
For the body of your DIY electric guitar, you will generally have two options – either a solid paint, or something that will allow at least part of the wood grain to show through. Perhaps you have done other woodworking projects and have a good assessment of your skills in this area. If not, let me just suggest that, for a woodworking novice, painting is much more difficult that staining, dying, or oiling. If you don’t have a well ventilated place you can use a spray can, you may also find yourself needing spray equipment and a ventilation system. I will just offer that, for me, using a stain or dye finished with wipe-on poly or using something like Tru-Oil Gun Stock Finish gave me them most forgiving and best looking results.
In my experience, though, one of the most common woods in DIY electric guitar kits – basswood – is not that great for a wipe-on grain showing finish. In fact, every attempt I have made at staining or dying basswood I have ended up sanding back and painting over. My favorite, and my recommendation for any first-time builder, is mahogany. It stains or dyes well, and a top coat of poly makes it pretty durable. Use grain filler if you don’t want a good, smooth surface. If you like a natural wood finish, try using Tru-Oil on ash, maple, paulownia, or another grain-rich wood.
Your neck will most likely be maple or mahogany, and Tru-Oil, tung oil, boiled linseed oil or just about any other furniture finish will look great. If you have a rosewood or similar fingerboard, don’t put any kind of finish on it but treat it with Dunlop Fretboard 65 Lemon Oil. For a maple fingerboard, just use a light coat Tru-Oil or wipe-on poly.
Finally, consider the shape of the headstock. If the kit already has one that looks good, great! That will be a lot easier especially if you are a beginner. If your kit comes with a blade headstock (uncut, straight on one side) or a spade headstock (uncut, straight on both sides) then you will need to consider how you want it shaped. For more on this, see my article How To Shape A Headstock.
Neck Construction: Set Neck vs. Bolt-On
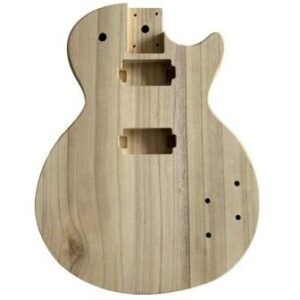
DIY electric guitar kits come with two different types of neck-to-body joints. Actually, commercially made electric guitars also have these two types of construction. The neck can either be glued to the body in what is known as a “set neck,” or it can be attached to the body with heavy wood screws in what is called a “bolt-on” configuration. Generally, Gibson style guitars like the Les Paul, Explorer, or most PRS-style kits will have a set neck although nearly can be found with bolt-on necks. Fender-type kits such as Strat- or Tele-style guitars, and most bass kits, use bolt-on necks.
Each neck style will have advantages and disadvantages. As for the sound, a lot of electric guitar players believe a set neck provides better sustain and a warmer tone than a bolt-on neck. Other guitar players think this is nonsense, much like the debate over tone woods. Here is a brief breakdown of the pros and cons of each neck type for the DIY electric guitar kit builder.
Set Neck Pros
- A cleaner finished look
- Creates a permanent bond
- More authentic for some kits
Bolt-On Neck Pros
- More forgiving, easier adjustment
- Can be easily removed
- Does not require glue or clamps
Set Neck Cons
- Much harder to remove
- Some kits are not drilled for the bridge
- In general, more skill is required
Bolt-On Neck Cons
- Misalignment might require plugging to redrill
- Easy to leave gaps
- May require a drill press if not pre-drilled
Of course, there is no right or wrong answer. I’ve built a fair number of both types of kits, and though it takes more patience with a set neck I have never had one turn out bad. Remember to test-fit everything before gluing or bolting anything. You will need clamps (and surface protection!) for a set neck kit, and I highly recommend clamping a bolt-on neck before installing the screws so that you are assured of a tight joint with no gaps. For your first kit, go with a bolt-on neck (mine was a Jazz bass). My second kit was a PRS-style with a set neck, and that went quite well.
The Bridge Configuration: One Piece vs. Multiple Pieces
The next thing to consider is the type of bridge configuration. The simplest bridge to install is a hard-tail bridge that just mounts to the surface of the guitar body. Some of them allow the strings to be installed right from the back of the bridge (top-loading) while others pass the strings down through the body to the back of the guitar (string-through). Tele-style kits, many bass kits, and a lot of other designs use hard-tail bridges.

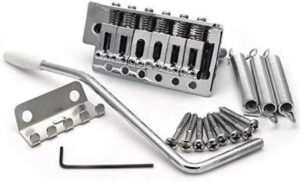
Strat-style kits and other DIY electric guitar kits with a tremolo bridge require a little more skill and patience to install. The bridge itself is fairly easy, as the front of it will just screw to the top of the body. But on the back side there are usually springs and a spring claw that must be installed. Be sure to follow the instructions closely, and maybe check out a few videos before you install the springs. I scratch the back of a pretty nice Strat-style because my tool slipped while putting in the springs. Adjusting the proper gap on the top can also be a challenge.
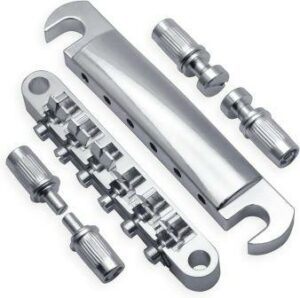
The Tune-o-matic bridge is the kind used on Les Paul and other Gibson style guitars, and is most common when you have a set neck configuration. An adjusting post threads down into a bushing that is pressed into the body of the guitar, and the bridge sets on the posts. Often there is also a tailpiece that mounts the same way. It isn’t difficult to install the bushings and the rest of the components, but if your kit does not have these holes pre-drilled then a great deal of skill is required to properly locate the holes for the bushings, and a drill press is mandatory to make sure the holes are perfectly perpendicular.

In all cases, make sure you have a ground wire underneath the bridge, attacked to the spring claw, or in the hole for the Tune-o-matic post bushings before you install them. And that brings us to then next item to consider for your skill level, installing the electronics.
Electronics Assembly: Soldering vs. Plug-In Components
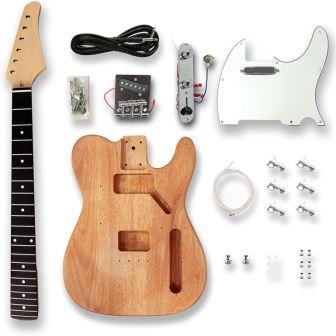
Your DIY electric guitar kit is going to include one or more pickups, an output jack for connecting the cable to the amplifier, some combination of volume and tone control pots, and possibly a switch. Take a good look at your kit before you purchase it to see exactly how these components will be supplied. Some DIY electric guitar kits require no soldering at all for the electronic components, they simply use plug-in connections. If you are not comfortable with or do not have the tools for soldering, look for one of these kits.
Electronic components for some DIY kit styles, such as Strat-style guitar or P-style bass kits, will come already assembled and mounted to the pickguard. Others may have the wired components assembled on a control plate, like a Tele-style guitar or Jazz bass kit. For these, you will may only have to connect the pickups and possibly the output jack. The majority of other kits will likely require you to do at least some wiring of the components themselves. Look to see if these are shipped loose or are already assembled into a wiring harness.
Wiring can be one of the more challenging skills to develop. You may find it helpful to practice soldiering with some extra wire or old components before jumping into the real thing on your DIY kit. If you need to assemble your own wiring harness from loose components, try cutting out a piece of heavy cardboard in the shape of the guitar cavity, punching holes it it for the pots and switches, and assembling them first, Then transfer the completed harness to the kit and connecting it to the pickups or other components.
The advantage of using individual components in your kit is that you can change them to customize your sound if you want. You can also arrange the routing of the wires, color code them, or otherwise give the electronics your own signature. But if you don’t have those skills and tools yet, just go for one of the kits that doesn’t require any soldering. It is a skill you can pick up later with your next kit.
The Essential Toolkit: Tools Needed for Building Your Guitar
Let’s make a list of things you will need to complete your DIY electric guitar kit. These links will take you to Amazon where you can read more, even if you don’t buy it there. Here are some essentials:
- Finishing materials
- Sandpaper – most kits recommend sanding to 220 grit
- Wood finish, like one or more of these
- Tru-Oil Gun Stock Finish
- Minwax Tung Oil Finish
- Dye such as Keda Wood Dye
- Minwax Wipe-On Poly
- Any automotive spray lacquer
- Clear spray lacquer
- Philips screw drivers
- #2 for the neck, bridge, and pickguard screws
- small fine tip for tuning machine screws
- Small wrench – 10mm for guitars, 15mm for bass kits
- Wire cutters or a String winding tool with a cutter
If you are going to be soldering, you will need a soldering iron that will reach 650F/350C and some 60/40 rosin core solder. For more on soldering and soldering techniques, read my article Essential Wiring and Soldering Tools.
If you need to drill holes for screws, you will probably need a 1/8-inch bit. Put a piece of tape on it to mark the maximum depth you want to go. If you are drilling holes for the tiny screws that hold and align the tuning machines, use a 5/32-inch bit. With anything smaller, you might put too much stress on the very small screws and they twist off pretty easily. I never use power tools to drive the screws in, only a hand driver with soap on the screw threads.
Most kits will have the hex keys needed for adjusting the truss rod, saddle height, and anything else specific to that guitar for setup. After you have built a few, you will acquire a drawer full of these. For other setup tools, read my article Neck and Fret Setup Tools.
Lets Find a Kit!
If this is your first kit, pick something easy. Get a feel of how it goes, then try another one that might require a little more skill. They say practice makes perfect. I’m still a long way from perfect, but the practice is fun!
For a kit that is easy to finish (mahogany), does not require headstock shaping, has a bolt-on neck, an easy to install bridge, and plug-in electronics, try this Leo Jaymz Tele-style kit. Or if you want an easy DIY bass guitar kit with those same characteristics, consider this Leo Jaymz PJ Bass kit. I’ve built a couple of Leo Jaymz kits, both a Tele and a bass, and know they are good quality DIY kits.
If you are searching for a 2-humbucker kit, here are a couple to consider from Fistrock. And again, I’ve built a couple of Fistrock kits (a Strat and a bass) and they are great – very good customer service as well. For a bolt-on kit, try this semi-hollow style, or for a good introduction to set necks, consider this “almost” Les Paul style. Both have flamed maple tops, which are a only little more challenging but look beautiful. And both have the bridge and tailpiece holes already drilled.