Gibson Explorer and Flying V electric guitars are both futuristic designs popular in the 1970s and 1980s with heavy metal and hard rock musicians. The distinctive shapes makes them enticing to the DIY electric guitar kit builder, and there are some specific challenges to be considered. Because this is such a unique guitar, you will want to think through the different configurations and options before selecting a kit. Here are a few of my observations and experiences from building my Explorer style DIY electric guitar kit.
My Explorer DIY Electric Guitar Kit
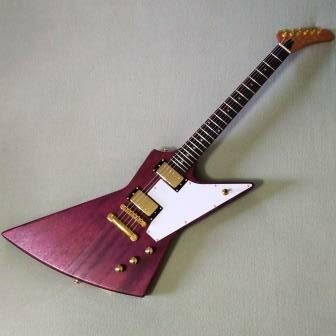
Most Explorer DY electric guitar kits are pretty similar. I chose a kit from Bad Cat Instruments, and although this exact kit is no longer available, there are a lot of choices from other sources to pick from. For an authentic finished product, make sure you compare the body shape to the actual Gibson or Epiphone Explorers. This one is spot on.
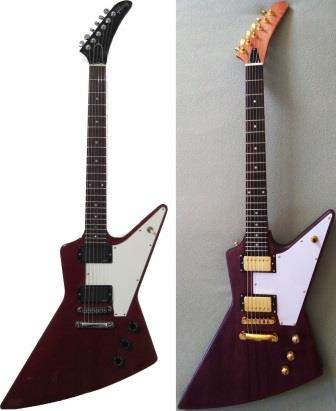
This picture shows the genuine Gibson Explorer with chrome hardware and black trim along side my Bad Cat Explorer kit with gold hardware. The Explorer was first made in 1958, and the 1976 re-issue had gold hardware.
Gibson Explorer bodies are usually either mahogany or alder, though the original guitar was made from African Korina. The DIY kits you will find are most often mahogany, but occasionally you will see one made from basswood, a less expensive common hardwood. The Explorer kit I finished has a mahogany body, mahogany neck, and rosewood fingerboard. Personally, I really like working with mahogany and very much dislike basswood.
One of the first things to consider when buying an Explorer kit is how the neck is installed. The Gibson and Epiphone Explorer guitars have a set neck, but Explorer-style DIY kits can be found with both set necks and bolt-on necks. Beginning kit builders may find the bolt-on neck easier and less intimidating. My Bad Cat kit has an authentic set neck, and out of all the kits I have built it was probably the easiest set neck to glue and clamp. Maybe, though, that is just because I am getting a little better at it.
Three Different Body Routing Styles
Explorer kits almost always have two humbucker pickups, but there are a few different types of wiring used. One option has a single volume and single tone control with a three-way pickup selector switch mounted in between them (1V1T). Another configuration like the pictures shown above has two volume controls, one for each pickup, and a common tone control (2V1T). The pickup selector switch is located way up at the end of the long horn. Typically, the 2V1T configuration uses a pickguard; the 1V1T may not. If you want to show off your woodworking, you may want to consider the 1V1T style.
The volume and tone controls, along with the switch for the 1V1T configuration, are mounted from a cavity in the rear of the guitar body. 1V1T wiring is much easier, and the entire harness can be fully assembled before installing it, leaving only the connection to the pickups, the output jack, and the bridge ground. 2V1T wiring is a little more complex.

Routing for the 2V1T wiring requires a path to get to the switch at the tip of the horn. There are typically two different ways this is accomplished. The most common way is to drill a long hole from the neck pickup cavity to the switch. For the long drill bit to start at the pickup cavity, it angles down as it goes toward the switch. In my case, this presented a problem that I will describe later.
A second method is to route out the area going to the switch so that the wiring can be easily installed from the top, similar to a Strat-style guitar. This also makes the large body a little lighter, which is helpful. Since this area is covered by the standard pickguard it will never bee seen.
Theoretically a third method would be to mount the switch from the back similar to a Les Paul. However, I have not encountered such an Explorer kit. Perhaps it would make the end of the horn too weak.
Initial Inspection
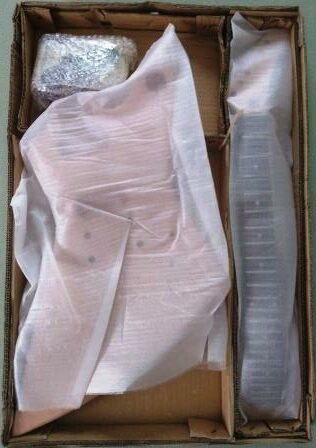
As with any DIY electric guitar kit, you should carefully inspect each part when you receive the kit. This is a relatively large guitar, and I was surprised to find that my Explorer kit shipped in the same size box as most other DIY electric guitar kits. The interior trays had to be cut in order for the body to fit, and as a result the package of components was against the body. Good thing they were well wrapped. Even the protective sleeve was too small. The “hockey-stick” headstock shape also just barely fit into the standard sized box.
Because there are so many interacting pieces that must line up with this kit, you should put as much as possible in place before actually attaching anything. In the case of the set neck, gluing it is usually one of the first steps. Make sure everything else aligns with it. After installing the bridge and tailpiece bushings, I used kite string to simulate the guitar strings and properly positioned the pickups and pickguard before drilling any screw holes.
I found a few small issues with my kit, mostly things that should always be checked. I examined the neck and determined it was not warped or twisted. Neck fit with the body was good and snug. The frets had a few sharp edges, but nothing out of the ordinary. All of the pre-drilled hole alignment looked good, as did the fingerboard wood and the surface of the mahogany.
Routing the Wires
Here is where I encountered the most problems assembling my Explorer DIY electric guitar kit. My kit has the wiring routed through the pickup cavities, with the switch wiring going down from the neck pickup cavity to the switch cavity. Because of the angle required to drill the long tunnel hole, the beginning is very near the top of the guitar body. It turned out to be directly under where one of the mounting screw holes for the neck pickup ring would go. And it was also so near the top that the wires prevented the pickup itself from fitting in the cavity and having the ability to be raised or lowered.
I had to very carefully use a Dremel and clear a path underneath the top of the guitar at the side of the cavity to make room for the wires to go around the moving parts of the pickup. Then I needed to move the wires over so that the screw from the pickup ring did not go through them. I discovered the exact same problem with the bridge pickup where the wires leave that cavity to go to the controls. This was certainly not a well thought out design by the manufacturer.
Another thing to consider is something common with most wiring harnesses that have individual volumes on each pickup. When you fully reduce the volume on one pickup, both pickups lose the signal. The reason for this is that the standard wiring method creates a short to ground for the second pickup whenever the first pickup is turned all the way down. It is a fast way to kill the volume and not have to worry about turning them both all the way down at the same time. But if you don’t want that, the problem is easily resolved.
All you need to do is reverse the wiring on the volume pot. Change the attachment of the wire coming from the pickup to the center lug of the volume pot. The output should then be taken from the other lug that is not grounded. This way the other pickup will always see the maximum resistance to ground – in this case, 500K. Check your wiring harness. If the output jack or tone control is attached to the center lug, just move it to the outside and connect your pickup to the center lug (the wiper on the pot). Same thing goes for a Les Paul, PRS, Jazz bass, or anything else with individual volume controls on each pickup.
Note though, that if you want to be able to kill all pickups with just one of the volume knobs, then leave the output on the center lug. Ultimately, it is just a matter of personal preference. In my case, I left the wiring as an authentic Explorer.
Bad Cat DIY Electric Guitar Kits
As for Bad Cat Instruments DIY electric guitar kits, my conclusion is that they aren’t a lot different than other moderate to higher end kits. They are a bit more expensive ($289 list), better than some, and in the past have had a great selection. At the time of this writing, they only have six kits available, no bass DIY kits, and as stated the Explorer described here is no longer offered. Will they have a new lineup in the future? My inside source says they will have an expanded offering as soon as they move their new warehouse. Time will tell.
The kit was manufactured and packaged in China, as was confirmed by their representative when I inquired about the small shipping box. Some brands or resellers do write their own specifications, and some will inspect the kits before they are shipped to customers. Evidently this one was not opened and inspected before sending it on to me. It did not come with instructions, a parts list, or anything that would identify it as a Bad Cat kit other than the name on the outside of the box. The truth is almost all of these kits come out of China, most from one or two manufacturers and, generally speaking, the quality is pretty good. The pickups sound great, and the bridge and tailpiece look great. If there is one thing that is mediocre, it is the tuners.
If you find the specific kit you are looking for at Bad Cat, and the price is acceptable to you, go for it. But in my opinion (that’s what this article is), you should consider getting one from Amazon where the transaction, delivery, and support are great. There you will find a good selection and product support from Leo Jaymz, Fistrock, Bexgears, or Solo – and even a few from Bad Cat. Make sure you read the reviews. Remember, inside the box they are pretty much the same. Most of them are good, it is the one building them (you) that makes them great.
A final thing to consider with your Explorer or Flying V kit is how you will protect it. They won’t fit in just any case or gig bag. For my purposes, an Explorer gig bag works well. It is certainly the most economical. I don’t plan on gigging with this guitar and a huge case would take up a lot of space. I purchased the Gator Extreme Gig Bag. It is well made, and the Explorer fits perfectly. Gator cases and bags have a great reputation.
Conclusion
My Explorer kit was a lot of fun to build, and because of the unique design, a lot of fun to show off. I finished the mahogany body with Keda wood dye and some wipe-on poly. It was a very basic process with very good results. Bad Cat kits are certainly worth considering.
What experience do you have with Explorer or Flying V DIY electric guitar kits? Feel free to leave a comment, ask a question, or share a picture below.