Wiring the electronic components can be intimidating to beginning DIY electric guitar kit builders. The task doesn’t need to be that daunting, and the steps are really pretty easy. But if you aren’t using the right tools, it’s also pretty easy to mess up. Here are some ideas you can put in place for the perfect wiring job on your DIY electric guitar kit, or even for rewiring your existing guitar.
There are, of course, many DIY electric guitar kits that don’t require soldering. Most BexGears kits and LeoJaymz kits come with pre-assembled wiring harnesses and plugin connectors for the pickups. Many of the Solo kits are offered with a solderless option. So, while you may find your selection a little more limited if you want to avoid soldering, they really aren’t all that limited.
Let’s take the plunge, though, and I think you fill find it is easier than you thought. It also opens up a lot of other possibilities when you start doing custom mods on your kit. And who doesn’t at least think about doing that?
The Soldering Process
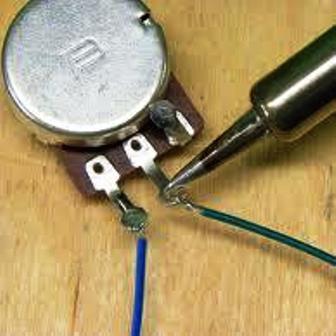
We’ll pick a common task – soldering a wire to a pot. Here are the basic steps:
- Tin the lug of the pot.
- Tin the end of the wire.
- Push the wire through the lug of the pot.
- Apply heat from the soldering iron to one side of the lug.
- Apply solder to the other side of the lug.
- Hold for a few seconds, them remove the heat. Do not move the wire.
The solder should cool and harden pretty quickly and be nice and shiny.
To tin the surface means to heat and apply a small amount of solder so that a thin layer already adheres to the surface before you actually make the connection. Tinning the lug puts a thin layer of solder on the surface before you actually make the connection so that when you do the solder will adhere easily. Tinning the end of the wire accomplishes the same thing, plus it prevents the fine strands that make up the wire from flaying all over the place.
Push the wire through the hole in the lug but do not wrap it. This will make it much easier to remove later if (when) you decide to make a mod. Apply heat to one side of the lug and a small amount of solder to the other; the solder will melt and flow toward the heat, making a nice solid connection. Don’t let the wire move until the cooled solder is set, otherwise you may end up with what is called a “cold solder joint.” You will know because it won’t be shiny.
Read Our Post “Basic Electric Guitar Wiring”Using The Right Soldering Tools
To do a good soldering job, you need a good soldering iron. You don’t have to spend a lot of money on it, but there are a couple of minimum requirements. First, it needs to reach a temperature of 350C or 650F. The actual wattage may vary; temperature is the number you need to confirm. Second, it should have a flat tip. Most come with multiple tips, so you may need to change it.
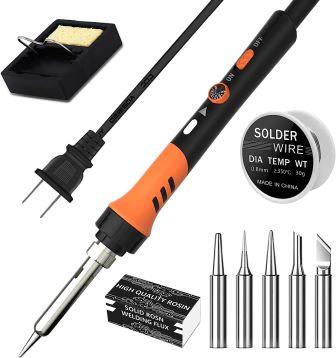
I have been using this simple soldering iron for more than a year. It is very good quality at a low price. On the 60-watt unit, a small dial adjusts the tip temperature between 200C and 450C. I usually leave it set at 350C. Though I’ve never actually tested the temperature (not sure how I would easily do that), I have not encountered problems. It came with a pointed tip installed, which I changed out for the included flat tip. The kit includes a little stand that I sometimes use, several tips, a tray of rosin for cleaning, and a small roll of solder that I don’t use.
Use 60/40 rosin-core solder, or something close to that ratio such as 63/37. 60/40 solder is made from 60% tin and 40% lead, and the melting point for this soft wire is about 180C or 350F. The rosin core provides a flux component that helps the solder flow around the pieces you are trying to join. Be careful not to use acid core solder, which is generally intended for metal seams and pipes. Acid core solder will destroy electrical components.
Some solder is made lead-free and uses different alloy metals to mix with the tin. Generally, that raises the melting point requiring greater heat and increased risk of damaging components. In your guitar, the use of leaded solder does not propose any significant health risk and will work better for the electrical components.
The kit I described above came with a small roll of 63/37 solder, however I generally use a more standard 60/40 solder.
Often you will need to remove solder from the wire joint, and for that there are a couple of good options. Many people use a “solder sucker,” a syringe that draws the excess solder inside itself. I like to use a soldering wick, a wire copper braid with a small amount of flux. The braid acts as a sponge and draws the hot solder into itself, removing it from the joint. Either way, you will want something designed to take solder out of the joint if you happen to apply too much or if you are trying to remove a wire or component.
“Helping hands” are also a necessity. Think about it – you need to hold the soldering iron, the solder, the wire you are soldering, and sometimes the component you are trying to connect. That’s hard to do with just two hands. “Helping hands” devices are clips that hold things for you so that you are freer to maneuver around your work and make a good solder joint.
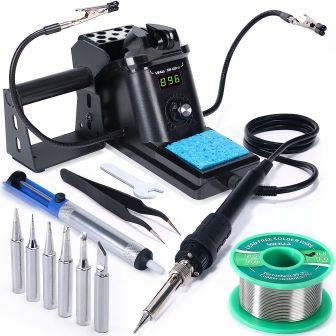
A soldering station is a little more elaborate and more convenient. It usually consists of a base that will hold the hot soldering iron when you aren’t using it, often with a temperature control and a cleaning sponge. Some soldering stations can get quite elaborate.
As a complete kit, soldering irons and soldering stations often come with an assortment of tips, a small roll of solder, and a solder sucker tool. Many soldering stations will have “helping hands” attached to them. This soldering station includes “helping hands” – two rubber tipped clips on flexible arms that can hold wires or components in place while you work. It has a digital temperature readout in either Celsius or Fahrenheit, an assortment of tips including the flat one you will need, a cleaning sponge, solder sucker, tweezers, and lead-free solder.
You will also need to have some needle-nosed pliers or strong tweezers, and small wire cutters. Wire-stripping pliers are nice, though you could use a knife or razor blade for removing the outer insulation from wire leads. Finally, a little container of rosin helps with cleaning. Make sure you have a small sponge, pad, or even just wet paper towel on which to wipe the tip of your soldering iron. You cannot make a good solder joint with a dirty tip.
More on Soldering Tools
It doesn’t take a lot of specialized equipment, but you do need a few good quality tools to do a great soldering job. We’ve listed a few of the here. What tools have you used to get good results? What are your experiences and how did you learn? Leave us a comment below.