While browsing through some DIY electric guitar kits, you have probably noticed a number of them with veneered tops. They make beautiful finished guitar projects you can be proud to show off. But how do you go about getting a great finish? Do you need an expensive, high quality kit? Can you get a good finish on cheap DIY guitar kits?
If you’ve purchased a top-of-the-line DIY kit with an expensive flamed maple top, I’m guessing this isn’t your first go around. But if this is your first try, you may be hesitant to spend a lot of money on a kit that might not turn out well. Fear not. You can make a nice looking veneer topped DIY guitar from the less expensive kits, and learn a lot while you are doing it.
About Veneer Tops on DIY Guitar Kits
One of the most important things to remember when working with veneer topped DIY kits is that the veneer is very thin. I haven’t actually measured it, as all of the kits I have built already had the veneer applied to the body, but I have read that it is a little as 1 millimeter – that’s less than 0.04 inches, roughly the thickness of your “A” string. The maple cap on expensive guitars is probably around 10 millimeters, around 3/8 inch. So when you hear anyone talk about sanding the veneer, be very cautious before trying it yourself.
The most common veneer on DIY electric guitar kits is flamed maple, generally a book-matched veneer with patters running perpendicular to the grain itself. Flame maple, also called flamed maple, tiger maple, curly maple and several other names, is a distortion of the wood fibers that produces the wavy lines known as “flames.” Each of those names represents a distinction within patterns, but your inexpensive DIY guitar kit is most likely just going to be labeled as “flamed maple.” They won’t, however, all look the same.
Two other common veneers on DIY electric guitar kits are quilted maple and spalted maple. The quilted or quilt maple is similar to the flamed maple and looks like a wavy “quilted” pattern, somewhat similar to ripples on a body of water. It is a distortion in the grain itself. Spalted maple is actually wood that has been allowed to begin initial stages of decay, creating dark lines and streaks created by fungus. Quilted maple veneer and spalted maple veneer make stunning guitar tops.
Spalted Maple
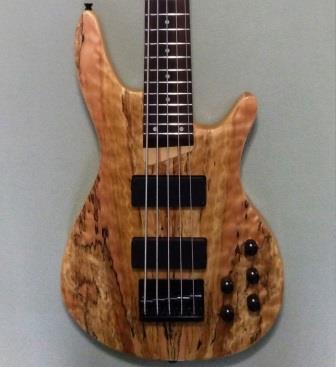
This is my 5-string bass with an ash body and spalted maple veneer. It was once offered by The Fret Wire (now defunct), but I bought mine from a vendor on eBay who frequently offers “blem” kits. One thing about spalted maple veneer is that the pattern is very random, and a defect is easily hidden. My kit was blemished in that there was a chip in the veneer near the edge. Since there was no binding with this veneer, I just sanded the chipped spot down to the ash underneath, and after finishing it is almost completely hidden.
Some builders have added color to the spalted maple. Most though do as I have done here and left it natural. I finished this bass guitar kit with several applications of Tru-Oil Gun Stock Finish. For the veneer, I gave it a light sanding with 220 grit paper just to remove any high or rough spots (except, of course, for the blemish). The Tru-Oil was applied using fabric squares cut from an old T-shirt. According to the bottle, it can be poured directly on the wood and spread with your finger. I chose to use the lint-free cloth and wear latex gloves, but that’s just me.
On this particular kit, I used the Tru-Oil not only on the spalted maple veneer top, but over the entire bass – everything except the fingerboard. The headstock also had the same spalted maple veneer. This DIY bass kit has a bolt-on neck. so I finished the body and the neck separately before assembling it. Since it does not have pickup rings, it was important for the edges of the routing to be smooth. I buffed the whole thing with steel wool. The Tru-Oil says it sets in two hours; I let these set for almost two weeks before putting them together.
Quilted Maple
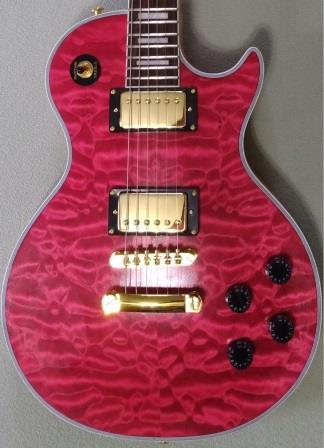
Here is my Bad Cat Les Paul style kit with a quilted maple veneer top. The rest of the guitar is all mahogany. There is a plastic layered binding all around both the top and back of this guitar as well as around the headstock, which also has the quilted maple veneer. This kit is no longer offered (actually there are no Gibson-style kits currently in the Bad Cat website store).
Before starting anything on this top, I carefully inspected the veneer looking for glue residue or other defects. Fortunately, I found none. I went over the entire top very carefully with a strong LED pen light. It was suggested that I should check the veneers with a UV light, and I may get one of those in the future. While this quilted maple veneer was very good, I have had bad experiences with other flamed maple veneers and glue bleed through. I think the light will be a good investment.
After a light sanding, I started applying the color. For this kit, I used Keda Wood Dye. And though I mixed straight red dye with alcohol and water, when I tested it on a scrap piece of wood (not veneered), it was very pink. Previously I had darkened the same red dye with black and applied it to mahogany, and that came out as a beautiful burgundy – see both my Strat-style and Explorer-style kits. I did not want burgundy on this quilted maple LP, though. So I mixed in a little brown. That made the color a little deeper, but it was still pink. Then I conducted another experiment. I applied the pink dye to light maple, then after it dried I applied Tru-Oil. That turned into the beautiful red I was looking for.
On this quilted maple, I slowly and carefully rubbed the pink dye into the top with T-shirt material, being cautious not to get the wood too wet. After allowing it to dry, I applied more dye. I think I went through this process five or six times until I was satisfied with the evenness of the color (although it was still pink!). Then I began applying Tru-Oil, and with the very first application the color changed to red. I let that dry so that the color would be consistent, then over the course of several days applied Tru-Oil over both the veneer and the mahogany back and sides.
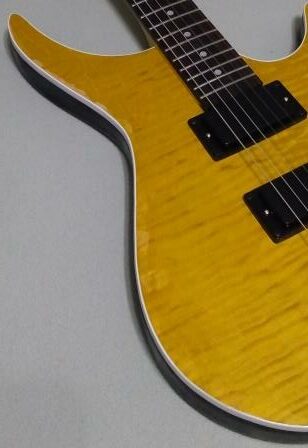
Flamed Maple
Pictured here is my PRS-style kit with a flamed maple top. The rest of this guitar is also mahogany, and it has a single binding around the top of the guitar body. I purchased this kit from Budreau Guitars.
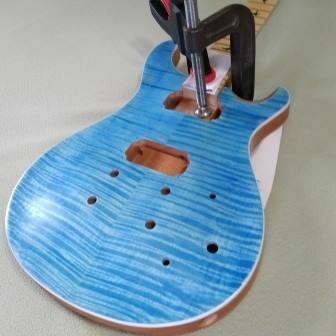
For this top, I stayed with just a single shade of blue Keda Wood Dye. Wiping from the inside out, starting at the center book-match seam and going out toward the binding, the flame pattern darkened slightly while the rest of the wood remained light. The color contrast is much more subtle than some flamed maple finishes.
Many DIY kit builders use a black dye first to enhance the appearance. After applying the black dye and allowing it to dry, the top is sanded back so that the black remains only in the flame pattern. Then the color is applied to the entire top, going into the light sanded areas but also into the black portions creating a darker shade of the chosen color. On this guitar, I chose not to do the black first because I was not certain of the thickness of the veneer. I did not want to risk sanding through it.
After the dye was fully dry, I sprayed it with several light coats of Watco nitrocellulose clear lacquer giving it a high gloss finish.
A Few Less Than Stellar Projects
Not all of my attempts at finishing flamed maple came out great, but I did learn things in the process.
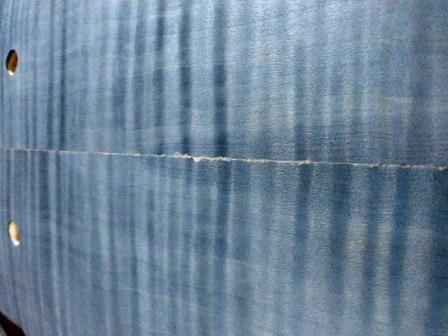
Pictured first is the seam in the top of my ES-335 kit from Pango. Although I did a lot of sanding, there are still many areas of this top that had enough glue residue that the dye did not absorb evenly. My frustration with this was heightened by the “that’s just the way it is” response from Pango. They blew me off, claiming all veneers are bad, and even suggested I use a paint brush to draw the grain back in! After carefully sanding, I was able to get out most of the glue and come up with a reasonably acceptable blend of color. The seam down the middle still looks bad, and sanding any further would have gone through the veneer.
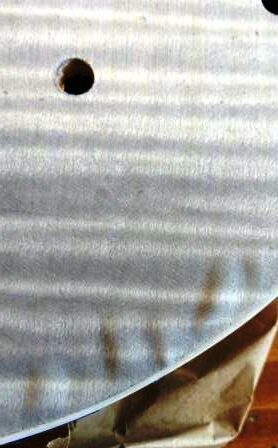
The second kit pictured is from Muslady, a popular lower-end product from China (most all kits are sourced from China). This top also had considerable glue residue around the edge at the binding on the top horn. Most of the rest of it, including the book-matched seam, looked pretty good. Unlike Pango, the Muslady accepted responsibility for the defective product and sent a replacement body. Unfortunately, it was in worse condition than the first one – but at least they did something about it. Instead of sanding it out, I did my best to hide the glue spots by experimenting with the gold color, and I think it came out fair.
The third picture is a 12-string LP style guitar purchased through and eBay vendor. I applied a grey-black dye first, intending to sand it back before applying the final color. In the process, I noticed a few glue spots that I hadn’t caught before. But more importantly, when I was wiping on the dye the veneer started bubbling up around the edge next to the binding in several spots. In this case, because of the lightness of the grey-black I was wiping it on a little wetter than usual, but it should not have bubbled the veneer. That means that in some places there was too much glue (hence, the glue spots) and in the places where it bubbled up there was not enough. I was able to carefully press this back down, let it dry, and continue. By the time I put on the top coats of Tru-Oil, the surface was smooth and there were no longer any bubbles.
Conclusion
So these are a few of my projects with veneered wood tops. It takes practice, and there are certainly other techniques that could be used. This is the way I have done mine in the past, but who know what the next one will bring?
My go-to for color has been water and alcohol based Keda Wood Dye, but many other articles I see have suggested Angelus Leather Dye. That will be worth checking out, and I will probably give it a try. For the finished surface, I really like Tru-Oil and Minwax Wipe-On Poly because they are easy to apply. The Watco spray lacquer was good, but in other projects I’ve used Minwax spray clear lacquer (which has no mixing ball) and actually like it better.
What are your experiences with flamed maple, quilted maple, or spalted maple veneers? Have you worked with other veneered finishes on a DIY guitar kit? Leave a comment below and let us know.