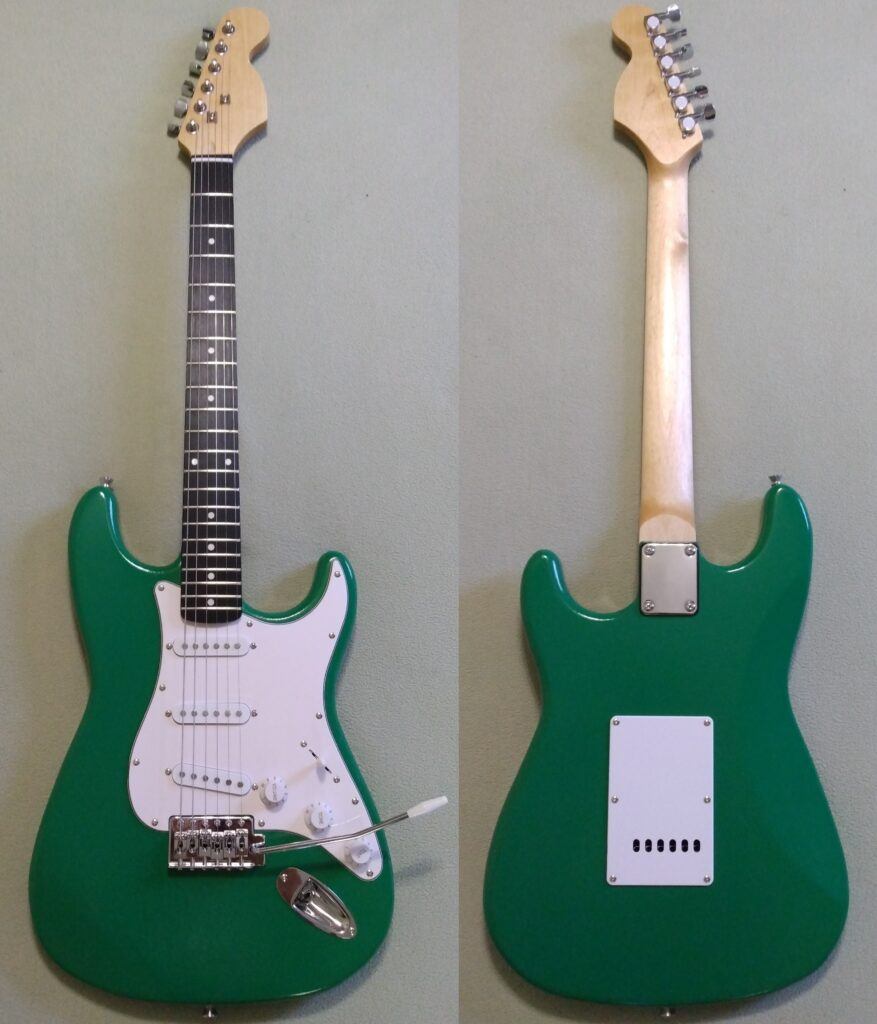
Fistrock is a quality line of affordable DIY electric guitar kits sold through Amazon. Formerly they were sold under the brand name Bogart. While individual components and other items are still sold under the Bogart name, the complete guitar kits are known as Fistrock. Recently I purchased a Strat-style kit for about $100 and put it together. I am very satisfied with this kit. Here is an overview of how things went.
The Fistrock Strat-style kit includes everything needed to complete the project (except finishing products), including a basswood body and a maple neck with a dyed poplar fingerboard. Initially I was concerned about the poplar fingerboard, but after completing the project I think it will be comparable to the rosewood I am used to using. We’ll come back and give another report after I’ve had a chance to play it for a while.
What’s In The Firstrock Box
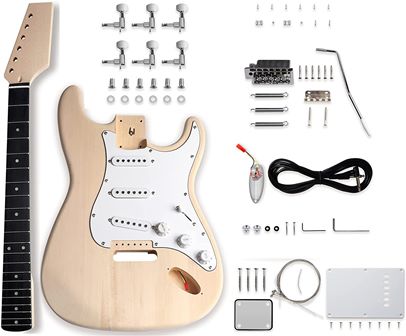
Here is a picture from the Amazon website of the Fistrock Strat-style DIY electric guitar kit I purchased. This is one of the best packaged kits I have ever received. In fact, the box with the guitar kit came inside of another shipping box, so it was all very well protected. Inside the guitar kit box were three smaller boxes – one for the body, one for the neck, and one for everything else.

This kit came with the fully assembled white pickguard already attached to the body. Typical for a Strat-style guitar, there are three single-coil pickups mounted to the pickguard, along with three dime-sized pots (one volume control and two tone controls) and a five-way selector switch. The three-ply pickguard, neck, and body are all numbered and matched for the proper fit in each kit.
The bridge is a standard Strat-style tremolo bridge with three springs that are mounted through the back side of the guitar. The kit comes with a set of strings and an instrument cable with 1/4-inch plugs. I usually disregard those items and use my own.
There are no printed instructions in the box, however the Amazon seller will email them to you after your purchase. The instructions I received still had the Bogart name on them. They are pictorial and easy to follow with almost no printed text, clearly intended to cover multiple languages. And they include a parts list which was very helpful. But the best way to understand the assembly of this DIY guitar kit is to watch the 8-minute video on the Amazon listing.
Test Fitting the Neck and Body
A visual inspection of the neck looked to be straight. There were no sharp fret edges at all, and the poplar fingerboard didn’t appear to have any problems. A white Strat-style nut, presumably plastic, was glued in place.
I seated the neck heel into the neck cavity. It wasn’t overly tight, and there also wasn’t any noticeable play. I put a straight edge across the frets and they looked good. I set the bridge and the jack plate in place but didn’t go any further with them at this time. So far, it looked like it would be a pretty nice and very standard guitar. Major adjustments to the pre-drilled holes wouldn’t be required.
Finishing the Neck and Body

The maple neck came with a blade type headstock, so to make this look like a Strat I first had to find a suitable template. I settled on a vintage-style shape, but the blade headstock was a little too small so I had to reduce it just slightly. I traced it on both sides (very important!) and then shaped the headstock using a Dremel rotary tool and sanding cylinder. I am pleased with the results.
After sanding the headstock back to 400 grit, I applied a couple of coats of Minwax Tung Oil Finish. The neck is very smooth and the maple is a nice amber color. Treating the dyed poplar fingerboard would happen later, after dressing the frets and before installing strings.
Before working on the body I removed the pickguard assembly. The basswood body was smooth, and I sanded it just a little more with 220 grit paper, then wiped it down. Previously I had read that basswood is difficult to stain. I wanted a green guitar, so I decided to try using Keda Wood Dye. That didn’t work out well. The wood absorbed the dye in a very splotchy way. In a couple of places, the formation of the grain and knots completely rejected the dye. In other places, it appeared that some fill had been used on the basswood, and that didn’t absorb the dye either.
I abandoned the dye/stain idea and went with a good spray paint – Colorshot “cash” gloss green. After several passes – two cans worth, very light coats each time – I had the green color I wanted, but the surface wasn’t acceptable. It still looked like canned spray paint. Then I began rubbing the surface with 0000 steel wool and the surface greatly improved. It also darkened a little. After letting it dry and cure for almost a week, I finished it off with several coats of Minwax Wipe-On Poly.

Assembling the Fistrock DIY Guitar Kit
I decided to do things in the order they are presented in the video. First, I installed the tuning machines in the headstock. Then, because I had removed the pickguard assembly in order to apply the finish, I reinstalled it, not tightening the screws yet and making sure the jack plate wire and tremolo ground wire were properly routed. After that was the tremolo bridge, then the jack plate. Since the electronics is all pre-wired, all that was necessary was to connect the solderless plug.

From the back side of the guitar, I installed the spring retainer and attached the springs to the tremolo assembly. Then, for alignment purposes, I pushed a a 6-foot length of string (kite string, not guitar string) through the bridge, one end through each outside hole (low E and high E) so that it looped around the back of the assembly. After turning the guitar back over, I placed the neck into the neck cavity without attaching it, then took the ends of the string loop over the nut and around the outside tuning machines. My purpose in doing so was just to see how the strings were going to align with the neck and pickups. You can see from the picture that it is nearly perfect!
Keeping with the video steps, I installed the strap buttons. This is something I would normally do last, but again – just following the instructions. Then I installed the neck, carefully clamping it in place first so that I got a good, tight fit with the four neck screws.
Before installing the strings, I polished the frets with 0000 steel wool, protecting the fingerboard with painter’s tape. Then I wiped the dyed poplar fingerboard with Dunlop Fretboard 65 Ultimate Lemon Oil. I always use that on rosewood fingerboards, and the Amazon seller confirmed with the manufacturer that I should treat the dyed poplar in the same way. Finally, I installed the strings. Not the ones that came in the kit, as I never do that, but rather D’Addario EXL-110 strings (that’s what I always use).
To finish up, I installed the two string retainer clips. The holes for these are NOT pre-drilled, so I was careful to locate them according to images of vintage Stratocasters I found. Modern Strats seem to have only one string retainer on the highest two strings, and you could do that if you wanted. The last thing to do was install the back cover over the tremolo spring assembly.
Final Setup of the Fistrock Kit
No adjustment to the truss rod was required. This neck was in great shape just as it came from the kit. The nut slots were just a hair high (about 0.015″ at the first fret when pressing the third), but I decided not to file them down yet. I might do that later. I adjusted the saddles to set the string height at the 12th fret, raised the pickups a little, and then began setting the intonation.
This is where I encountered the only real problem with the whole kit. I couldn’t quite intonate the low E string, and ended up removing the spring from the saddle screw to get it back far enough. Remember, I’m using D’Addario Regular Light 10’s, 0.046″ on that last string. I don’t know the gauges of the strings that came in the kit, perhaps they are lighter. This fix seemed to do the trick for me.
The electronics for this kit are a vintage Strat configuration. On the 5-way switch, the 5th position (full forward) is only the neck pickup. The 4th position gets the neck and middle, the 3rd position only the middle, the 2nd position the middle and bridge, and the 1st position only the bridge. The first tone control (middle knob) affects only the neck pickup and the second tone control is wired to the middle pickup. So, in the 4th position both tone controls are in place. In the 3rd and 2nd position, it is just the second tone control, and there is no tone control in the 1st position with only the bridge pickup (just as Leo Fender intended!).
These single-coil pickups sound great, especially considering the price point for the kit. If you wanted to wire it as a modern Strat, you could probably jumper the middle and last wipers on the switch so that the second tone control was also connected in the 1st position. Since I’m going for vintage Strat (as evidenced by my choice of headstock shape), I left it as is.
I am very happy with the way this guitar turned out. It looks great, plays well, and has the variety of sound found in a vintage Strat. I don’t use the tremolo whammy bar, so I can’t really comment on how well that works. This guitar does seem to stay in tune as is. Perhaps I will make an adjustment to the nut slots (or just replace the nut with a better one) sometime in the future, but for now I’m going to leave it alone. I want to see how this dyed poplar fingerboard holds up.
Would I buy another Firstrock DIY guitar kit? Absolutely!

Stratocaster is a registered trademark of Fender Musical Instruments Corporation.


Interestingly I bought the same kit as you! I tried to match things together, but it wasn’t easy for me. I think this kit can be exciting for those who want to play the guitar that they fit with their own hands. Did you buy pedals too? Was there anything to guide you? What is the rate of this product on amazon?
Thanks, Liam.
Some are easier than others. I found this Strat kit to be relatively easy to assemble, but you do need to take your time. Fistrock has some great videos in their Amazon listings that help a lot.
I just started playing electric guitar when I began building these kits, though I’ve played acoustics for a long time. I have a nice amp with a delay, so that helps a lot.
Yes, I’ve purchased a few pedals. I like Donner pedals, they are small and inexpensive but are more than adequate for practicing at home. I’m not quite good enough to try playing in public, but I think they would be fine for that as well.
Prices are always fluctuating. Check Amazon for the current price.
Larry,
Thank you for sharing your website and showing us your DIY on how to assemble your Firstrock guitar. I am also impressed with the knowledge and expertise you have for this instrument. It is surreal to believe that you can now purchase a high-quality guitar of this caliber for only a fraction of the cost of a high-priced one. I am blown away by the quality of your guitar. Your finished product is phenomenal. I am wondering:
1) When did merchants such as Amazon start Selling Firstrock DIYs?2) Do you see this as a foreseeable hobby for people like me who like to put things together?3) How did it take you to reshape the headstock using the Dremel rotary tool?4) What was the overall sound quality?5) What would the price of a Firstrock that is already assembled be?
Congratulations on your Firstrock masterpiece.
Rachelep.s. I also enjoyed the 8-minute YouTube video. Awesome
Thanks for your comments, Rachele. Hopefully I’m getting a little better at it with each kit.
Amazon, Walmart and a few other online mass market retailers have had kits for a while, but I think there is getting to be a better variety of choices. Fistrock is actually a new name for the line that was once marketed as Bogart, and before that, Holmer. I think there were some registration issues. Of course, these are Far East companies doing business in the U,S, Unfortunately, producing these same products in the U.S. would be cost prohibitive. The quality is pretty good.
I started building DIY electric guitar kits after I retired, and it has been very rewarding. If you like putting things together, this might be a good hobby for you. The challenge of making it sound good and play well – the setup – is also part of the fun.
Overall I’d guess I spent a couple of hours getting the headstock the way I wanted. I describe it in more detail in my post How to Shape a Headstock. The key is to take your time and not get in too much of a hurry.
I think it sounds great. The quality of the pickups and electronics is good, especially at this low price point. I took time to get it set up correctly so it is in tune anywhere on the neck. I actually did not play electric guitar until I started building these kits, and I’m still not very good at it. But I’ve played acoustic guitars for more than 50 years.
Fistrock guitars aren’t available already assembled, but there are some very good inexpensive electric guitars on the market. I recently bought a Glarry guitar complete with a small amp for less than $100. After setup (very important) it sounds pretty good. I’m thinking of sanding off part of the logo so it just says “larry” 🙂
Thanks again for your comments. Let me know if you try this.