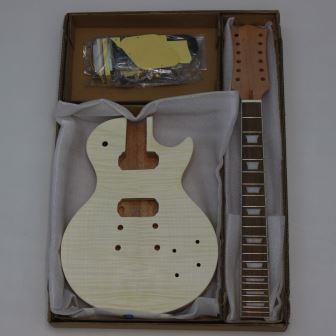
The neck of your DIY electric guitar is attached to the body in one of two different ways. Strat- and Tele-style guitars utilize a bolt-on neck, as the the majority of DIY electric guitar and bass kits. However, many kits use a set neck, meaning the neck is glued to the guitar body rather than being held on by screws. Set necks are found in many Les Paul style kits, or in Explorer, Flying V, or other kits patterned after Gibson models.
When building a bolt-on neck DIY electric guitar kit, you will almost always finish the neck and body before attaching the neck. However, on a glued set neck, some kit builders prefer to put the neck and body together before applying the finish. With a set neck kit, do what is most comfortable. You can apply the finish either before or after attaching the neck.
Characteristics of a Set Neck
A set neck is glued into the body of the guitar using a strong adhesive, creating a seamless bond between the two parts. Many times the set neck is made from the same material as the guitar body, often mahogany or maple, but that isn’t a requirement.
In general, the set neck has unique tonal characteristics. This joint typically provides better sustain and resonance due to the more solid connection. The neck and body act as one unit, which can lead to a smoother tonal quality, especially in higher registers.
Repair and maintenance of a set neck guitar is also unique. If the neck needs repair, it is more difficult and expensive to fix compared to a bolt-on neck. The neck is also not easily replaced if damaged, requiring extreme care in softening the glue and preventing damage to the neck cavity.

Preparing to Glue a Set Neck Guitar
Before gluing a set neck guitar, it’s crucial to have everything you need on hand. This includes the right tools and materials, an understanding of how it all fits together, and a clean, well-organized workspace. Let’s break down these elements one by one.
First off, gather your essential tools and materials. You’ll need wood glue, clamps, sandpaper, a damp cloth, and a few small brushes for applying the glue. Make sure you have good-quality clamps that are suitable for guitar work, as well as any other specific tools recommended by your DIY electric guitar kit’s manufacturer.
Safety should never be overlooked. Wear safety goggles to protect your eyes, and you may want to wear gloves. Keep your work area well-ventilated to avoid inhaling any fumes. It’s also wise to have a first-aid kit on hand just in case. If you accidentally cut yourself, immediately clean and cover the cut. And be extra careful not to get any blood on your kit!
Understanding how it all fits together is key. The neck joint area where you’ll be applying the glue is vital for the instrument’s playability and durability. Get familiar with the join and always do a test fit. Knowing where each part connects will help you apply the glue more effectively and ensure a solid bond. Practice setting the clamps as well (see the section on clamping below).
Lastly, ensure your workspace is clean and well-organized. A cluttered area can lead to mistakes, and you don’t want dust or debris ruining the glue job. Lay down some old newspapers or a drop cloth to protect your work surface and keep your tools within easy reach. Remove any tools you don’t need from the work space. This setup not only makes the process smoother but also minimizes the risk of damaging your guitar or other items.
Step-by-Step Guide: Properly Applying the Glue
Choosing the right glue can make or break this project. Titebond Original Wood Glue is a popular choice among DIY electric guitar kit builders because it is both strong and easy to work with. Other options include hide glue or epoxy, but make sure the glue has enough working time before setting. Always read the directions on the glue container.
Before applying the glue, check the fit of the neck joint. It should be snug but not overly tight. Use sandpaper to smooth any rough areas, ensuring a perfect fit. This way, the glue will bond the surfaces efficiently.
Now, it’s time to apply the glue. Coat both the neck heel and the corresponding cavity in the guitar body. Use a small brush to spread it evenly across the surfaces. Avoid getting glue on the finished parts of the guitar as it can be difficult to remove later.
Ensure an even distribution by rubbing the joint together slightly before securing it. This helps to eliminate air pockets, which can weaken the bond. Wipe off any excess glue immediately with a damp cloth to prevent it from hardening where it’s not needed.
Precision is key here. Make sure both parts are aligned correctly. Once you’re confident that everything is in place, you can move on to the clamping process.
Clamping and Setting: Ensuring a Secure Bond
Choosing the right clamps is essential. You’ll need several C-clamps or bar clamps, ideally padded to prevent damaging the guitar’s finish. Make sure the clamps are of good quality and that their size is appropriate for the guitar parts you’re working on. Place cardboard or other protection between the guitar and the clamp.
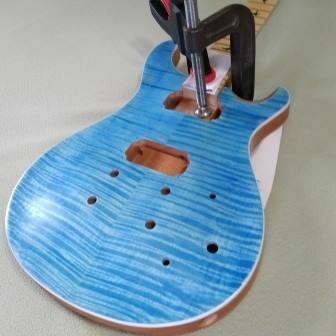
Positioning the clamps correctly is crucial. Place them strategically to apply even pressure across the neck joint. Begin with a clamp in the middle of the joint to hold it steady, then add clamps on either side. Avoid over-tightening the clamps, as this can squeeze out too much glue and weaken the joint. Keep a damp cloth handy to wipe up any glue that might seep out from the joint.
Set the clamping duration based on the glue manufacturer’s recommendations. For Titebond Original Wood Glue, clamp time is listed as a minimum of 30 minutes (go longer) with no stress on the joint for 24 hours. During this period, keep the guitar in a stable, vibration-free environment to ensure the joint sets properly.
Monitor the curing process closely. Regularly check the clamps to ensure they haven’t slipped or loosened. If you notice any issues, address them immediately. It’s also a good idea to keep the work area at a consistent temperature (above 50°F) and the humidity low to help the glue cure effectively.
Finishing Touches: Perfecting the Neck Joint
Once the glue has fully cured, it’s time to remove the clamps. Do this gently to avoid any sudden stress on the joint, being careful not to hit the guitar with the clamp. A smooth and clean removal will help keep the newly glued joint intact.
Start cleaning up any excess glue that might have seeped out during the clamping. Use a sharp chisel or a razor blade to carefully scrape away the hardened glue. Work slowly to avoid marring the wood’s surface.
After removing the excess glue, inspect the joint closely. Check for any gaps or misalignments that might need further attention. If everything looks solid and you haven’t yet applied the finish, you’re ready to sand the joint.
Use fine-grit sandpaper to smooth out any rough areas and achieve a seamless transition between the neck and the body. Sand in the direction of the wood grain to maintain consistency and avoid scratches. Patience is key here, as rushing can lead to an uneven finish.
If you’ve already applied the finish, you may need to do a little touch-up. Remember, the finish is not going to stick to the glue the same as it does the wood, so make sure as much excess glue as possible is removed before doing any touch-up.
Once you’re satisfied with the sanding, you can move on to refinishing the neck as needed. Depending on your guitar’s finish, you might need to apply some touch-up paint or lacquer to blend the joint with the rest of the guitar.
Now you can assemble the rest of the guitar carefully, ensuring that all parts are securely in place. With everything back in place, give your guitar a thorough test. Play a few chords, bend the strings, and check for any buzz or instability. This step confirms that the neck joint is solid and that the guitar is ready for use.