I’ve suggested before that one of the easiest DIY electric guitar kits to build is a P-style bass. If you are choosing your first kit, a P-style bass is a great choice. If you are a bass player, you’ll have an additional bass in your collection. And if you are a guitar player, then this could be a perfect introduction for you to start playing bass.
This style DIY bass guitar kit has only a few parts to install. In most cases, with this design the pickguard is prewired including the output jack. And in some kits, including the one I will be describing here, even the pickups are pre-wired to the controls. For my kit, there was no soldering at all required.

The total assembly time for my DIY P-bass guitar was about an hour, including the time I used taking a few pictures with my phone. Of course, that is not the only “time” required for this kit. Most of the time is dedicated to finishing the body, and that also requires a lot of just waiting – waiting for the finish to dry or cure. And additional time is needed after assembly to complete the setup.
I’ll be walking you through the assembly of my short scale DIY P-bass kit. It’s a 30-inch scale, but the steps I describe are applicable to most any full-sized 34-inch P-bass kit as well. My kit came from a distributor clearing out Fretwire inventory and is no longer available, though there are similar kits out there. The Fretwire products were great, some of the best you could get without spending a ton on a high-end kit. It was just their distribution system that fell short.
Finishing My DIY P-Bass Kit
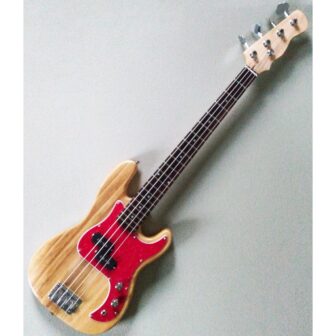
My DIY P-bass kit has a Paulownia wood body. Paulownia is one of the lightest hardwoods around, and has a very nice wide and pronounced grain pattern. I’ve built other paulownia bass and tele-style kits and they’ve turned out well. I much prefer a stained, dyed, or oiled natural look as opposed to paint, and the paulownia is well suited for that kind of finish.
For this P-bass body, I did some light sanding to make sure there was no sealer of any kind remaining. Then I applied a good coat of Minwax Tung Oil Finish just using a piece of an old T-shirt. After waiting a few minutes, I lightly buffed it and then set it aside until the next day. As I previously said, most of the “time” required for finishing is just simply waiting.
Over the next week and a few days I applied a total of seven coats of the Minwax Tung Oil Finish, always waiting at least 24 hours between applications. The oiled finish left a matte and almost glowing surface, notably darker than the unfinished wood. This is one of my favorite natural finishes for my DIY guitar kits.
I did the same thing to the neck and headstock, though not quite as many applications to the back of the neck as I like the neck to have a smooth, unfinished feel. First, though, I made sure I had masking tape covering the rosewood fingerboard in the event I might touch it while I was working on the neck. If you have a maple fingerboard, you can go ahead and apply the Minwax Tung Oil Finish there as well. Another option I have used on maple fingerboards is Tru-Oil Gunstock Finish which is very similar.
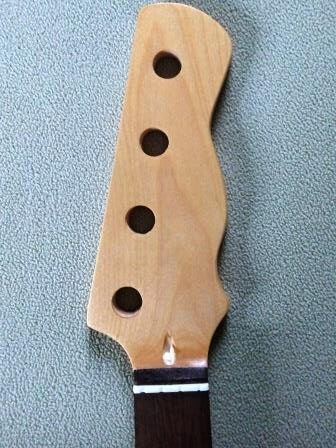
Some kits will come with a headstock that is already shaped, either generic or mimicking a known brand. My kit had a blade-style headstock, so before applying the finish I had to shape it. I chose a pattern based on the MarkBass style headstock. However, I decided to try something different and used a coping saw to rough out the shape first, intending to sand it back to the exact shape I wanted.
That was a bad choice. I had never used a coping saw on wood this thick, and didn’t realize how much the blade would flex. I ended up with a nice shape on the front of the headstock but a cut on the back side that didn’t match up. Really, I thought I had ruined it. But I decided to wrap some 120-grit sandpaper around a spray paint can and went to work taking out the part I and messed up. I’m actually quite pleased with the result, and like it better than the bland shape I had originally planned. Never, ever give up.
Assembling my DIY P-Bass Kit
With the oiled finish fully dried and cured I began the assembly process. As I said earlier, the assembly itself only took about an hour. The order of assembly on a P-bass kit isn’t set in stone, and I base mine on what I need to do in order to keep everything properly aligned. So, here we go.
First, I pressed in the front bushings and installed the four open-gear tuning machines in the headstock. As always, I drag the screws through a bar of soap to ease installation. These are very small screws, and it is critical not to force them or over-tighten them or you risk spinning off the little screw heads.
Next, I installed the bridge in the pre-drilled holes. Before placing the bridge, I scratched up the back of it and pushed a length of ground wire through the appropriate hole. This wire did not come in the kit, I supplied it myself, which I will explain in the next paragraph. There are seven screws in this bridge, so making any side-to-side adjustments later is very limited. This is why I start here with the bridge, because I can make alignment corrections when I attach the neck.
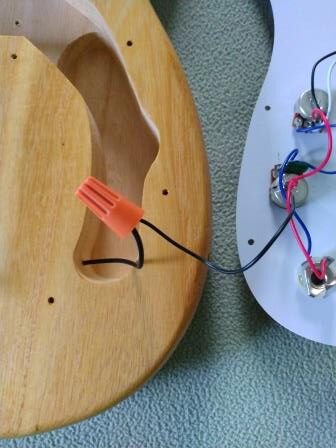
Third, I installed the pickguard and pickups. Though this is often done closer to the last step in assembly, I chose to do it here because I wanted the pickups in place when I aligned the neck. This pre-wired pickguard had a ground wire already attached that was to go under the bridge, but I like to put my own wire under the bridge and then attach it to the provided ground wire using a wire nut. That makes it a lot easier to remove the wired pickguard in the event I want to make modifications or repairs.
Finally, with the bridge and pickups in place, I was ready to align and install the neck. To do that, I run kite string from the tuning machines, across the nut, across the saddles, and through the string holes in the bridge. Now I can look at how the kite strings line up over the pickups and on either side of the position markers on the fingerboard. With everything centered and the neck seated as far down as it will go, I put the neck screws through the back plate and body ready to go into the neck, clamped the neck so that it was tight against the body, and finished driving in the neck screws. I do all of this by hand, never with a power driver.
A Little Touch-Up
At some point, probably while installing the bridge, I must have pushed either some hardware or tool into the top of the body. It made a small indentation right next to the bridge assembly. So, I’m adding this little section here just to let you know how I addressed it.
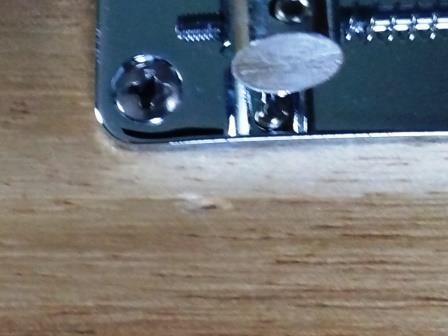
The blemish was fresh, not too deep, and hadn’t had any Tung Oil Finish added after it occurred. So I heated up my soldering iron, which to this point was not needed since all the components on this easy kit were pre-wired. Then I took a small piece of folded paper towel and got it wet with tap water. I placed the wet paper towel over the blemish and touched it a few times with the flat side of my soldering iron.
Of course, you could hear the water in the paper towel sizzle. It is important not to leave the soldering iron on the towel too long, but if needed you can repeat the application a few times. As the soldering iron heats the water in the paper towel into steam, the steam goes down into the wood fibers that were pushed in. After a couple of attempts, the indentation was gone and there was no noticeable blemish.
That doesn’t always work, but in this case it was perfect. I’ve done similar repairs on blemishes in other DIY guitar kits, some that I put there myself and some that were already there when I received the kit. For larger blemishes, you can use a regular electric iron and moist washcloth or towel. If you do this before applying a finish, be sure to let the wood completely dry and, if necessary, sand it a little.
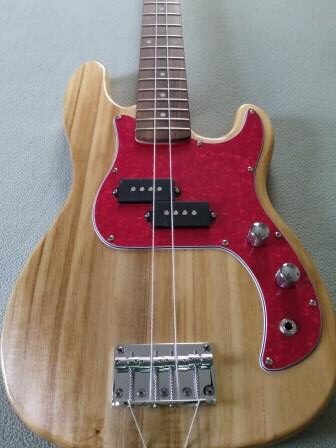
The Fully Assembled Easy DIY P-Bass Build
There you have it. I installed the strings, made some slight adjustments to the neck and bridge following the steps here for setup. This DIY P-Bass looks and sounds great. The paulownia body is pretty light, and with the heavy open-gear clover tuning machines with metal bushings, there is just the slightest neck dive. But because of the size of this bass body it is really comfortable to hold and the dive is not at all noticeable while playing.
Have you built a basic DIY P-Bass kit? Did you find it as easy as I have described here? Please leave us a comment below.