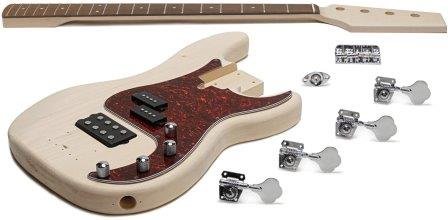
My favorite DIY electric guitar project is a bass. That’s probably because I am a bass player. Bass kits are also some of the easiest to build. But after you have completed the assembly, you will need to properly set it up so that your great looking instrument is also playable. Here are the steps I take when setting up my DIY bass guitar kits.
Besides the DIY kits, I have also accumulated several basses in various stages of neglect and disrepair. Actually, restoring them is almost as much fun as building them. And just as in kit building, the final step of restoration is the setup. The procedure is the same, whether you have a 4-, 5-, or 6-string bass. In fact, you can apply this same method to your 6-string DIY electric guitar kit (or 7- or 8- or 12-string or whatever you have).
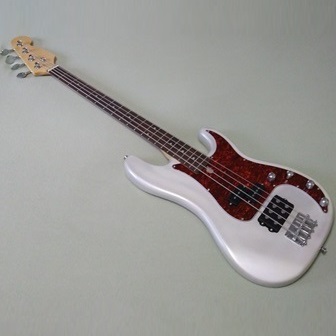
The Solo DIY Electric Bass Kit
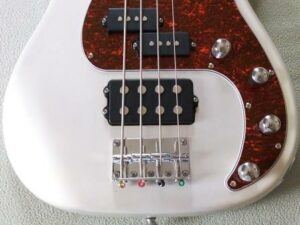
The bass kit I am using here has a P-style body, with both a P-Style pickup and Music-Man style pickup. It is one of the best kits I’ve purchased, the only drawback being that I am not particularly a fan of basswood bodies. This is a quality kit, and you can get it at a very good price from Solo Music Gear.
Wiring this kit was a little different. It has two volume and two tone controls (B500K and A500K pots, respectively). The problem was that when wired as described, the two tone controls did exactly the same thing and interacted with both pickups – in essence, they were in parallel.
So, I split the Music-Man style humbucker and swapped out one of the A500K tone pots for a B500K volume pot. Now it has three volume controls: one for the P-style pickup, one for the north coil on the humbucker and one for the south coil. Is there a noticeable difference in the sound? The jury is still out on that.
Update: Check out my article Wiring a Music Man Pickup: Spin-a-Split.
The other somewhat unusual variation on this kit is the location of the double-action truss rod. Nearly all kits have this access in the headstock. This kit, instead, has the adjustment at the heel of the neck. You access it through a slot in the pickguard. The process, however, is unchanged. Always remember “righty-tighty lefty-loosey.” That never changes.

Overall this is a great bass kit, with a few more features that similarly priced kits. It is still very easy to assemble. It sounds and plays great, has a comfortable weight, and the balance is better than some other bass kits I have built. I highly recommend it. Now, on to the setup.
Tools You Will Need
Let’s get the right tools together before starting the setup process. Some of them are optional, but a few of them are absolutely essential. Here is a list of things you most certainly will need:
- A good straight edge. Make sure it really is straight, and it shouldn’t be longer than the fingerboard. Sometimes these are notched to go over the frets and set directly on the fingerboard. For an example of one of these, look here. I use an aluminum yardstick that I’ve shortened to 24″ and notched using a round file.
- A truss rod wrench. This probably is a hex wrench that came with your DIY bass kit.
- A fret rocker. Usually, it has four sides of varying lengths so you can span three frets anywhere along the neck. It is very important that these four sides all be perfectly straight. For an example of one of these, look here. Any straight edge of the correct length will work. I cut four individual pieces from the remaining piece of the aluminum yardstick mentioned above.
- Something with which to level the frets. Most people use a fret leveling beam, a perfectly flat beam with an abrasive surface for leveling the frets. For an example of one of these, look here.
- A capo. Any standard guitar capo will work.
- Feeler gauges.
- String height gauge.
- Philips screwdriver for the truss rod cover and bridge saddle screw.
- Tool for adjusting the saddle height. This is probably a small hex wrench that came with your DIY bass kit.
- Bass guitar tuner. A chromatic tuner is highly recommended, allowing you to check more than just the open string and harmonic. For a good chromatic tuner at an economical price, try the Korg CA-2.
Many of these items can be purchased together in a kit like this one, reducing the cost. Some you can make yourself.
In addition to these necessary tools, here are a few more that will be helpful:
- Fret eraser for polishing frets and eliminating high spots.
- Rubber-tipped hammer to tap down high or loose frets.
- Dunlop Fretboard 65 to treat a rosewood fingerboard.
- Nut file set for bass guitars.
- Patience. Actually, that isn’t optional. Unfortunately I do not have a link for that.
Before You Begin the Setup
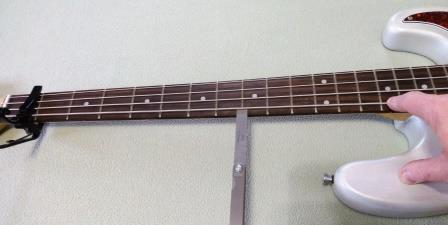
The process starts with the strings off. I like to start with the neck straight, which facilitates dressing the frets. Place a straight edge along the length of the neck on top of the frets, or if you have a notched straight edge, directly on the fingerboard. Adjust the truss rod so to eliminate gaps either in the middle, meaning there is forward bow or relief, or at the ends, meaning there is backward bow. To eliminate the forward bow, tighten the truss rod (remember righty-tighty, lefty-loosey). If you have too much back bow, add relief by loosening the truss rod.
With the neck straight, you can now level the frets. Use a leveling beam with sandpaper to lightly go across the frets in the direction of the neck – never crossways to it. Some people use a marker across the top of the frets as a way to tell if any of them are too high – the marker will sand off first. Use a fret rocker to check three frets at a time – it has different length edges so you can always find one side that will cover only three frets. If it rocks back and forth, the fret in the middle is high. First, tap it with a small rubber-tipped hammer to make sure it is seated. If it still rocks, carefully sand it down, making sure you protect the fingerboard. Check down the middle and both sides of the frets, as you may find one high in some spots but not all the way across.
When the frets are level, use steel wool or a fret polishing eraser and polish them to a nice shine. Again, be careful to protect the fingerboard and and to make sure steel wool fragments don’t get in the pickups. If you have a rosewood fingerboard, treat it with Dunlop Fretboard 65 Ultimate Lemon Oil. Wipe the fingerboard down, then install the strings.
Tune your bass. You need the proper string tension for the setup steps.
Adjust the Neck Relief
This is a critical step, and the truss rod should be used only for neck relief, never for string height action. Previously we set the neck to straight. Now that the strings are installed and brought to proper tension, the neck will bow forward a little, which is both normal and desirable. The truss rod will counteract the strings so there is not too much bow.
To measure neck relief, first put a capo between the nut and first fret. Press down at the 17th fret, usually about where the neck meets the body, and use a feeler gauge to measure the gap between the bottom of the string and the top of the 8th fret. If there is no clearance, the neck is too flat and will need relief added. A neck that is flat or has backward bow will have fret buzz in the middle frets.
Loosen the strings a little to make this adjustment. You may need to lift them out of the nut slots and push them to the side. Turn the truss rod in small increments, checking the clearance at the 8th fret while holding down at the first and 17th frets, aiming for about 0.012″. Fender specification for the Player Series Precision or Jazz Bass (9.5-inch neck radius) is 0.012″. Smaller radiused necks (fingerboards) may need more clearance, larger radiused necks may have less. Ultimately it becomes player preference, but this is a good starting point. Turning the truss rod counter-clockwise loosens the truss rod, adding relief and putting more bow in then neck. Adjusting clockwise tightens the truss rod, flattening the neck.
Set the String Height
Make sure you have removed the capo before setting the string height.
String height is measured at the 12th fret, halfway between the nut and the bridge. How you make this adjustment will depend on your bridge. For most bass guitars, each string passes over an individual bridge saddle before being anchored. There are usually two small hex-head screws that are used to raise the saddle up and down. Normally you will adjust both equally so that the saddle sets level.
For a few designs, such as the violin bass or a Tune-o-matic style, adjustments are made on each end of the bridge rather than each string. Turn the adjusting screws or thumb wheels to set the proper height of the high and low strings. The design of the bridge should make the middle strings correct.
You can generally set the string action with the strings at full tension (tuned). Again, this is ultimately player preference, but a good starting point is to set the low string (E or B) at about 0.100″ and the high string (G or C) at about 0.080″. The middle strings should be somewhere in between these numbers, attempting as much as possible to match the radius of the fingerboard.
Now start playing at the 12th fret, going up 1/2 step (one fret) until you reach the last fret. If you hear a lot of buzzing, you may need to raise the string height. Playing hard will cause more buzzing and probably require higher strings. Little or no fret buzz means you could lower the action if you wanted, always trying to keep the strings following the fingerboard radius.
If you completely lose one note (a “dead” note), it may be that there is a high fret needing leveled. And if your bridge saddles are as low as they will go and the strings are still too high, you may need to put a shim under the neck heel.
Intonation for Your DIY Bass
This is the biggie, though not really all that difficult to do. The goal is to be in tune over the entire neck, no matter which string or which note you are playing.
The open string is tuned to vibrate at a specified frequency, or musical note. Lightly touching the string exactly in the middle of its length causes each half to vibrate at twice the original frequency, the second harmonic, producing a musical note an octave higher. However, pressing down on the string behind that fret actually stretches and bends the string slightly.
Setting the intonation at the 12th fret means adjusting the length of the string so that the remaining portion, from the 12th fret to the bridge saddle, vibrates at exactly twice the frequency as the open string. Because each string is a different size and tension, the lengths will be different. Generally, the thicker strings will need to be longer, though due to other factors that isn’t always the case.
Begin by tuning your bass again using a good tuner, preferably a chromatic tuner with an analog needle or similar digital indicator. Confirm your tuning by playing the second harmonic, lightly touching near the 12th fret without pushing down against it. Now press down on the string as you would normally play the 12th fret. If the tuner indicates the note is sharp, it means the string is too short. Use the long adjusting screw with a spring around it to move the saddle back, making the effective string longer. If the tuner indicates the note is flat, the string is too long and the saddle needs to move forward.
Set each string so that the second harmonic and the 12th fret are the same, one octave higher than the open string. You will need to re-tune each time you move the bridge saddle. I like to tune the string down about one step before moving the saddle, then retune and check the 12th fret.
When you have intonation for each string correct at the 12th fret, play other notes up and down the neck and check them with the chromatic tuner. If you find many notes that are sharp, lengthen the string slightly. Likewise, if you find many notes that are flat, shorten the string slightly. Ideally you will not find any variation and all the notes will be in tune. If you have sharp notes only at the first and second frets, the nut slots (described earlier) may need adjustment.
After you have finished this step, go back and check all the others in order, beginning with the neck relief, then the string height. If you make any changes, it will probably be necessary to also make changes in the following steps as well. After making certain the intonation is set properly, there is still one more thing to do.
Check and Adjust the Nut Slots
Basically, this is a check. Very seldom – maybe once or twice – have I ever found it necessary to adjust the depths of the nut slot on a bass. Use a feeler gauge and check the clearance from the bottom of the string to the top of the first fret. It is normally in the 0.020-0.025″ range, though could be as low as 0.010″. Lower than that might cause a buzz on the open string. If the height is 0.030″ or even 0.035″, there still may not be a problem.
Tune the string. Then play the first fret as you normally would, looking at a chromatic tuner. If playing the G string, the first fret should now register a G#. If it reads noticeably higher than that, it may be necessary to lower the nut slot because the string is being bent down too far. This is a rough estimate right now, since we have not yet set the intonation, but it should be pretty close. Make this check again after the intonation is set, then decide if you need to adjust the slot depth.
If you do find it necessary to deepen the nut slot, be very careful. You can take material away, but you can’t put it back. If you don’t have the proper file set to deepen the nut slots, you can use a length of old string (roundwound, not flatwound or coated). Just work it back and forth in the slot, watching the dust closely. Slant slightly down on the tuning machine side opposite the fingerboard. Don’t remove too much.
Setting the Pickup Height
The distance between the top of the pickups and the bottom of the strings should be small enough that the pickup produces a full, strong sound, yet great enough that your fingers or the strings do not hit the pickup when playing. Pickup height can usually be set using adjusting screws on each side of the pickup. Use a small scale with 1/64″ marked increments for this adjustment.
The specified distance between the pickup pole and the bottom of the string for a Fender bass is between 8/64″ and 6/64″ on the bass side and between 6/64″ and 5/64″ on the treble side. For Precision style staggered pickups, the center positions can also be adjusted. Set them visually so that the pickup is approximately level. Each side – treble and bass – should be adjusted so that a balanced level is achieved across all strings.
Pickup height, like string height, is ultimately a matter of player preference. Experiment with different settings and find what is most comfortable.
Conclusion
Setting up your DIY bass kit is not to difficult if you do things in the proper order. The steps have worked successfully for me both on DIY bass kits and on off-the-shelf completed basses. And they are basically the same steps I take with my DIY electric guitar kits. Do you have any tips for setting up a bass? Do you do it differently? Please leave a comment below.